


This 205-page service manual is the factory reference for the Cruz Crane, covering the complete mechanical, air, electrical, and hydraulic systems. You get full hydraulic schematics tracing fluid paths through the main system, steering, outriggers, swing, hoist, and winch circuits, plus wiring diagrams for the charging circuit, control circuits, lights, and collector ring. A thorough troubleshooting section pairs with step-by-step procedures for the air brake system, transmission shift linkage, and turntable swing. Top off the engine crankcase to 32 liters; the back-of-book charts give you torque values for Grade 5, Grade 8, Special DMC, and JIC swivel nut fasteners to exact factory spec. Swing faults, brake failures, hydraulic drift: stop chasing symptoms without the right schematic. Bookmarked by system; open on any device and pull up the spec before you touch a wrench.
What's Inside This Drott 1500, 1800, 2000 Manual
| System | Pages | Key Topics |
|---|---|---|
| General | 4-7 | Safety Precautions, Nomenclature, Introduction, Directional Reference, Parts and Service |
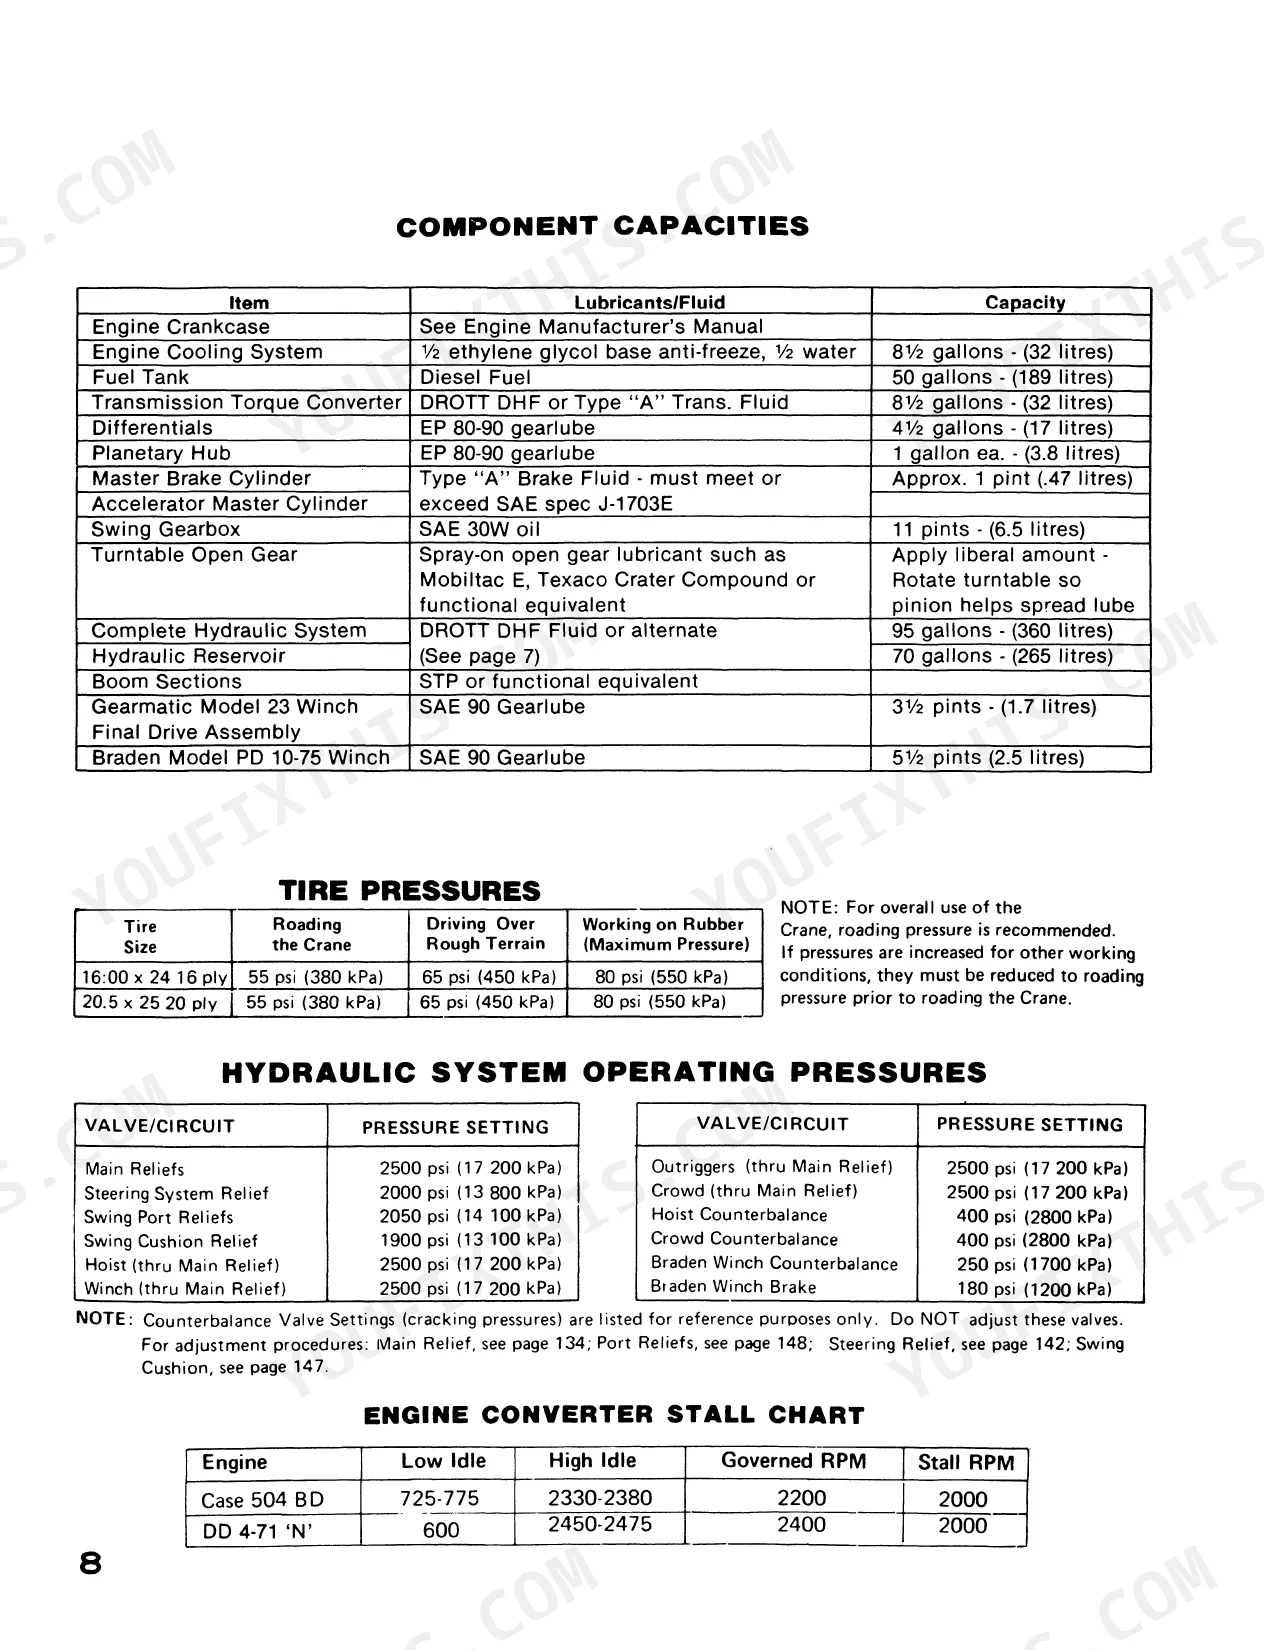
| Scheduled Preventive Maintenance | 8-15 | Lubricant and Fluid Recommendations, Component Capacities |
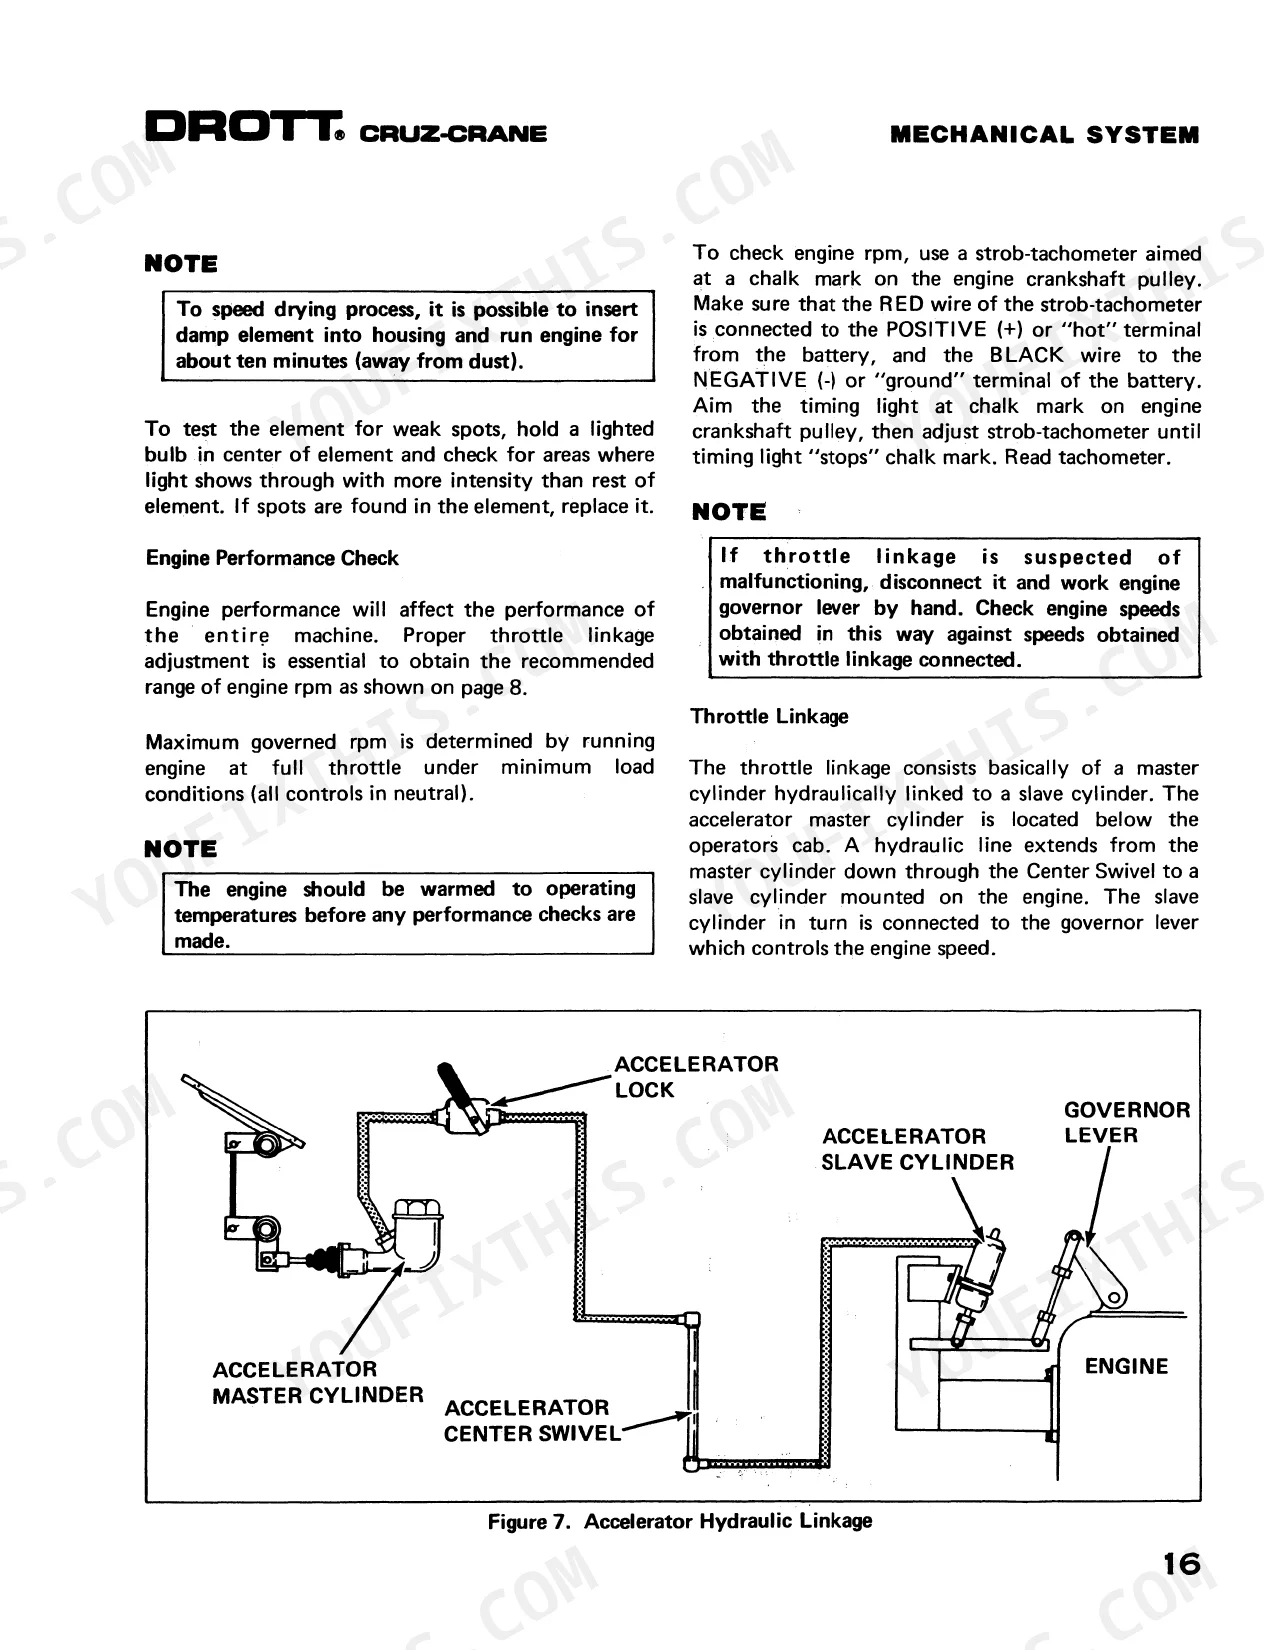
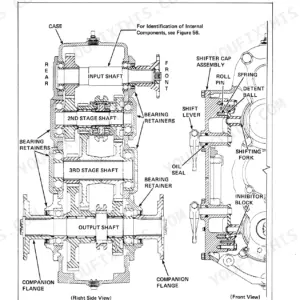
| The Mechanical System | 16-94 | Engine and Cooling System, Accelerator Linkage, Torque Converter, Transmission and Shift Linkage, Axles and Brakes, Turntable Swing, Boom |
| The Air System | 95-117 | Air Supply System, Service Brake System, Parking Brake System, High-Low Range Shift System, Air Compressor, Control Valves |
| The Electrical System | 118-133 | The Charging Circuit, Control Circuits, Lights and Instrumentation Circuits, Collector Ring, Wiring Harness |
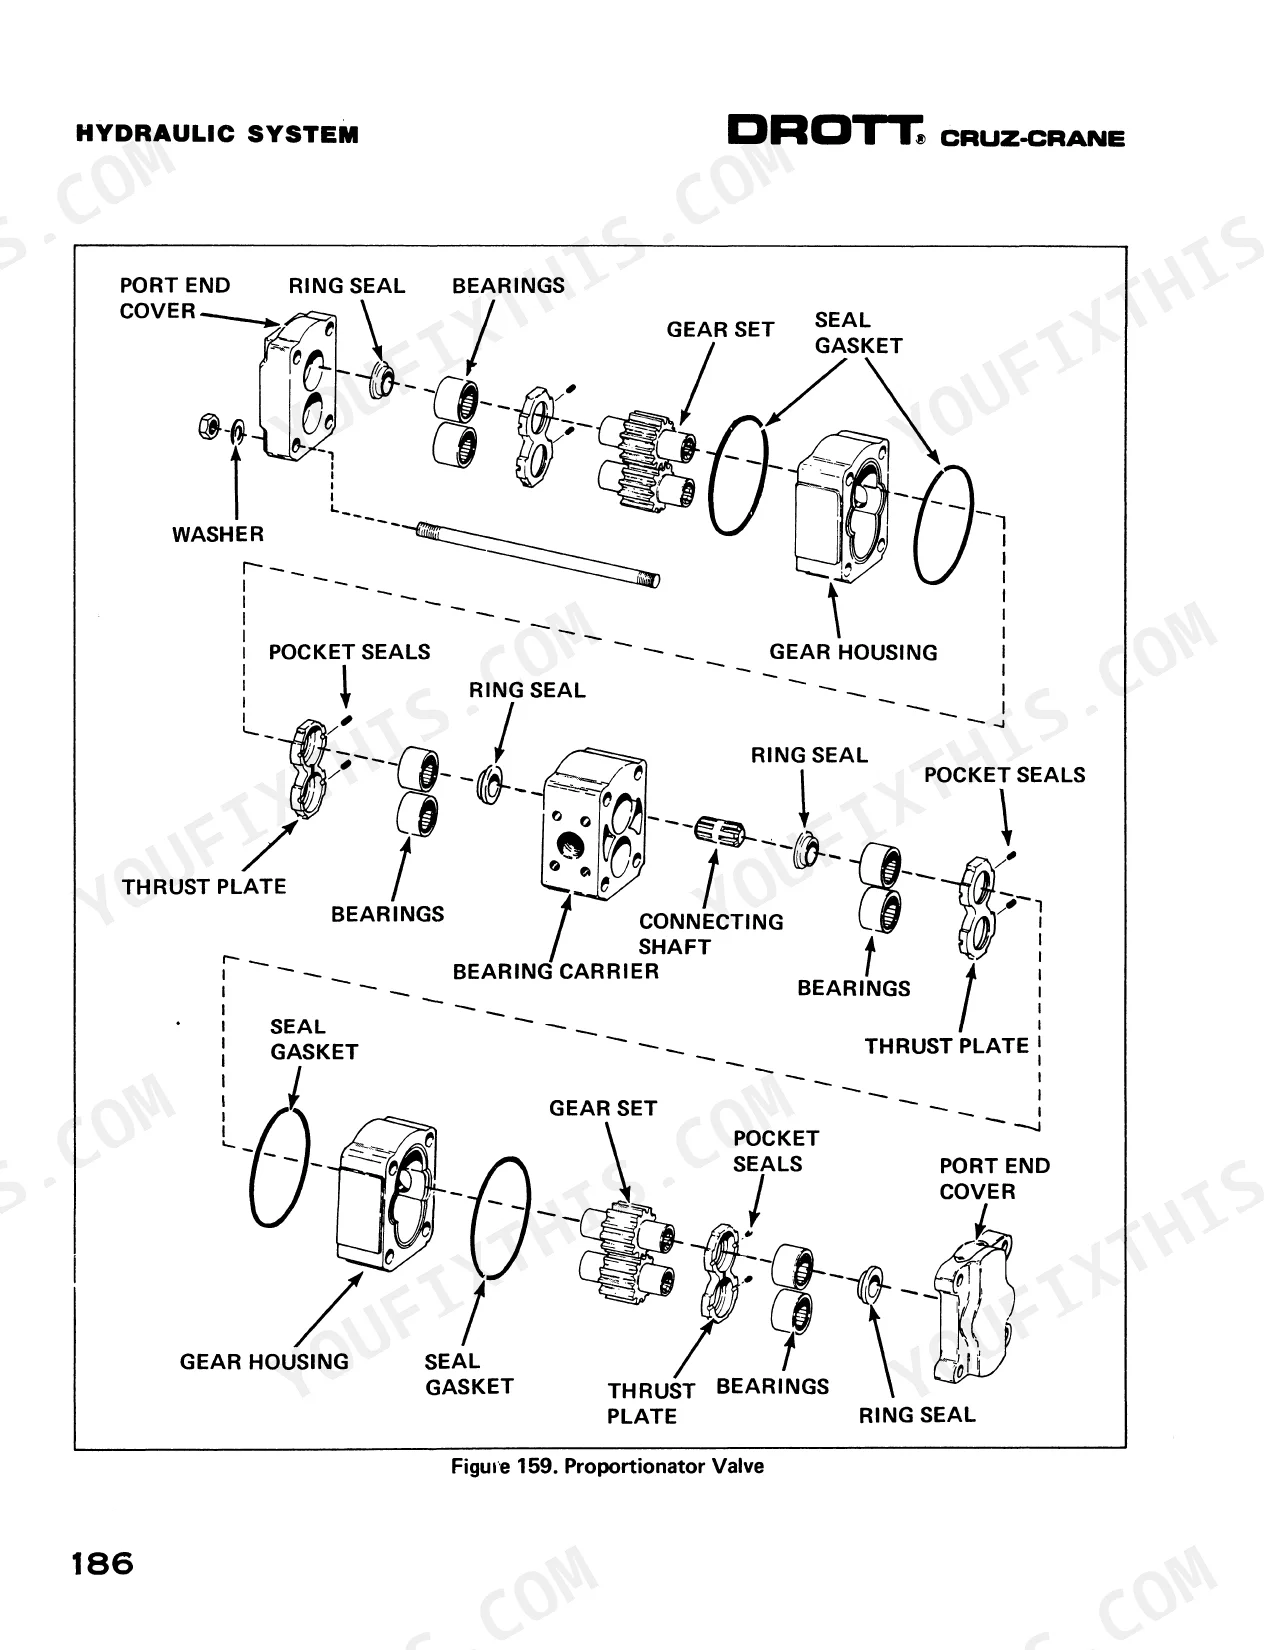
| The Hydraulic System | 134-194 | Main Hydraulic System, Steering System Hydraulics, Outrigger Hydraulics, Swing Hydraulics, Hoist Hydraulics, Winch Hydraulics |
| 195-205 | - |
Quick Reference Specifications
| Specification | Value | Page |
|---|---|---|
| Engine Crankcase Capacity | 32 L | p. 9 |
Drott 1500, 1800, 2000 Common Problems This Manual Covers
Drott Cruz Crane hoist mechanism making grinding noise, hoisting speed noticeably slow
Check hydraulic fluid level and condition first. Degraded or contaminated fluid is the leading cause of hoist sluggishness. Pull the hoist hydraulics troubleshooting chart: verify the control valve spools move freely, cylinders extend and retract fully, and there is no internal bypass. Inspect hoist brake and clutch components for wear; a dragging brake will cut speed and generate heat. Replace hydraulic fluid per the maintenance schedule on page 9.
Manual Section: Hoist Hydraulics TroubleshootingHydraulic pressure drops mid-operation, outriggers or swing respond slowly or stop moving
Inspect all hydraulic hoses and lines for cracks, chafing, and wet spots. A single weeping fitting can bleed enough pressure to collapse outrigger response. Check the general hydraulic troubleshooting chart for noisy operation and slow or loss-of-motion symptoms. Verify pump output and look for sticking valve spools. Tighten or replace any JIC swivel fittings using torque values from page 195 to stop seepage without over-torquing.
Manual Section: Hydraulic System Troubleshooting (General)Controls unresponsive, outrigger cylinders won't move when switches are activated p. 121
Start at the fuses and circuit breakers in the electrical system section beginning at page 118. Inspect each fuse for continuity and check breaker positions. Move to the control circuit troubleshooting chart on page 121: outrigger solenoid valves are a common failure point when switches are live but cylinders don't respond. Clean all ground connections at the collector ring and inspect wiring harness connectors for corrosion. Test solenoid coil resistance before condemning the valve body.
Manual Section: Electrical Control Circuits TroubleshootingTurntable swings unevenly, drifts after releasing control, or won't swing at all
Check swing brake release first: a brake that won't fully disengage will cause jerky or absent swing. Then go to the turntable swing troubleshooting chart. Verify the hydraulic swing circuit pressure and inspect the turntable bearing for binding or inadequate lubrication. Grease fittings on the swing bearing must be serviced per the maintenance schedule on page 9. If swing drifts, suspect the counterbalance or brake valve in the hydraulic swing circuit.
Manual Section: Turntable Swing TroubleshootingBoom extends or retracts sluggishly, excessive play detected at boom tip under load
Check the boom group troubleshooting section. Inspect hoist cables for excessive wear and measure boom end-play: any visible slop at the tip under load points to worn wear pads or slide blocks that need replacement. Verify hydraulic cylinder rod seals are not bypassing internally. Inspect boom sections for cracks or deformation at stress points, particularly around the pivot pins and extension guides. Structural cracks require immediate removal from service before any further load testing.
Manual Section: Boom Group TroubleshootingEngine won't start or cranks sluggishly, does not reach full RPM under load
Check the engine troubleshooting chart: clogged air cleaner and out-of-tune engine are the first two entries. Inspect the air cleaner element and clean or replace if restricted. Verify battery charge and cable connections; a weak battery causes slow cranking that mimics a mechanical fault. If the engine starts but won't reach full RPM, check accelerator linkage adjustment and confirm the fuel system is free of air. Engine crankcase capacity is 32 L (8.5 gallons): verify oil level is correct before extended cranking attempts.
Manual Section: Engine TroubleshootingFrequently Asked Questions
Torque specs for front axle input shaft?
For the pinion nut, which serves as the input to the axle, the torque specification is 800-1100 lb-ft (1100-1500 Nm). After tightening, install a cotter key. Additionally, if the rotating torque is not within 5 to 15 pound inches (0.57-1.69 Nm), the procedure should be repeated.
What are the replacement specifications for Fuses and circuit breakers?
Fuses are stamped with their amperage rating, and it is crucial to always use the correct fuse with the specified rating. Circuit breakers are of the thermal type and are designed to reset automatically; however, if they fail to reset, they must be replaced. The manual provides a diagram on page 120 showing various fuses with ratings such as 7-1/2 AMPS, 15 AMPS, and 20 AMPS.
How do you fix Cruz Crane hoist mechanism making grinding noise, hoisting speed noticeably slow?
Check hydraulic fluid level and condition first. Degraded or contaminated fluid is the leading cause of hoist sluggishness. Pull the hoist hydraulics troubleshooting chart: verify the control valve spools move freely, cylinders extend and retract fully, and there is no internal bypass. Inspect hoist brake and clutch components for wear; a dragging brake will cut speed and generate heat. Replace hydraulic fluid per the maintenance schedule on page 9.
How do you fix hydraulic pressure drops mid-operation, outriggers or swing respond slowly or stop moving?
Inspect all hydraulic hoses and lines for cracks, chafing, and wet spots. A single weeping fitting can bleed enough pressure to collapse outrigger response. Check the general hydraulic troubleshooting chart for noisy operation and slow or loss-of-motion symptoms. Verify pump output and look for sticking valve spools. Tighten or replace any JIC swivel fittings using torque values from page 195 to stop seepage without over-torquing.
What format is this Cruz Crane manual in?
Immediate download of the complete 205-page searchable Service Manual. Access it on any device, from a laptop at your desk to a phone in the field.
Can I print specific sections of this Cruz Crane Service Manual?
Yes. The PDF has no DRM restrictions, so print any page or section you need for your shop. Works with any standard printer.
Does this Cruz Crane manual include wiring diagrams?
Complete wiring diagrams are included, covering all electrical circuits, harness routing, and connector pinouts for the Cruz Crane.


Reviews
There are no reviews yet.