


This is the Kawasaki KLF250 Bayou service manual, covering the KLF250-A1, KLF250-A2, and KLF250-A3 models built from 1985 to 1987. Its 318 pages take you from routine periodic maintenance through a full engine and driveline overhaul on this four wheeler.The manual is organized by system: fuel and carburetion, engine top end, engine right side, lubrication, crankshaft and transmission, final drive, brakes, suspension, steering, frame, and the complete electrical system. Each section gives standard values and service limits, so you know when a part is still usable and when it needs replacing.You can set valve clearance, adjust the carburetor pilot screw and idle, check cylinder compression, torque the cylinder head correctly, and rebuild the clutch. Whether you are doing scheduled service or chasing a hard starting or running problem, this is the shop reference for keeping the Bayou 250 running.
What's Inside This Kawasaki KLF250-A1, KLF250-A2, KLF250-A3 Manual
| System | Pages | Key Topics |
|---|---|---|
| General Information & Units of Measure | 4-19 | Abbreviations, Kg, Lb, Gal (Us), Km, Mile, N·m, kgf·m, kPa, PSI, Km/H |
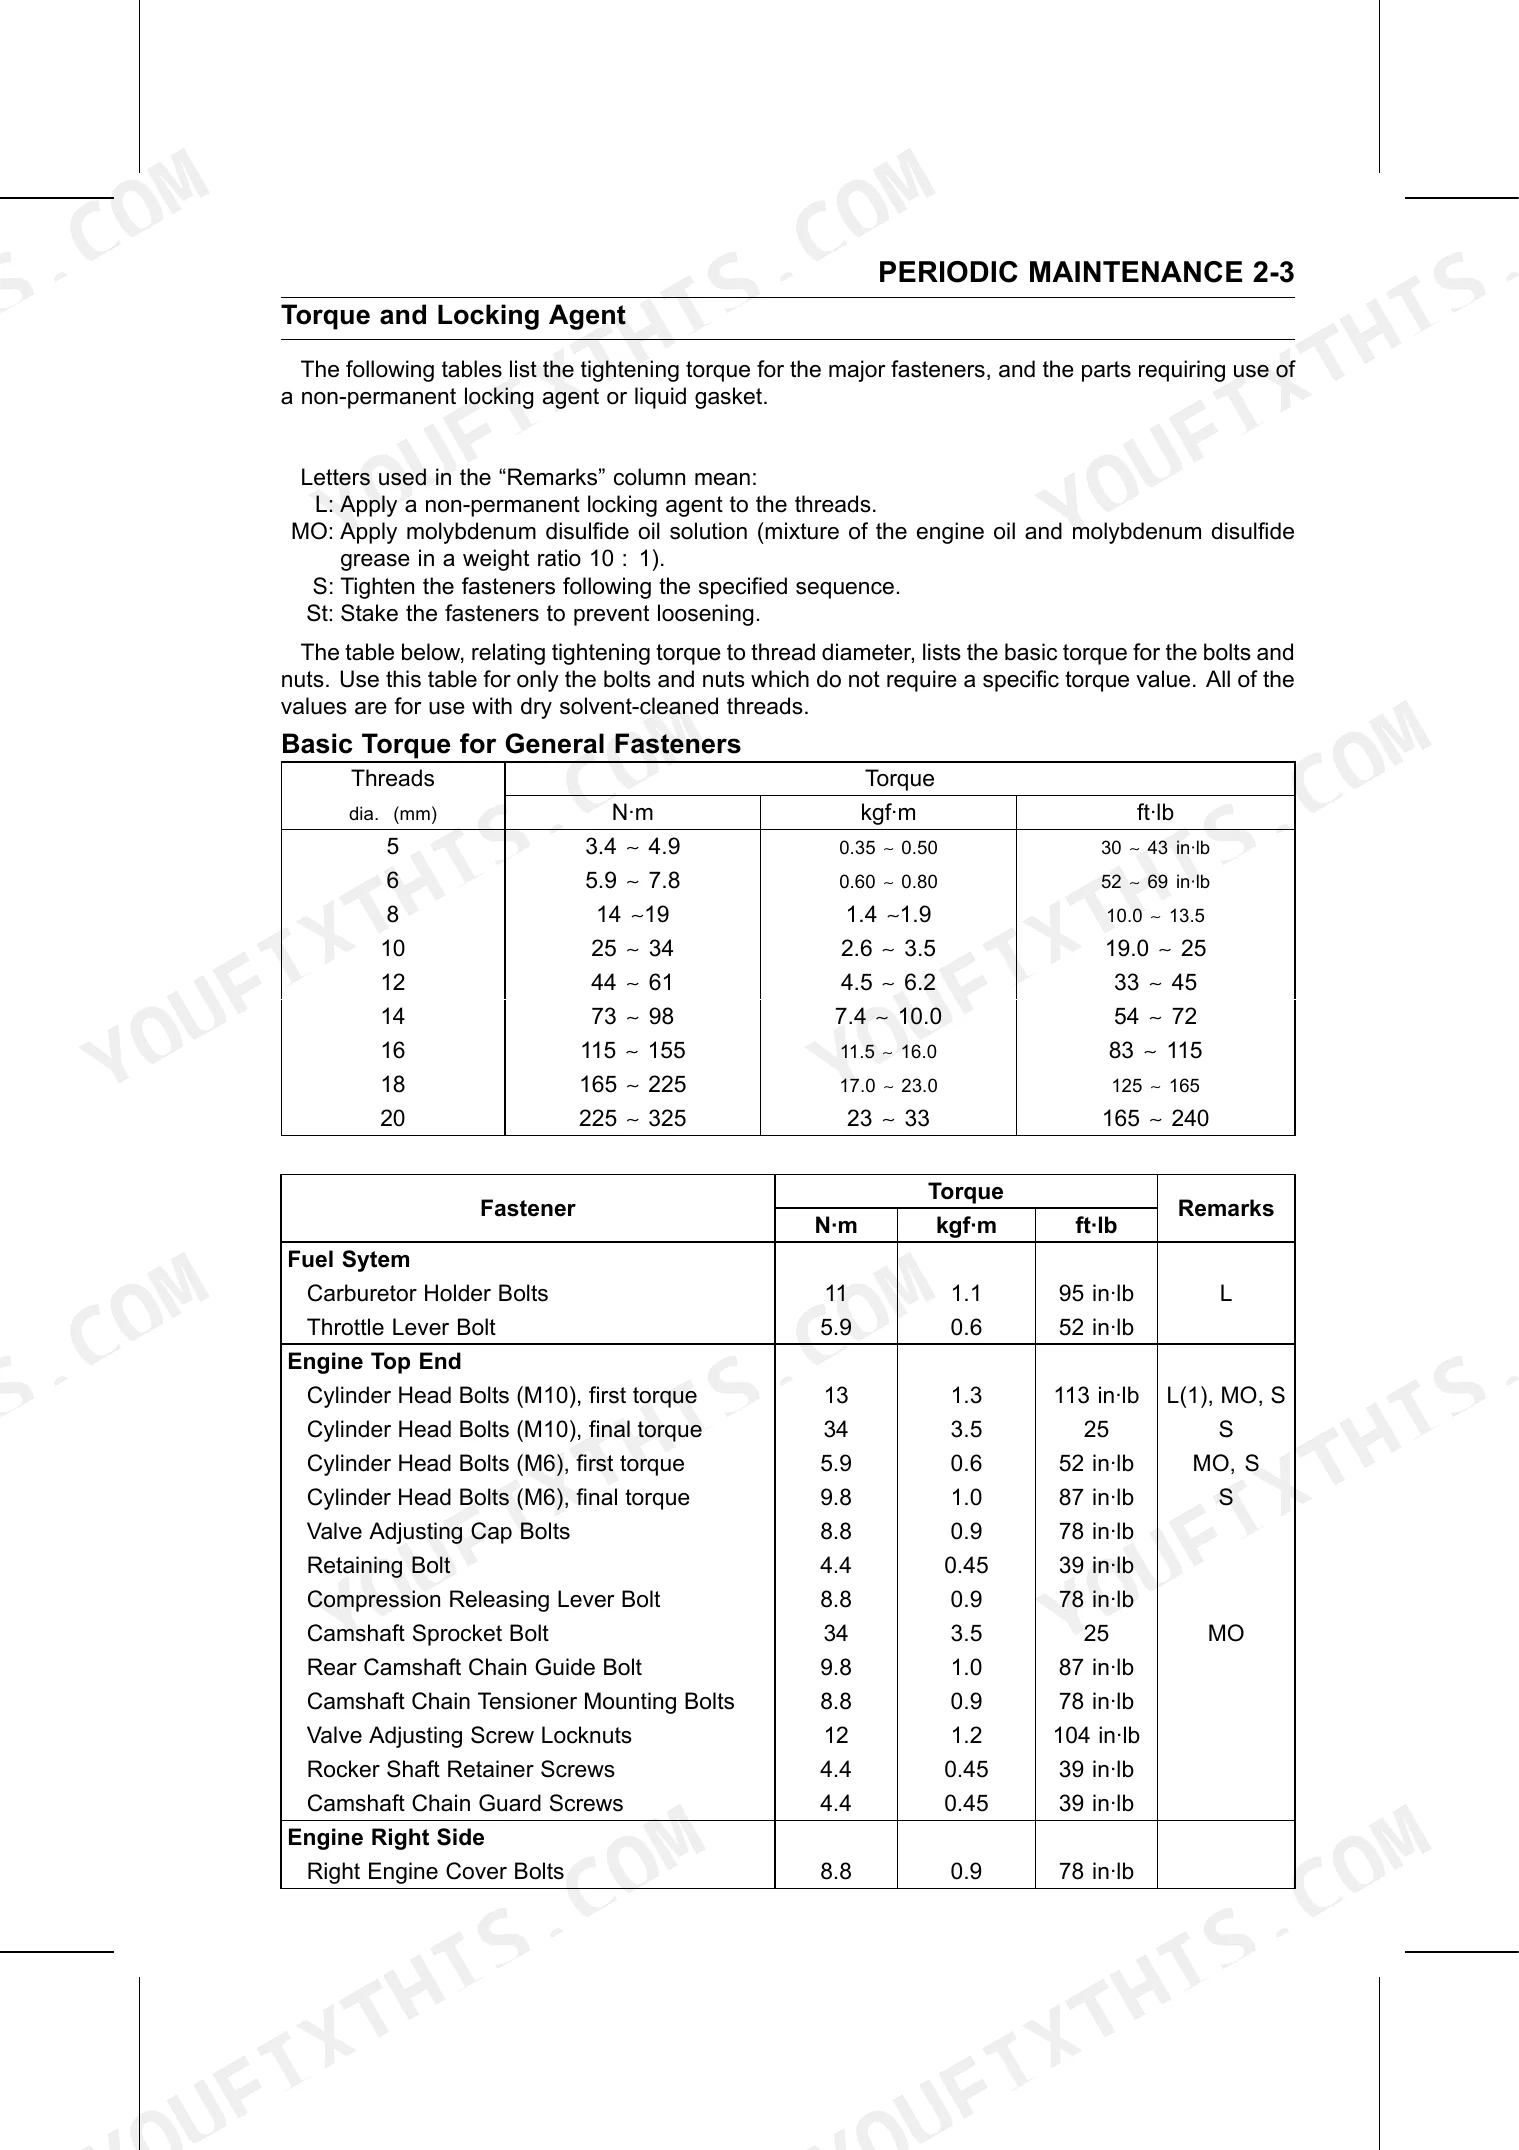
| Standard Torque Values | 20-23 | Threads, Torque, N·m, kgf·m, ft·lb |
| Periodic Maintenance & Adjustments | 24-48 | Throttle Lever Free Play, Valve Clearance, Engine Oil, Tire Tread Depth, Standard Tire, Final Gear Case Oil, Front Brake Lever Free Play, Cam Lever Angle, Rear Brake Lever Free Play, Brake Pedal Free Play, Spark Plug Gap, Brake Light Switch Timing, Idle Speed |
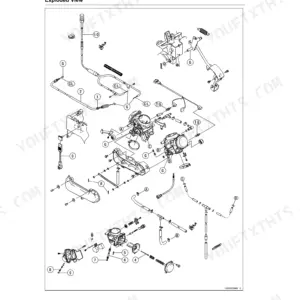
| Fuel System & Carburetor | 49-75 | Carburetor Pilot Screw, Carburetor Body, Fuel Level Gauge, Float Height, Float Bowl Mating Surface, Float Valve Needle Rod |
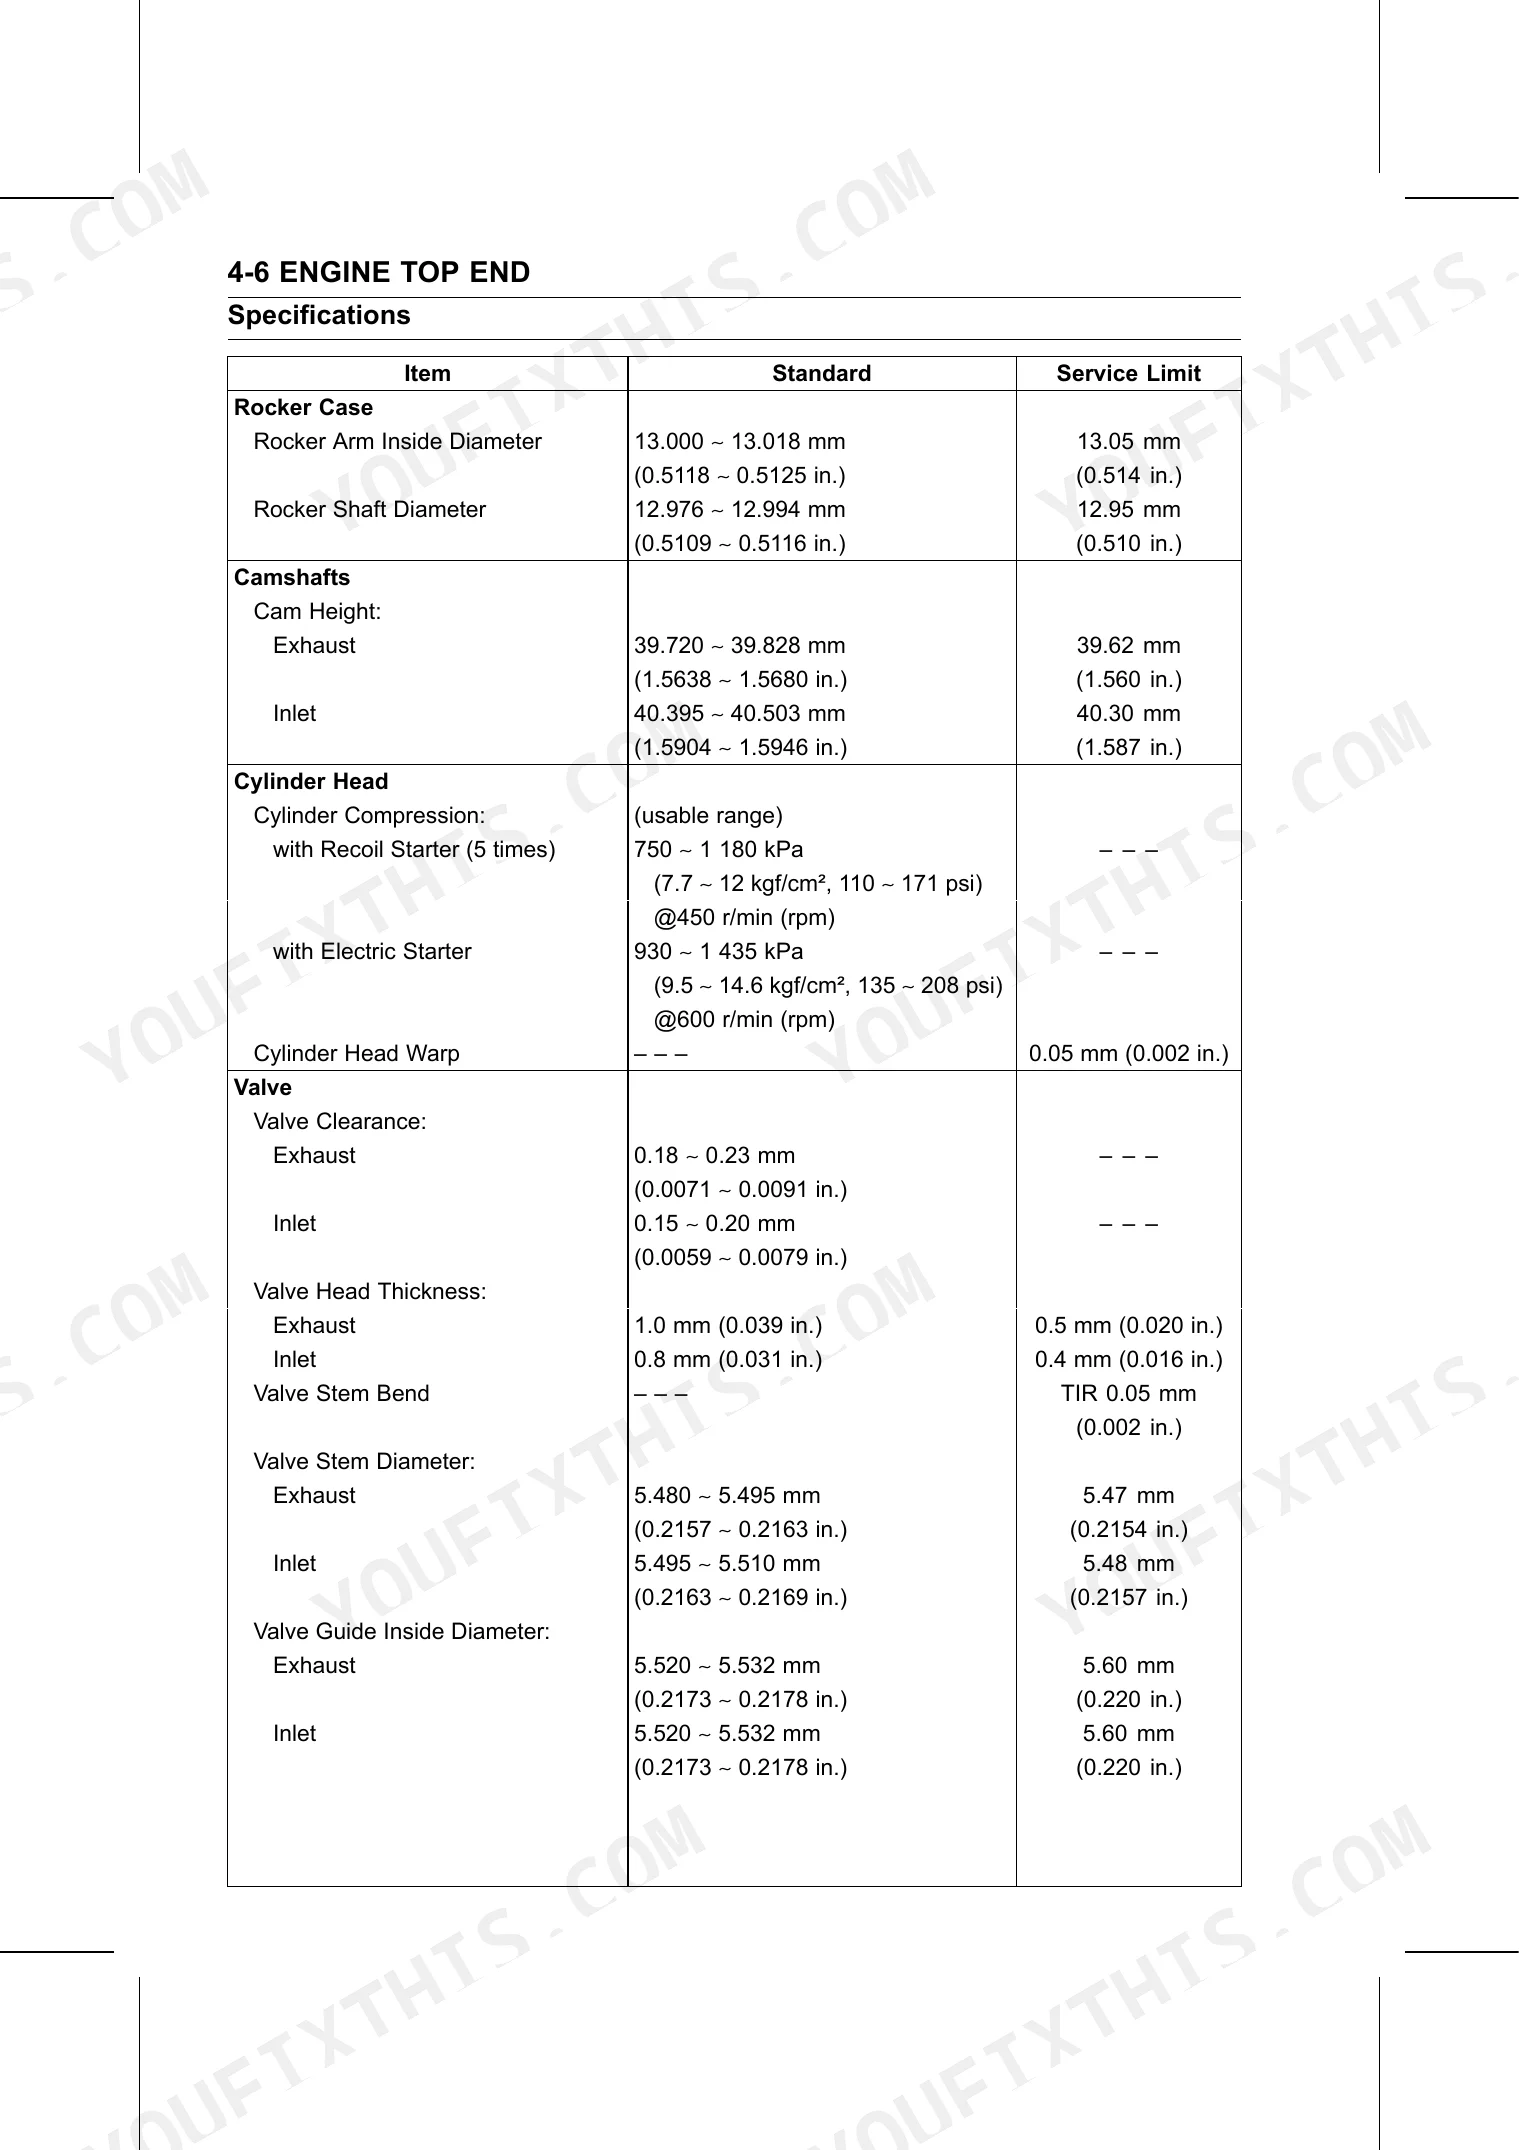
| Cylinder Head & Valve Train | 76-93 | Rocker Arm, Rocker Shaft, Cam Height, Cylinder Compression, Cylinder Head Bolt Torque, Cylinder Head Warp, Valve/Valve Guide Clearance, Valve Seat Surface, Cylinder Inside Diameter |
| Piston & Piston Rings | 94-107 | Piston Diameter, Piston/Cylinder Clearance, Piston Ring/Groove Clearance, Piston Ring Groove Width, Piston Ring Thickness, Piston Ring End Gap |
| Clutch | 108-111 | Primary Clutch Housing, Primary Clutch Shoe Groove Depth, Friction Plate Thickness, Friction Plate Warp, Steel Plate Warp, Clutch Spring Free Length, Gear Backlash |
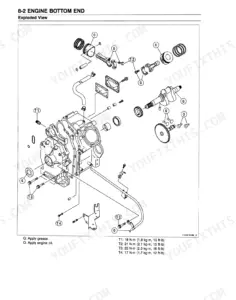
| Crankshaft & Transmission | 112-167 | Primary Gear, Crankshaft Diameter, Secondary Gear, Recoil Starter, Engine Lubrication System, Connecting Rod Big End Clearance, Crankshaft Runout, Connecting Rod Bend, Connecting Rod Twist, Reverse Knob Free Play, Shift Fork, Shift Drum Groove Width |
| Wheels, Tires & Steering | 168-186 | Toe-In of Front Wheels, Maximum Tire Air Pressure, Tire Air Pressure, Tire Beads |
| Final Drive & Bevel Gears | 187-216 | Drive Gear Shims, Driven Bevel Gear Shims, Bevel Gear Backlash (Front), Pinion Gear Shims, Ring Gear Shims, Bevel Gear Backlash (Rear), Cam Lever Angle (Front and Rear) |
| Brakes & Suspension | 217-267 | Front Brake Drum Inside Diameter, Rear Brake Drum Inside Diameter, Brake Shoe Lining Thickness, Brake Cam Diameter, Cam Hole Inside Diameter, Tie-Rod Length |
| Electrical System & Ignition | 268-291 | Battery, Regulator/Rectifier, Alternator, Stator Coil, Rectifier Circuit, Ignition Coil, Ignition Timing, Crankshaft Sensor, Commutator, Starter Motor Brush, Testing Relay |
Quick Reference Specifications
| Specification | Value | Page |
|---|---|---|
| Cylinder Head Bolts (M10) First Torquing | 13 N·m (1.3 kgf·m, 113 in·lb) | p. 82 |
| Cylinder Head Bolts (M6) First Torquing | 5.9 N·m (0.6 kgf·m, 52 in·lb) | p. 82 |
| Right Engine Cover Bolts torque | 8.8 N·m (0.9 kgf·m, 78 in·lb) | p. 20 |
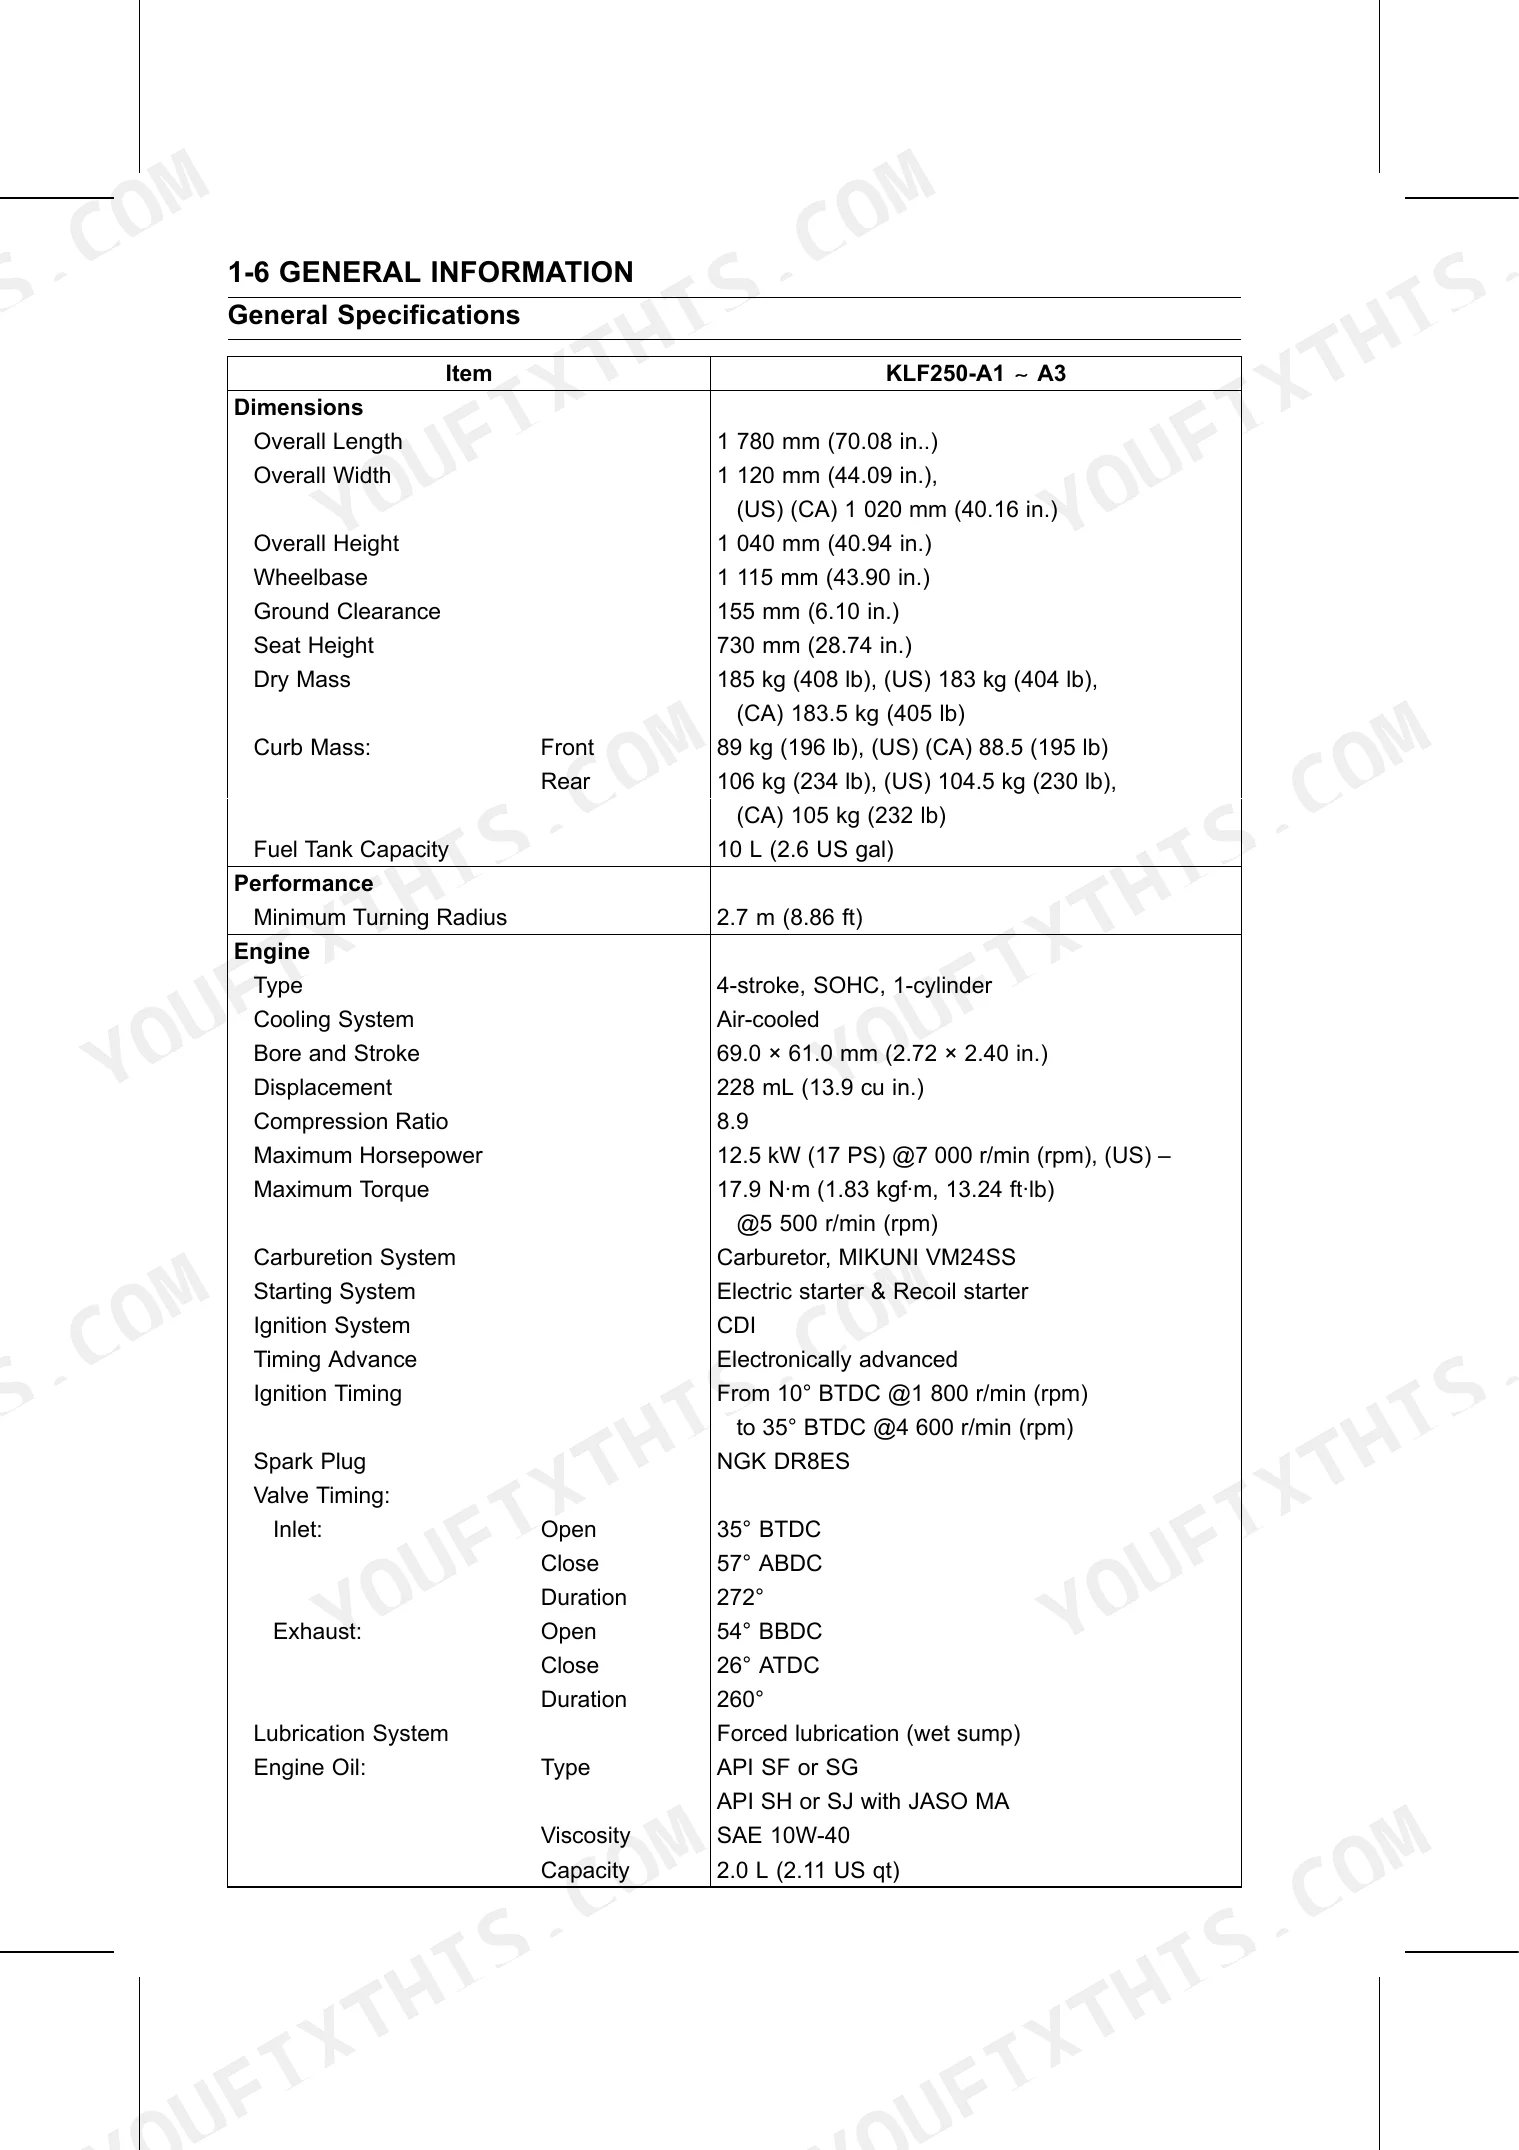
| Engine Oil Type | API SF or SG | p. 13 |
| Engine Oil Viscosity | SAE 10W-40 | p. 13 |
| Oil Filter Cover Bolts Torque | 8.8 N·m (0.9 kgf·m, 78 in·lb) | p. 29 |
| Oil Filter Replacement | Replace with a new one | p. 29 |
| Valve Clearance (Exhaust) Standard | 0.18 ∼ 0.23 mm (0.0071 ∼ 0.0091 in.) | p. 23 |
| Valve Clearance (Inlet) Standard | 0.15 ∼ 0.20 mm (0.0059 ∼ 0.0079 in.) | p. 23 |
| Engine Oil Capacity (filter not removed) | 2.0 L (2.11 US qt) | p. 13 |
| Engine Oil Capacity (filter removed) | 2.1 L (2.22 US qt) | p. 13 |
| Engine Oil Capacity (completely dry) | 2.75 L (2.91 US qt) | p. 13 |
Kawasaki KLF250-A1, KLF250-A2, KLF250-A3 Common Problems This Manual Covers
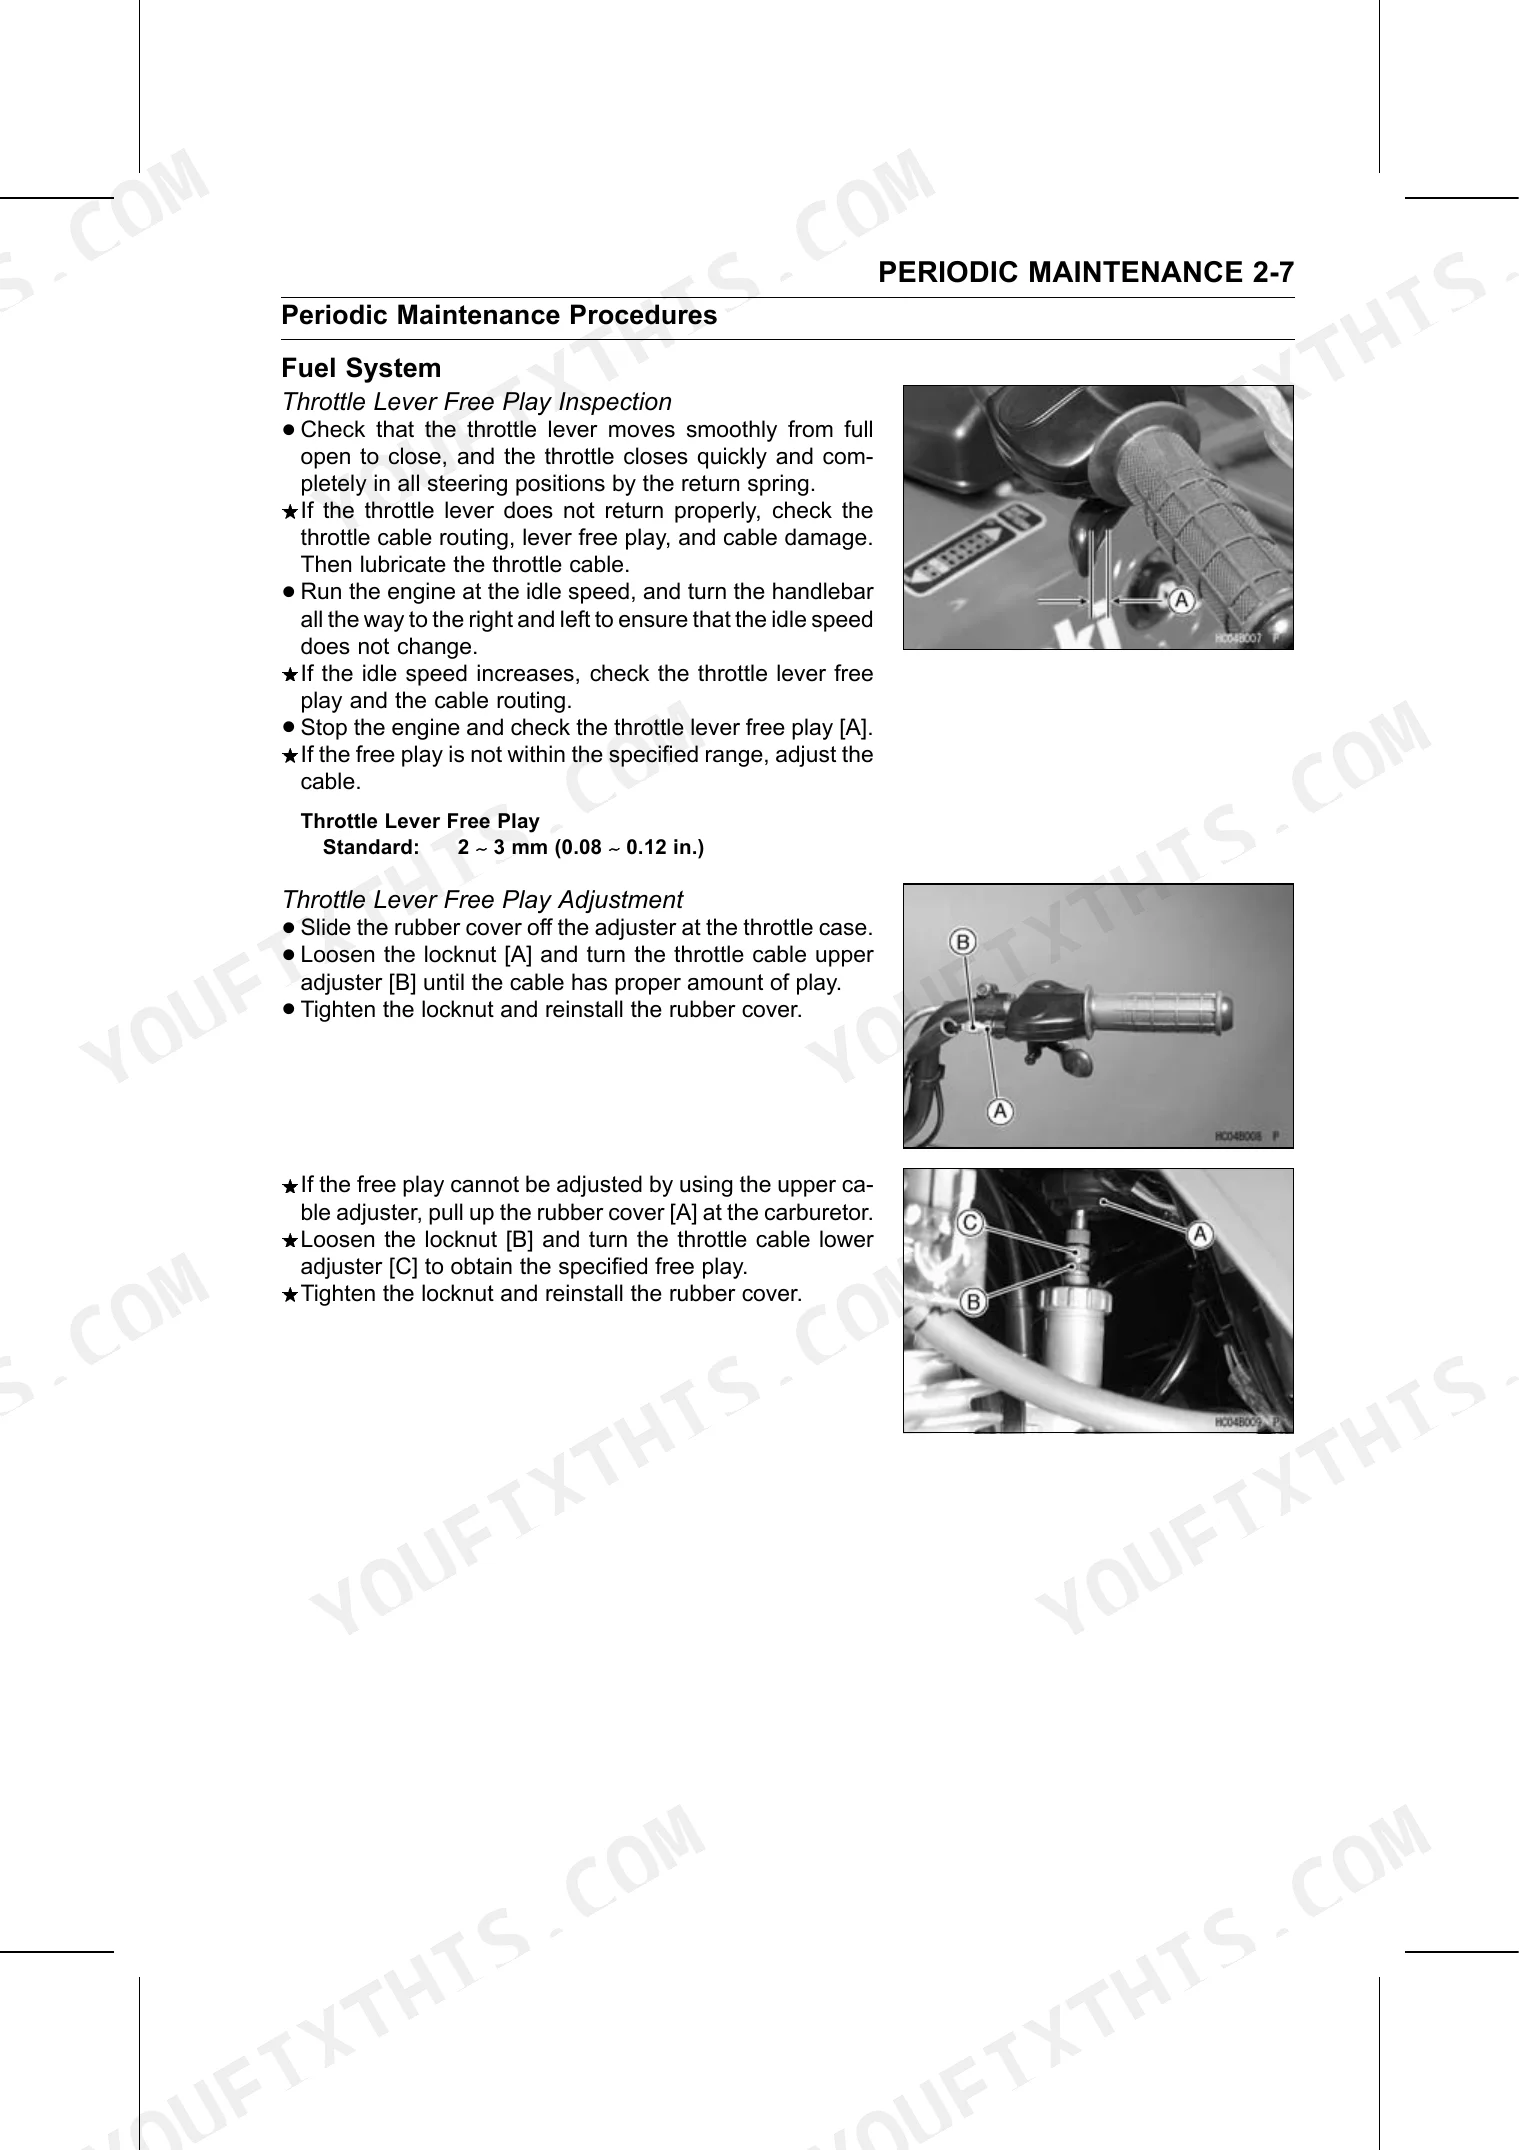
Hard starting from valve clearance out of spec
Missed tune ups let the valve clearance drift, which shows up as hard starting and loss of power. The valve clearance section gives the cold exhaust and inlet settings so you can reset them to standard.
Manual Section: Valve Clearance (When Cold) p. 27Rough idle and poor low speed running
A Bayou that idles rough or stumbles off idle usually needs the carburetor mixture reset. The carburetor pilot screw section covers the setting and the special pilot screw adjuster used to reach it.
Manual Section: Carburetor Pilot Screw Setting p. 49Low power and weak compression
Poor performance can trace back to low cylinder compression from worn rings, valves, or a leaking head gasket. The cylinder compression section explains how to measure it and how to read wet compression results.
Manual Section: Cylinder Compression (Usable Range) p. 80Fouled spark plug and weak spark
A fouled or wrongly gapped plug makes the engine misfire or refuse to start. The spark plug section covers inspection, cleaning, the correct gap, and the installation torque.
Manual Section: Spark Plug Gap p. 35Clutch slip or dragging
A clutch that slips under load or drags when disengaged points to worn friction plates. The friction plate section gives the thickness and warp limits so you can decide whether to replace them.
Manual Section: Friction Plate Thickness p. 109Flooding and fuel overflow at the carburetor
Fuel weeping from the carburetor or a flooding engine is usually a float level problem. The float height section covers checking and adjusting the fuel level and the float valve so the bowl fills correctly.
Manual Section: Float Height p. 50Frequently Asked Questions
Which models and years does this manual cover?
It covers the Kawasaki KLF250 Bayou in the KLF250-A1, KLF250-A2, and KLF250-A3 variants, built from 1985 to 1987.
What are the cylinder head bolt torque specs?
The cylinder head bolt torque section gives the first and final torquing values for both the M10 and M6 bolts, in the sequence the manual specifies. p. 82
Does it list the valve clearance specifications?
Yes. The valve clearance (when cold) section gives the standard exhaust clearance of 0.18 to 0.23 mm and inlet clearance of 0.15 to 0.20 mm, checked cold. p. 27
What is the engine oil capacity?
The engine oil section lists 2.0 L with the filter not removed, 2.1 L with the filter removed, and 2.75 L when the engine is completely dry. p. 29
How quickly can I access this manual?
This is a 318-page searchable PDF ready for immediate download. Works on any device -- pull it up on your phone while you are under the hood. No shipping, no waiting.
Am I able to print pages from this manual?
The PDF is DRM-free. Print whatever sections you need to take out to the shop. Standard letter or A4 paper works.
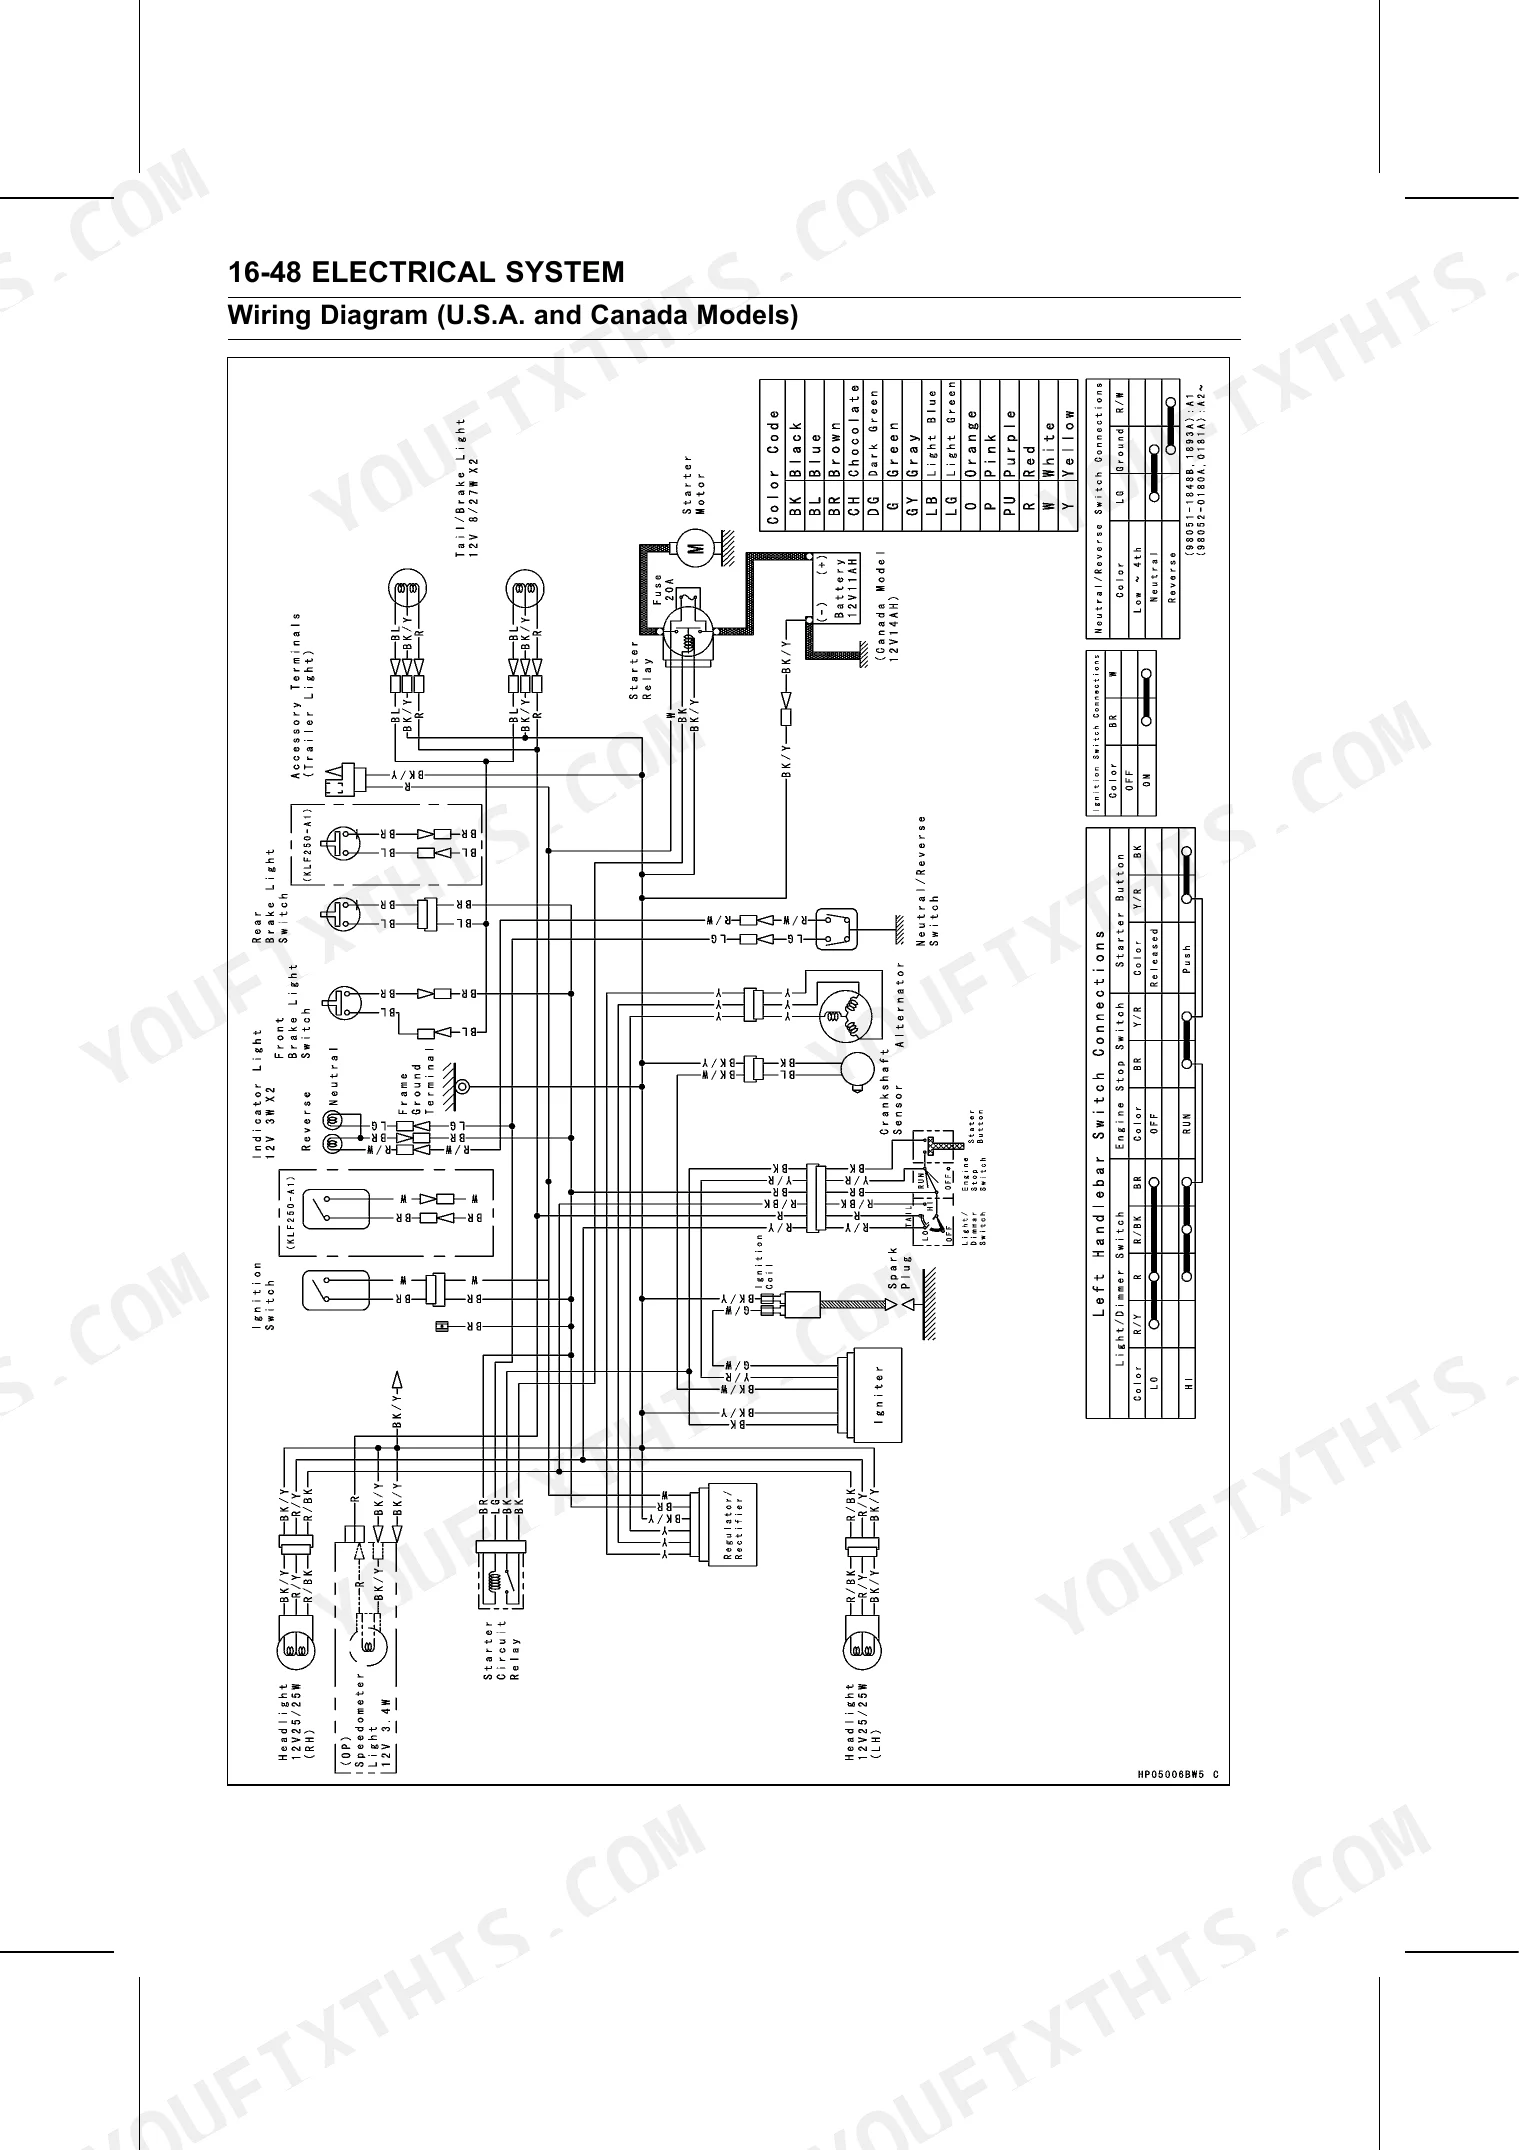
Does this Kawasaki KLF250 Bayou 250 service manual include wiring?
Included. The Kawasaki KLF250 Bayou 250 Service Manual covers complete wiring harness diagrams, electrical circuits, and connector pinouts.

Reviews
There are no reviews yet.