


Part of the Case IH Repair Manuals.
All 162 pages of this Case IH MDX Disc Mower Repair Manual (OEM #87023825) zero in on three models: MDX71, MDX81, and MDX91, giving you factory service from the PTO shaft and overrunning clutch through the bevel gearbox and cutter bar. Inside: a full torque section covering hardware, hydraulic tube fittings, and pipe threads; page after page of exploded views for every major assembly; and step-by-step procedures for PTO disassembly, jackshaft belt replacement, hydraulic cylinder service, breakaway link inspection, and complete cutter bar rebuilds. Your troubleshooting section and lubrication schedule round it out. Torque the knife bolts to 117 ft lbs (159 N·m) and seat the bevel gearbox output shaft seal at 13/16 inches (21 mm) depth. No more hunting forum threads for specs that may not match your machine. Bookmarked by section; open it on your tablet and jump straight to the procedure you need.
What's Inside This Case IH MDX71, MDX81, MDX91, MDX91 Disc Mowers Repair Manual
| System | Pages | Key Topics |
|---|---|---|
| General Information | 9-62 | Precautionary Statements, Safety, Ecology and the Environment, International Symbols, Hardware Torque Values, Installation of Adjustable Fittings in Straight Thread O Ring Bosses |
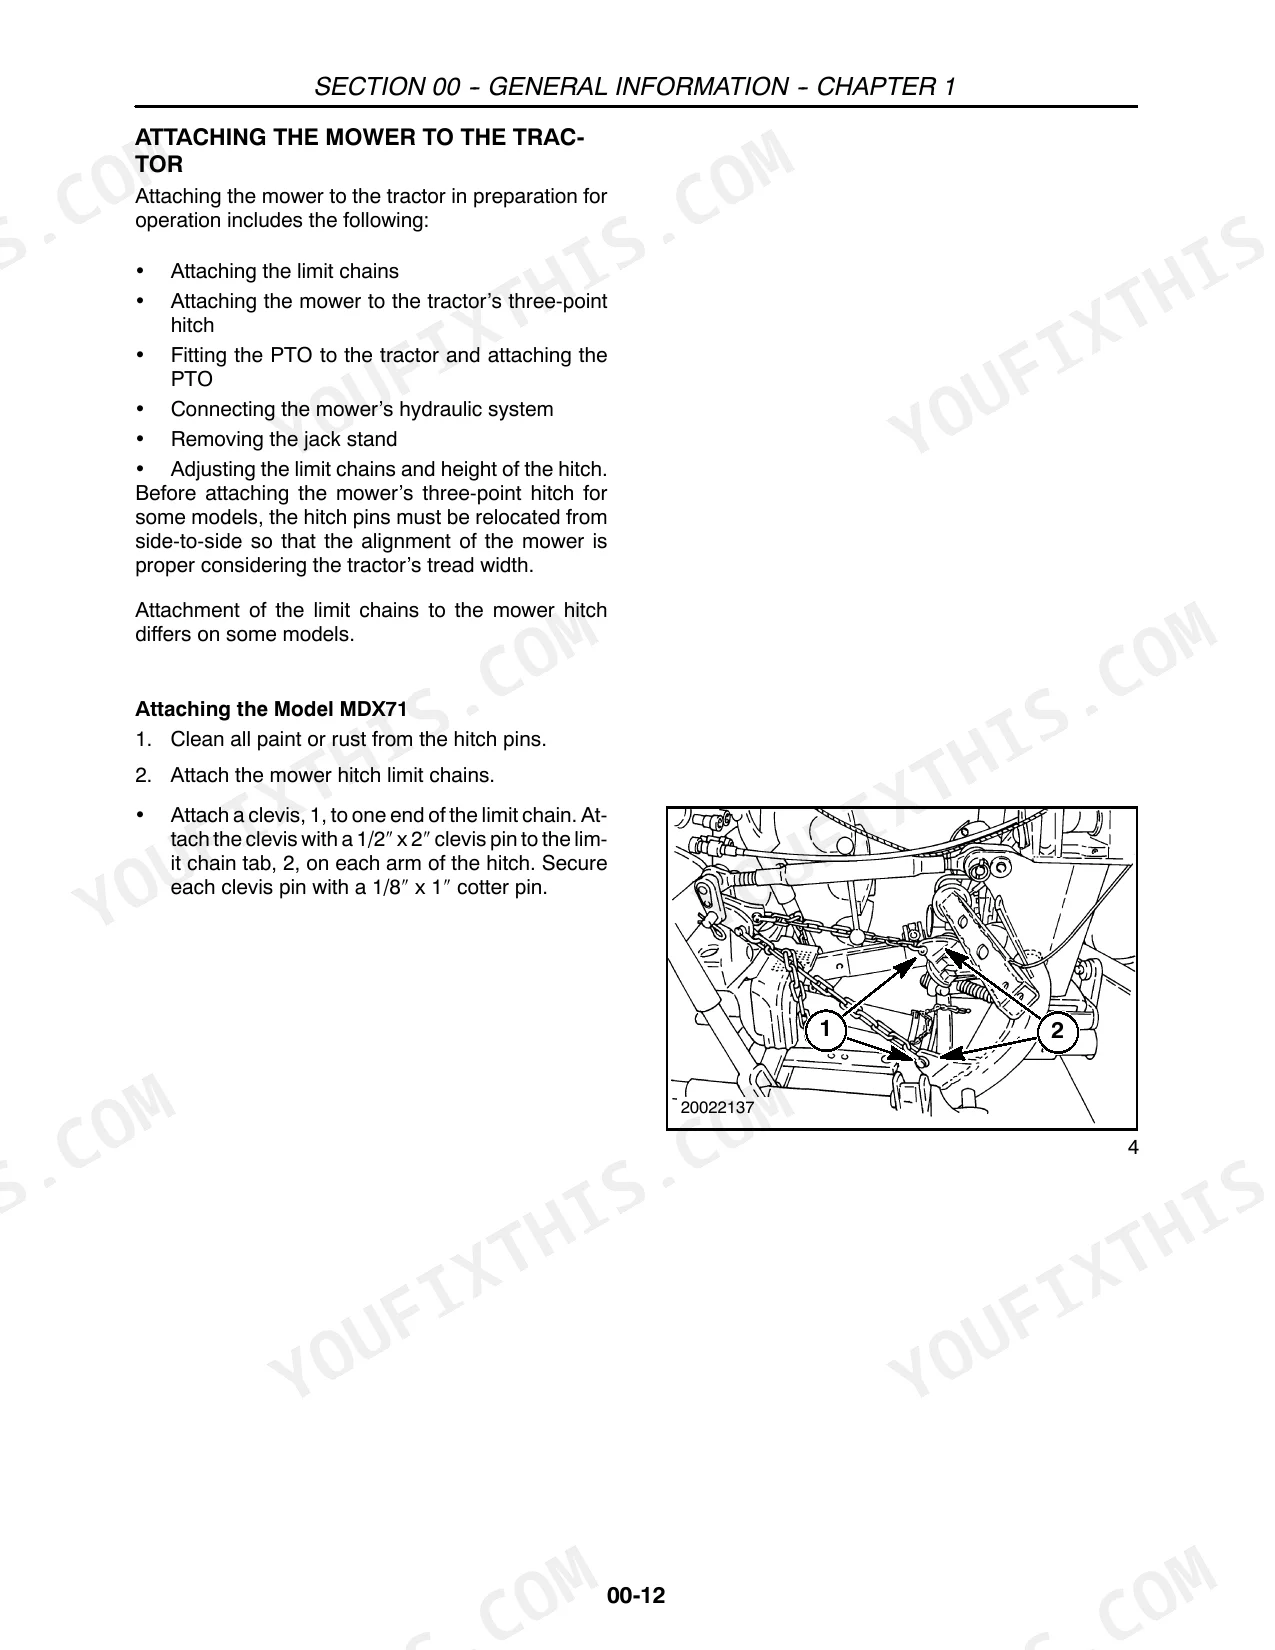
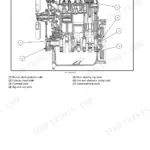
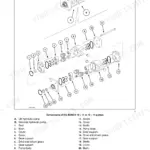
| Implement Power Take-Off | 63-82 | PTO (Implement Power Take-Off, Twist Lock - Disassembly, Twist Lock - Assembly, Overrunning Clutch - Disassembly, Overrunning Clutch - Assembly, Shielding - Disassembly, Shielding - Assembly, U-Joints - Disassembly, U-Joints - Inspection, U-Joints - Assembly, Shaft Tube Replacement) |
| Hydraulic System | 83-88 | Cylinders (Disassembly, Inspection, Assembly) |
| Frames | 89-94 | Breakaway Link (Disassembly, Inspection, Assembly) |
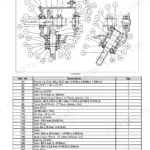
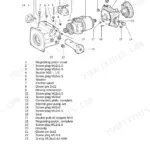
| Attachments and Headers | 95-146 | Bevel Gearbox (Removal, Disassembly, Reassembly, Installation) |
| Accessories | 147-152 | Left Swathboard Kit, High Stubble Kit, Knives, Degree Twist Knives, V Knives |
| Safety Decals | 153-162 | - |
Quick Reference Specifications
| Specification | Value | Page |
|---|---|---|
| All Models | ||
| Hydraulic system reset procedure | Place the tractor hydraulic valve in the “float” position to allow the cutter to follow the contour of the ground. | p. 44 |
| Knife replacement condition | Replace cracked or severely deformed knives immediately; replace if bent, severely worn, or if the hole is elongated. | p. 115 |
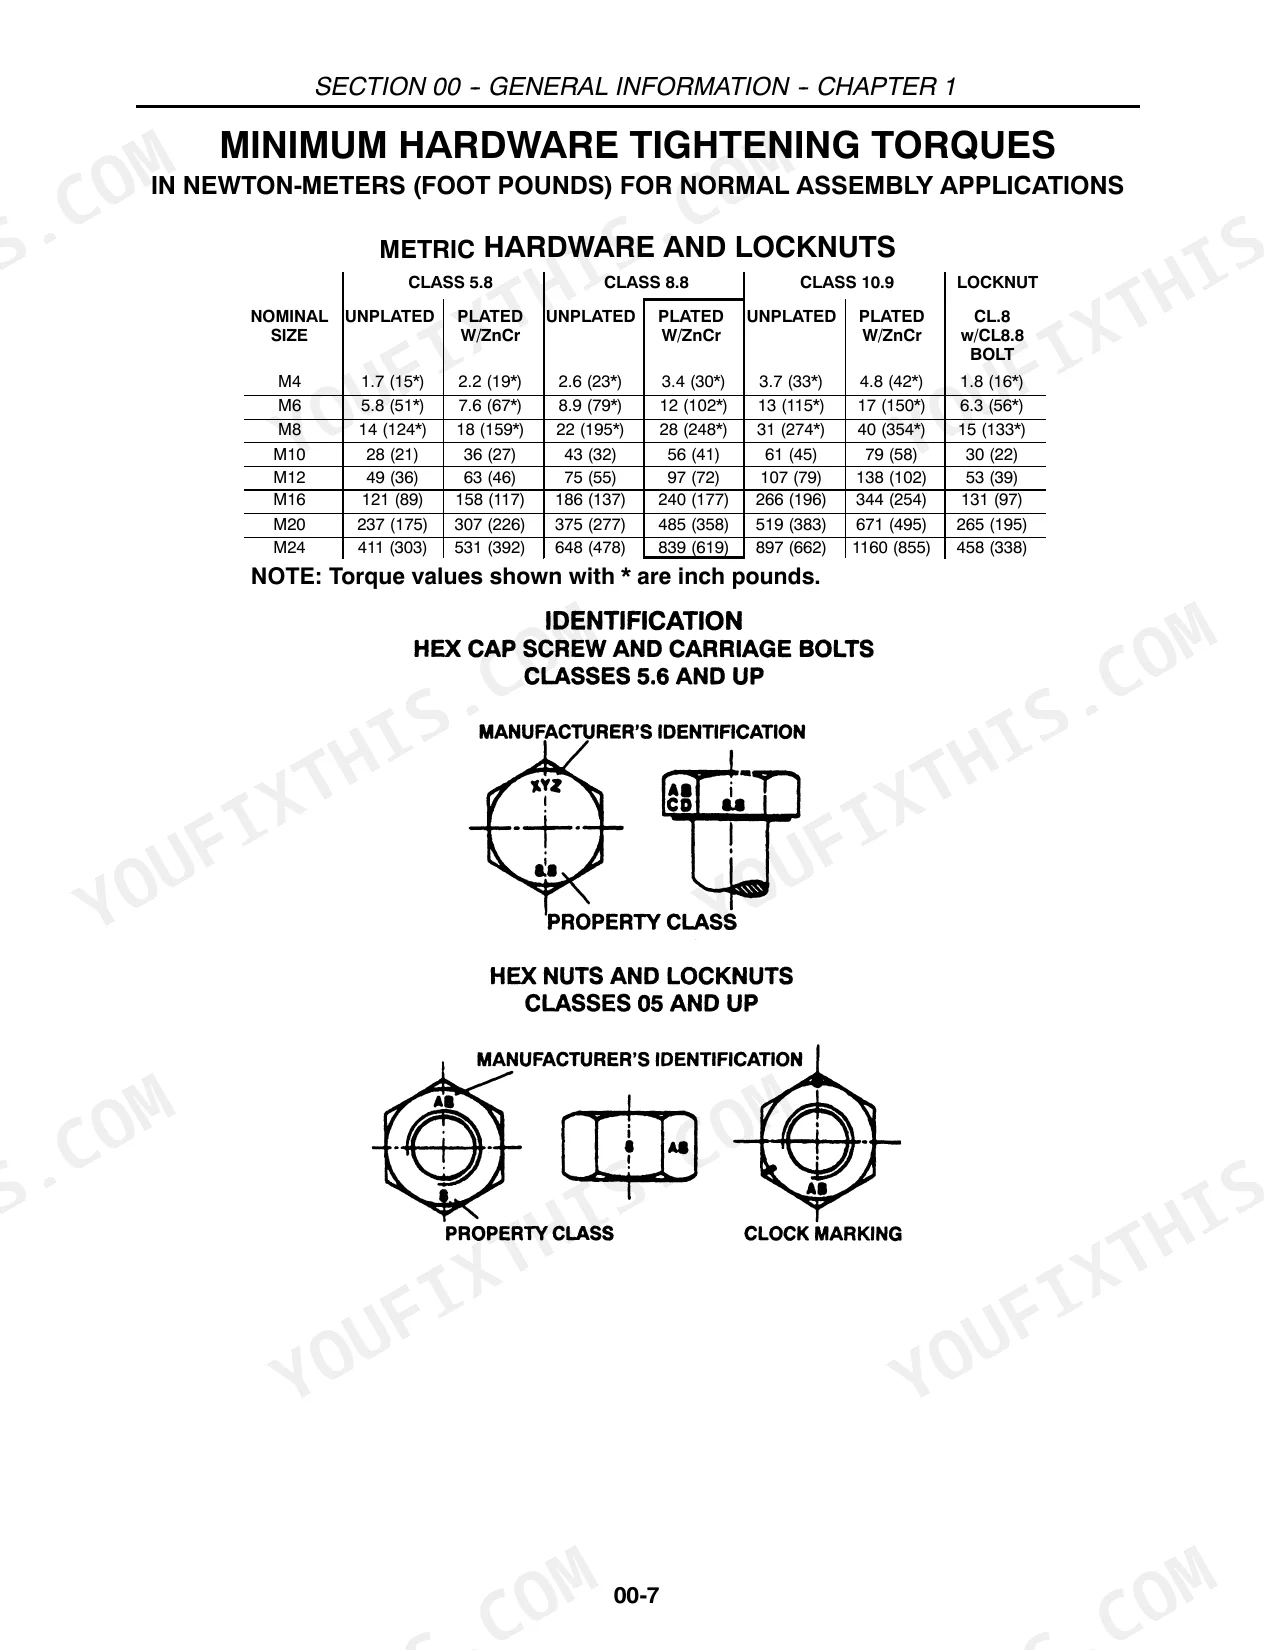
| Knife bolt torque | 117 ft lbs (159 N⋅m) | p. 106 |
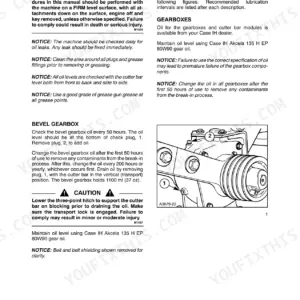
| Bevel gearbox output shaft seal installation depth | 13/16″ (21 mm) | p. 104 |
| Disc module shaft seal installation | Must be pressed into place flush with the side of the housing, and square to the shaft. | p. 133 |
| Rock guard replacement condition | Replace broken rock guards immediately; replace if worn thin before they break. | p. 118 |
| Skid shoe thickness | 1/4″ | p. 113 |
| Skid shoe width | 8″ | p. 113 |
| Disc retaining bolt torque | 83 ft lbs (113 N⋅m) | p. 114 |
| MDX71 | ||
| MDX71 Cutting Width | 2040 mm | p. 62 |
| MDX81 | ||
| MDX81 Cutting Width | 2400 mm | p. 62 |
| MDX91 | ||
| MDX91 Cutting Width | 2800 mm | p. 62 |
Case IH MDX71, MDX81, MDX91, MDX91 Disc Mowers Common Problems This Manual Covers
Knives worn, bent, or hole elongated causing uneven stubble and streaking across the field
Shut down the PTO and lock out the machine before touching any blade. Inspect every knife: replace immediately if cracked, severely deformed, or if the mounting hole is elongated — replacement criteria are on page 115. Install new knives with the correct rotation direction (clockwise vs. counterclockwise) matched to each disc position. Torque all knife bolts to 117 ft lbs (159 N⋅m) per page 106. Verify PTO input speed is 540 RPM and disc speed reaches 3000 RPM before cutting; low speed is the second leading cause of streaking after dull knives.
Manual Section: Attachments and Headers p. 115Excessive vibration during operation, worsening at higher PTO speeds
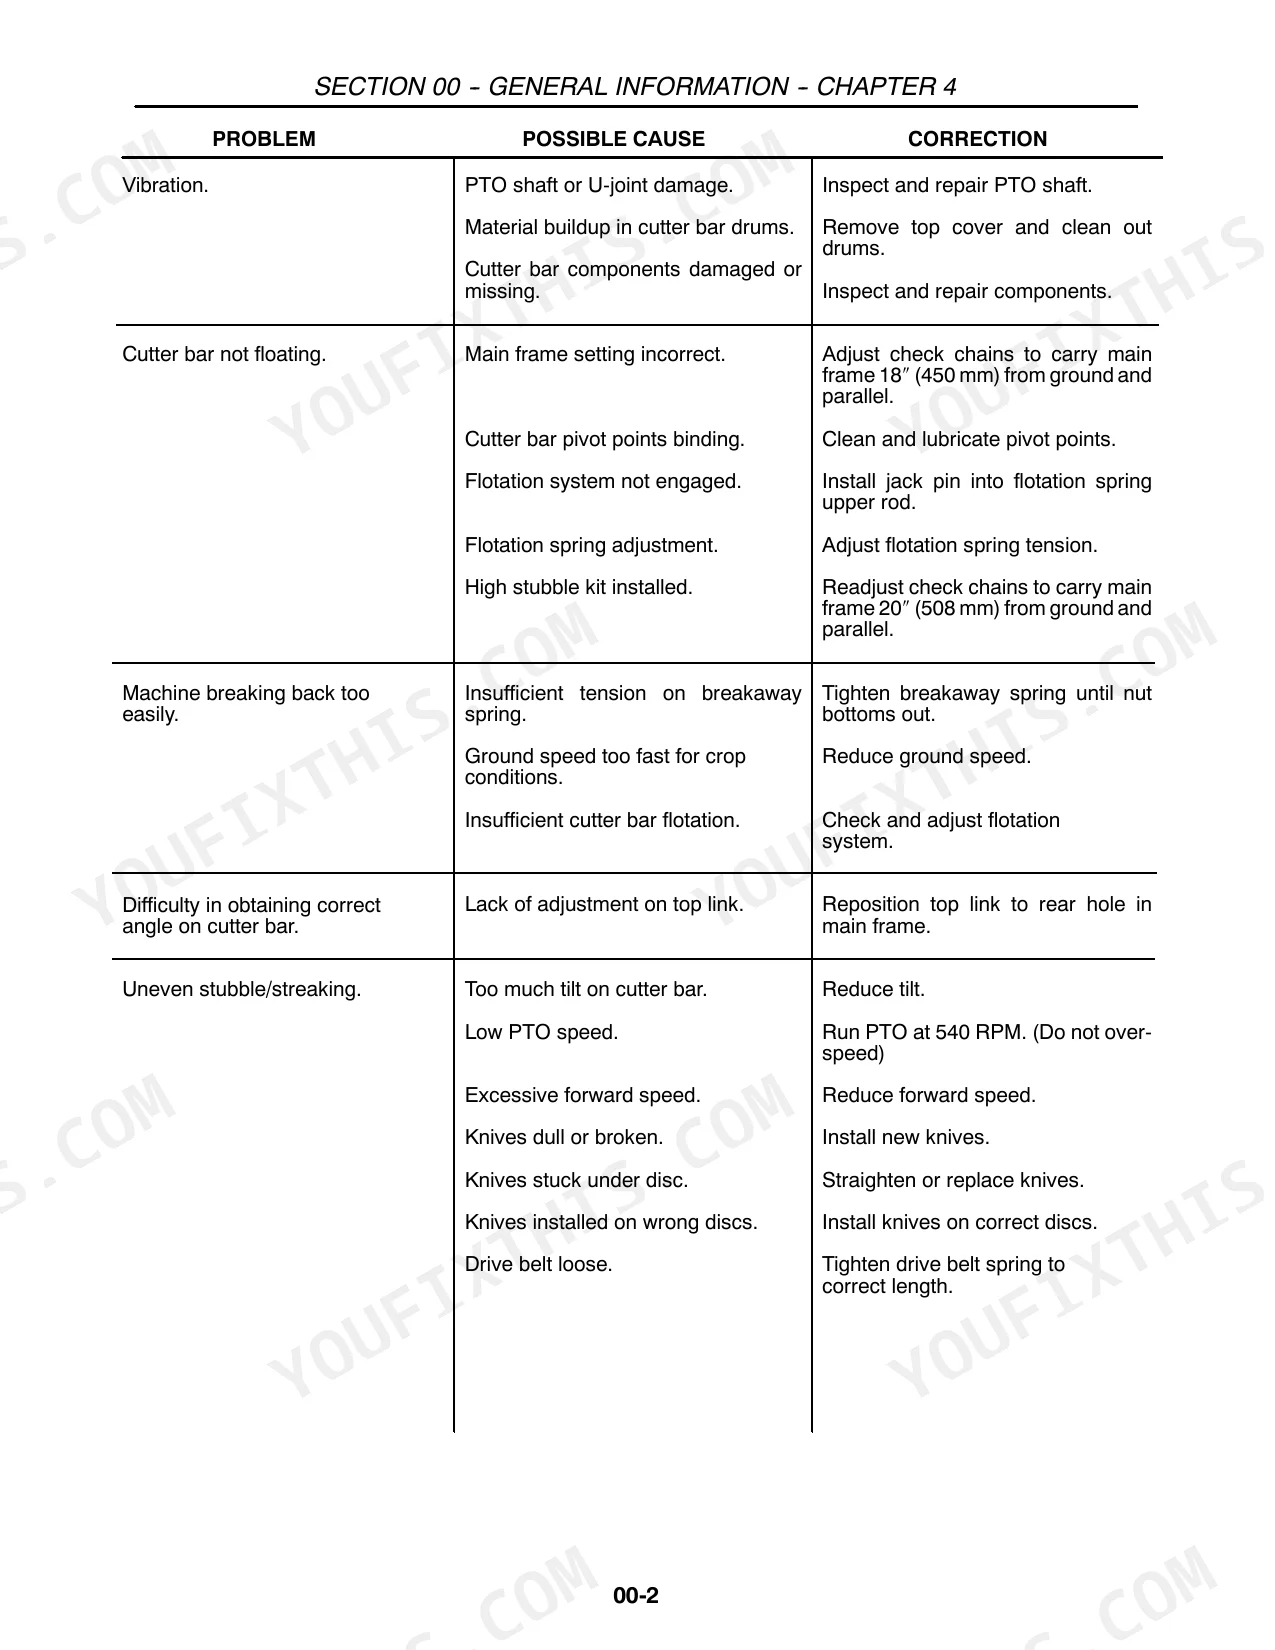
Stop immediately and check for missing or damaged knives, broken rock guards, or material packed inside the cutter bar drums — all are covered in the troubleshooting chart. Inspect the PTO shaft and U-joints for wear, brinelling, or play per the U-Joints Inspection section starting page 63. Replace broken rock guards before they break thin per page 118. Balance the knife complement: running with uneven knife count across discs is the fastest way to generate resonant vibration at 3000 RPM disc speed.
Manual Section: Implement Power Take-OffCutter bar not floating, leaving scalped patches or riding too high over uneven ground
Check that the flotation system is engaged and not locked out. Inspect all cutter bar pivot points for binding — clean and grease any that resist free movement. Adjust the flotation spring to match field conditions; the troubleshooting chart covers the full adjustment sequence. Place the tractor hydraulic valve in the float position per page 44 so the cutter can follow ground contour freely. If a high stubble kit is installed, confirm it is compatible with current field conditions — it restricts float travel by design.
Manual Section: General InformationSkid shoes worn thin or broken, cutterbar scalping soil on headlands and turning areas
Inspect skid shoes each day in rocky or abrasive fields. Replace immediately if broken; replace before they wear through 1/4″ thickness (page 113) — worn shoes let the cutterbar contact soil and accelerate disc seal damage. Standard shoes (K86572263) work for normal conditions; switch to high skid shoes (K87622885) for rough terrain. Torque all skid shoe mounting bolts to 113 N⋅m (83 ft. lbs.) per page 150 after installation.
Manual Section: Accessories p. 150Drive belt failing early or slipping, losing power transfer to cutterbar discs
Check belt alignment and tension before each season and after any belt replacement — misalignment and incorrect tension are the two root causes per the troubleshooting index. Inspect the belt for glazing, cracking, or fraying along the full run. Verify PTO input speed holds steady at 540 RPM under load; belt slip often shows first as a drop in disc speed before audible squealing begins. Correct alignment at the gearbox pulley first, then set tension to spec; do not over-tension, as that accelerates bearing wear on the bevel gearbox input shaft.
Manual Section: General InformationFrequently Asked Questions
What are the torque specs for the blade mounting bolts on Case IH MDX81 disc mower?
For the blade mounting bolts (knives), position the bolt protector and bolt, then torque the bolts to 117 ft lbs (159 N⋅m). After all knives are installed, turn the cutter bar by hand to ensure all knives are installed in the right direction and there is no interference. p. 117
How to reset the PTO engagement on Case IH MDX71
If the breakaway latch releases, stop the tractor immediately and disengage the PTO. To reset the cutter bar, back the tractor and mower until the cutter bar latches and is in its normal position. Do not raise the cutter bar to re-latch the breakaway. p. 45
What are the replacement specifications for 7-degree knives (clockwise: K9847683, counterclockwise: K9847684)?
The 7-degree twist knives are recommended for abrasive (sandy) cutting conditions. These knives are designed with a 7-degree twist angle to function well in specific crop and field conditions. p. 151
How do you fix case IH MDX71/81/91 disc shaft seals leaking oil, wet streak along cutterbar housing?
Remove the disc module and inspect each shaft seal for cracks, hardening, or lip damage. Press new seals in flush with the housing face, square to the shaft — any tilt causes immediate re-leak; see installation spec on page 133. For the drive module, apply the same flush-and-square install per page 145. Check the bevel gearbox output shaft seal depth: correct seating is 13/16″ (21 mm) per page 104. Refill the bevel gearbox to 1100 ml and each drive module to 300 ml before returning to service. p. 133
What do I get after purchasing this Case IH MDX71–MDX91 Series manual?
A 162-page Repair Manual in searchable PDF format, available the moment you complete checkout. View on computer, tablet, or phone, with no shipping wait.
Can I print this manual?
Absolutely. No DRM or copy protection. Print the whole manual or just the pages you need. Any home or office printer works.


Reviews
There are no reviews yet.