


Part of the Yanmar Repair Manuals.
Need the official factory breakdown for your Yanmar BY series marine engines? This 232-page Yanmar 4BY, 6BY Service Manual PDF (OEM #0BBY0-G00101) gives you the complete teardown and rebuild path for the 4BY and 6BY powerplants. Inside, you get full electrical and ECU schematics, complete error code lists, and a detailed fuel system flow diagram. Open up to step-by-step diagnostic charts and pages of torque tables designed to keep your boat out of the shop. Start the cylinder head bolt sequence by torquing to 80 N·m (59 ft-lb), then loosen all bolts at least 180 degrees before continuing, and always ensure your fuel supply line has a minimum diameter of 8 mm. Every hour in the harbor costs money. Grab this bookmarked digital reference, pull it up on your tablet, and fix the problem right the first time.
What's Inside This Yanmar 4BY, 6BY Manual
| System | Pages | Key Topics |
|---|---|---|
| Introduction | 5-6 | Revision History |
| Safety | 7-12 | - |
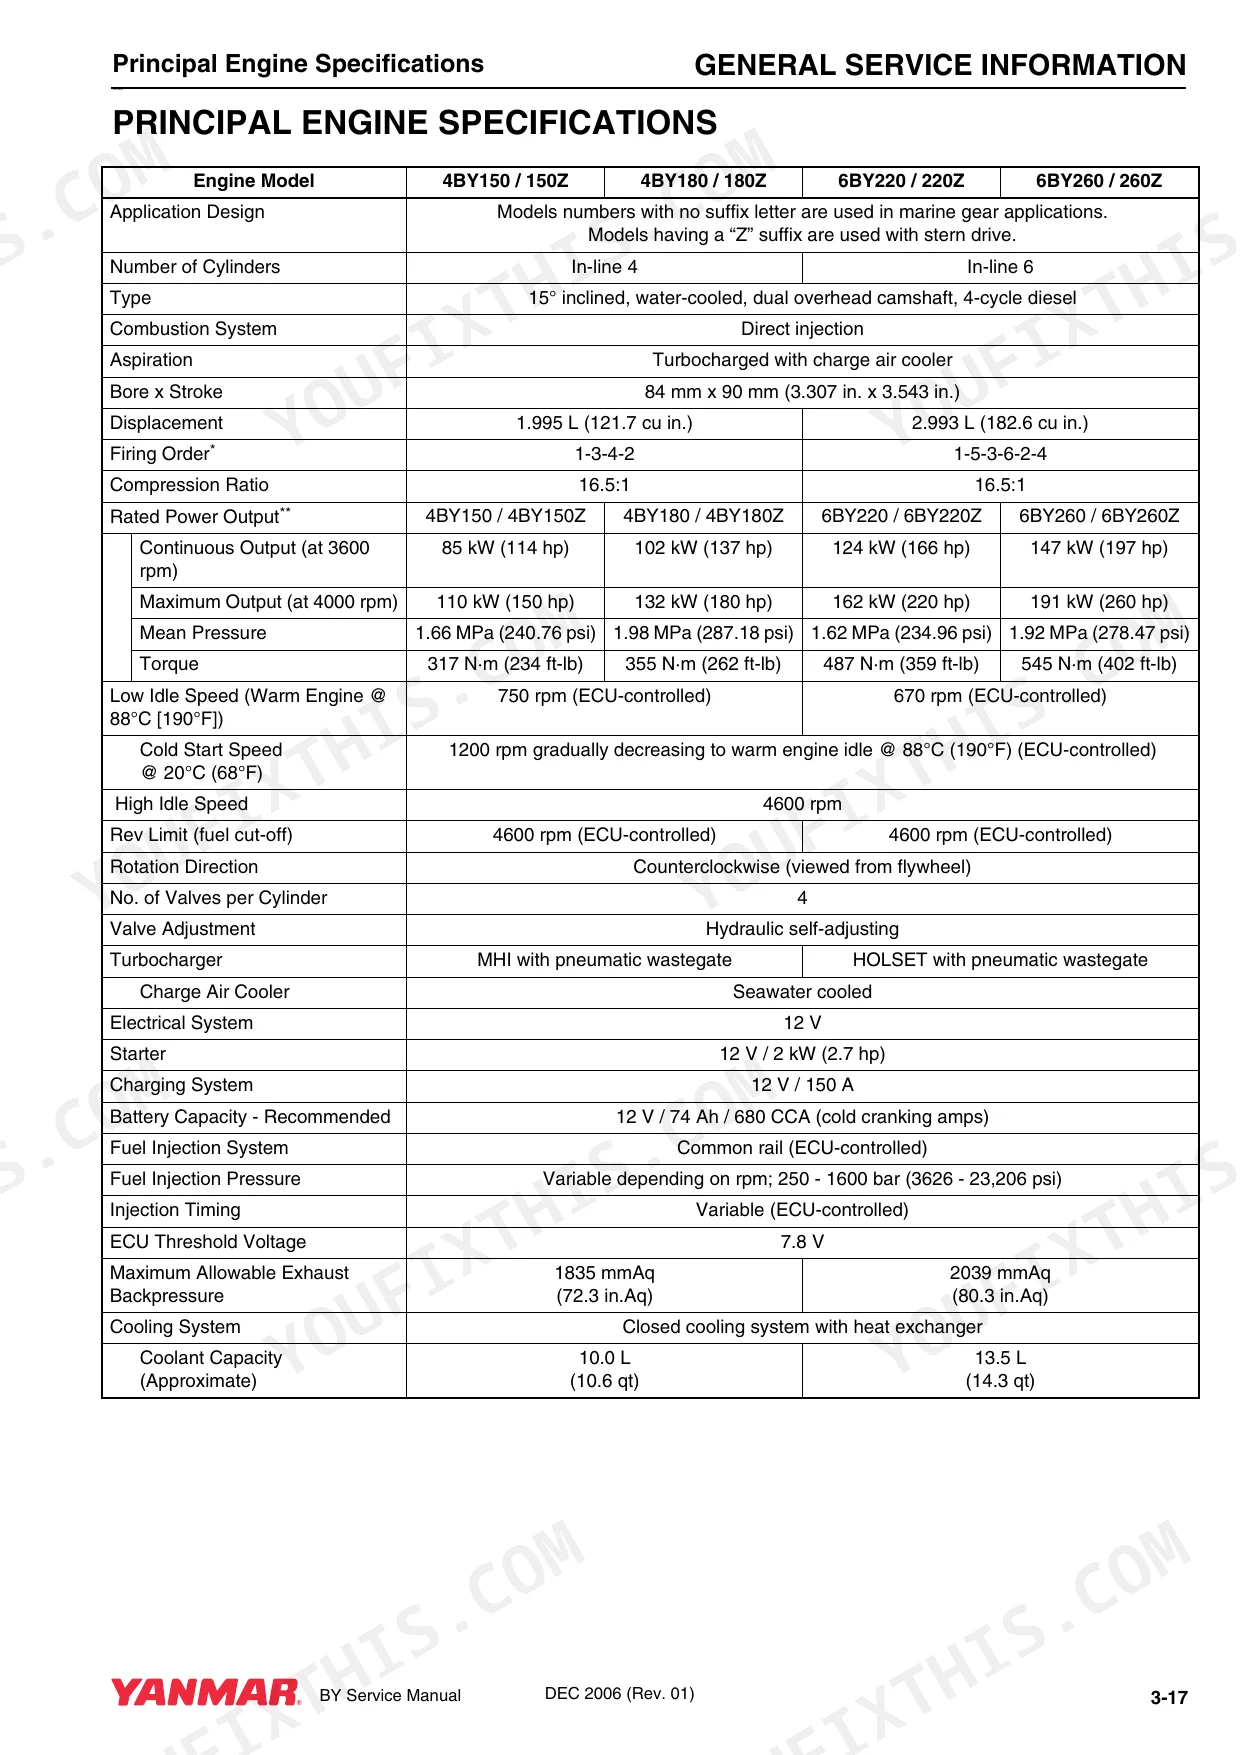
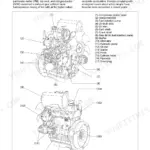
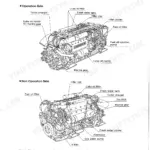
| General Service Information | 13-34 | Safety Precautions, Engine Outline Drawings, Engine Piping Diagrams, Location of Nameplates, Diesel Fuel, Engine Oil, Engine Coolant, Principal Engine Specifications |
| Periodic Maintenance | 35-46 | Epa Requirements, Periodic Maintenance Schedule, Periodic Maintenance Procedures |
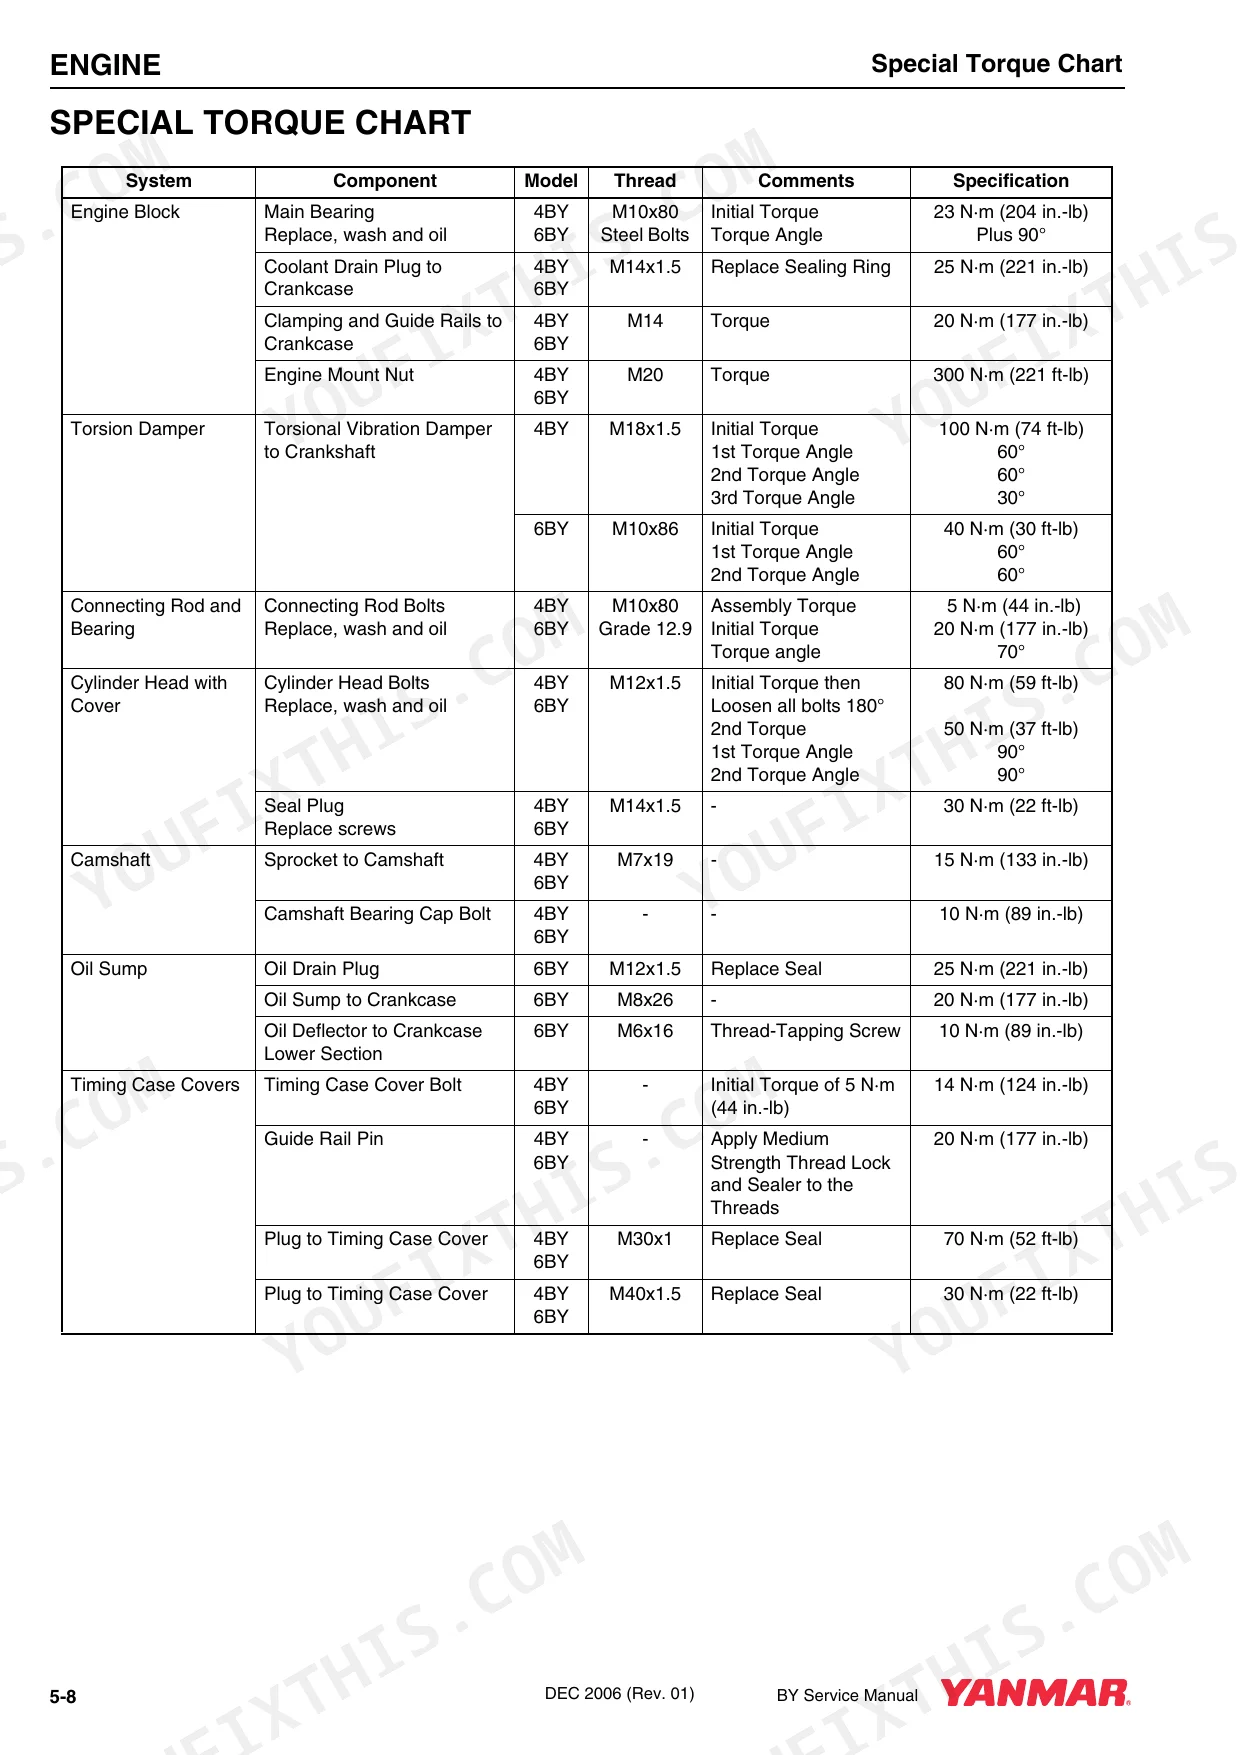
| Engine | 47-116 | Before You Begin Servicing, Specifications, Special Torque Chart, Special Service Tools, Measuring Instruments, Sealants and Compounds, Tests and Adjustments |
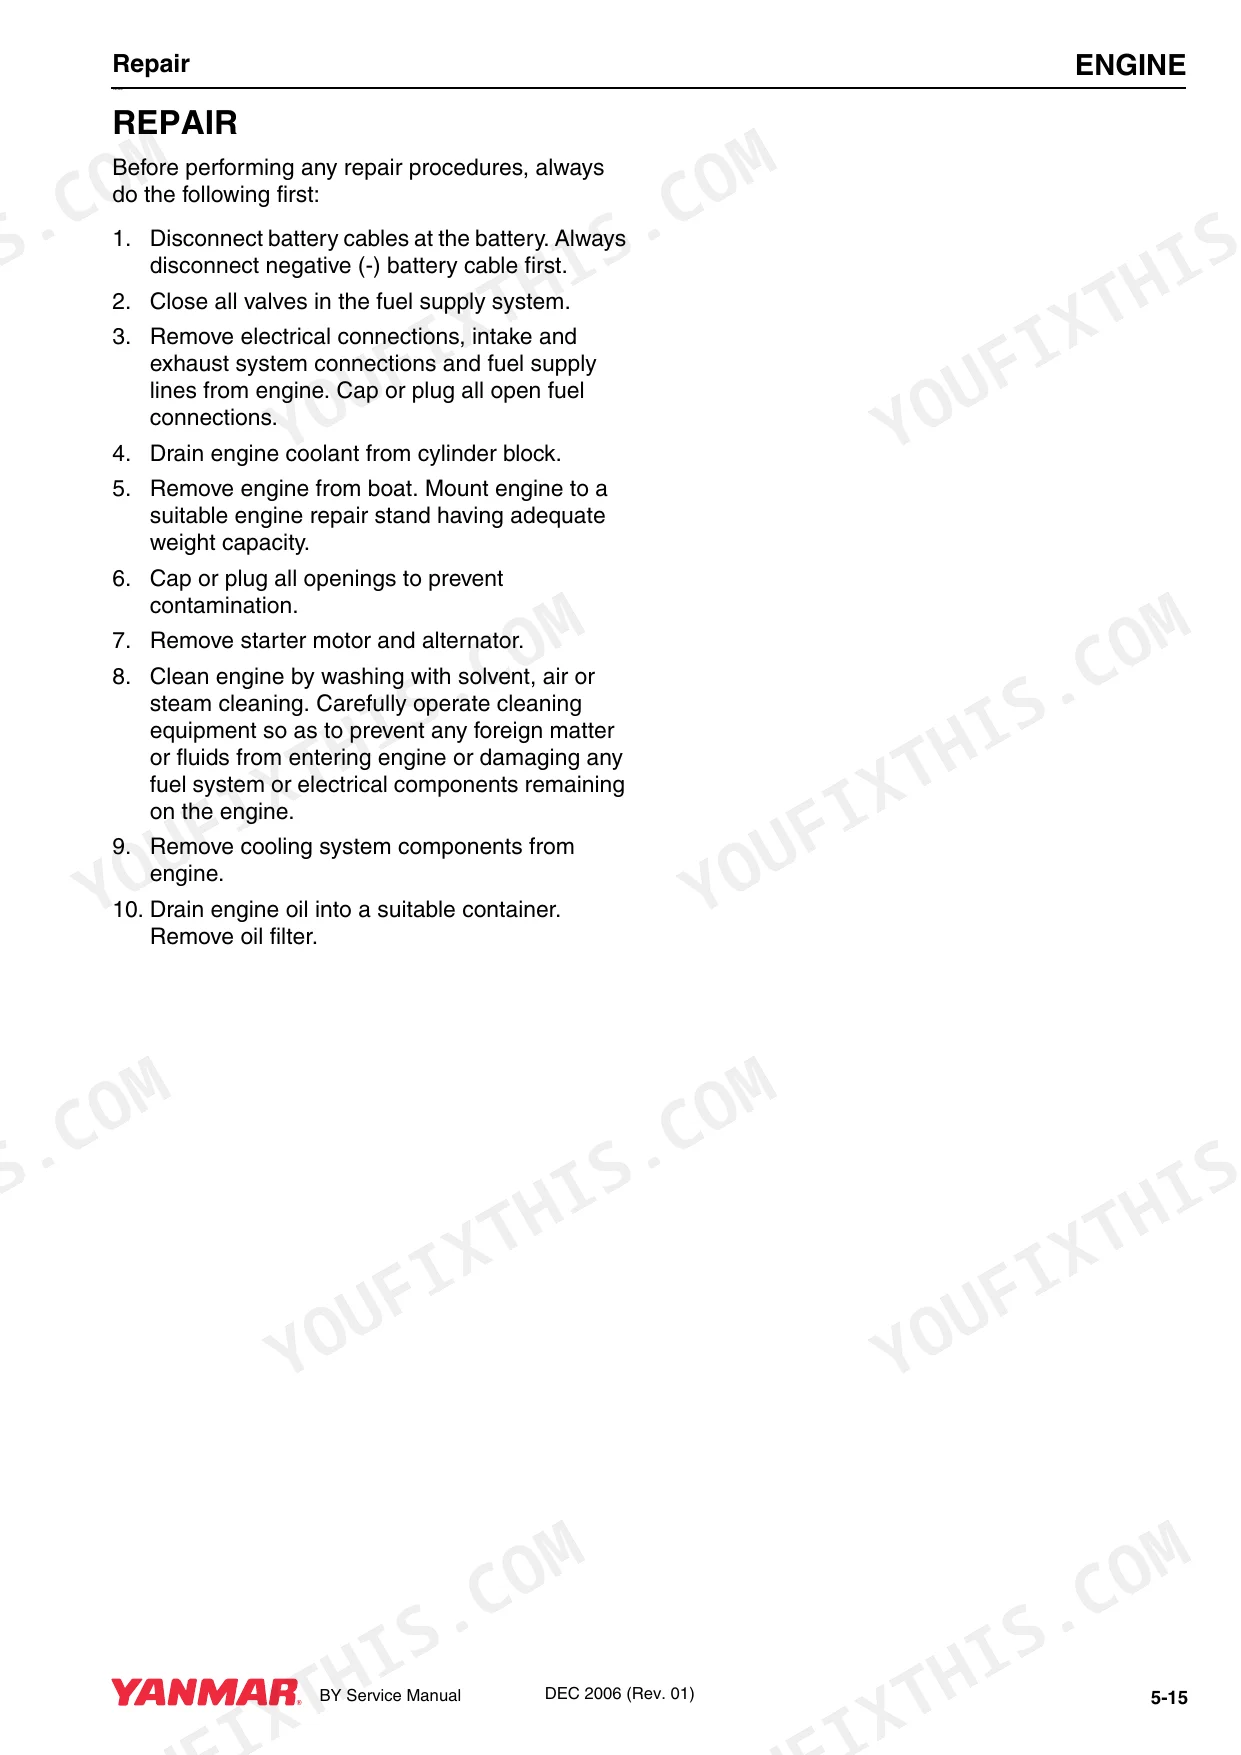
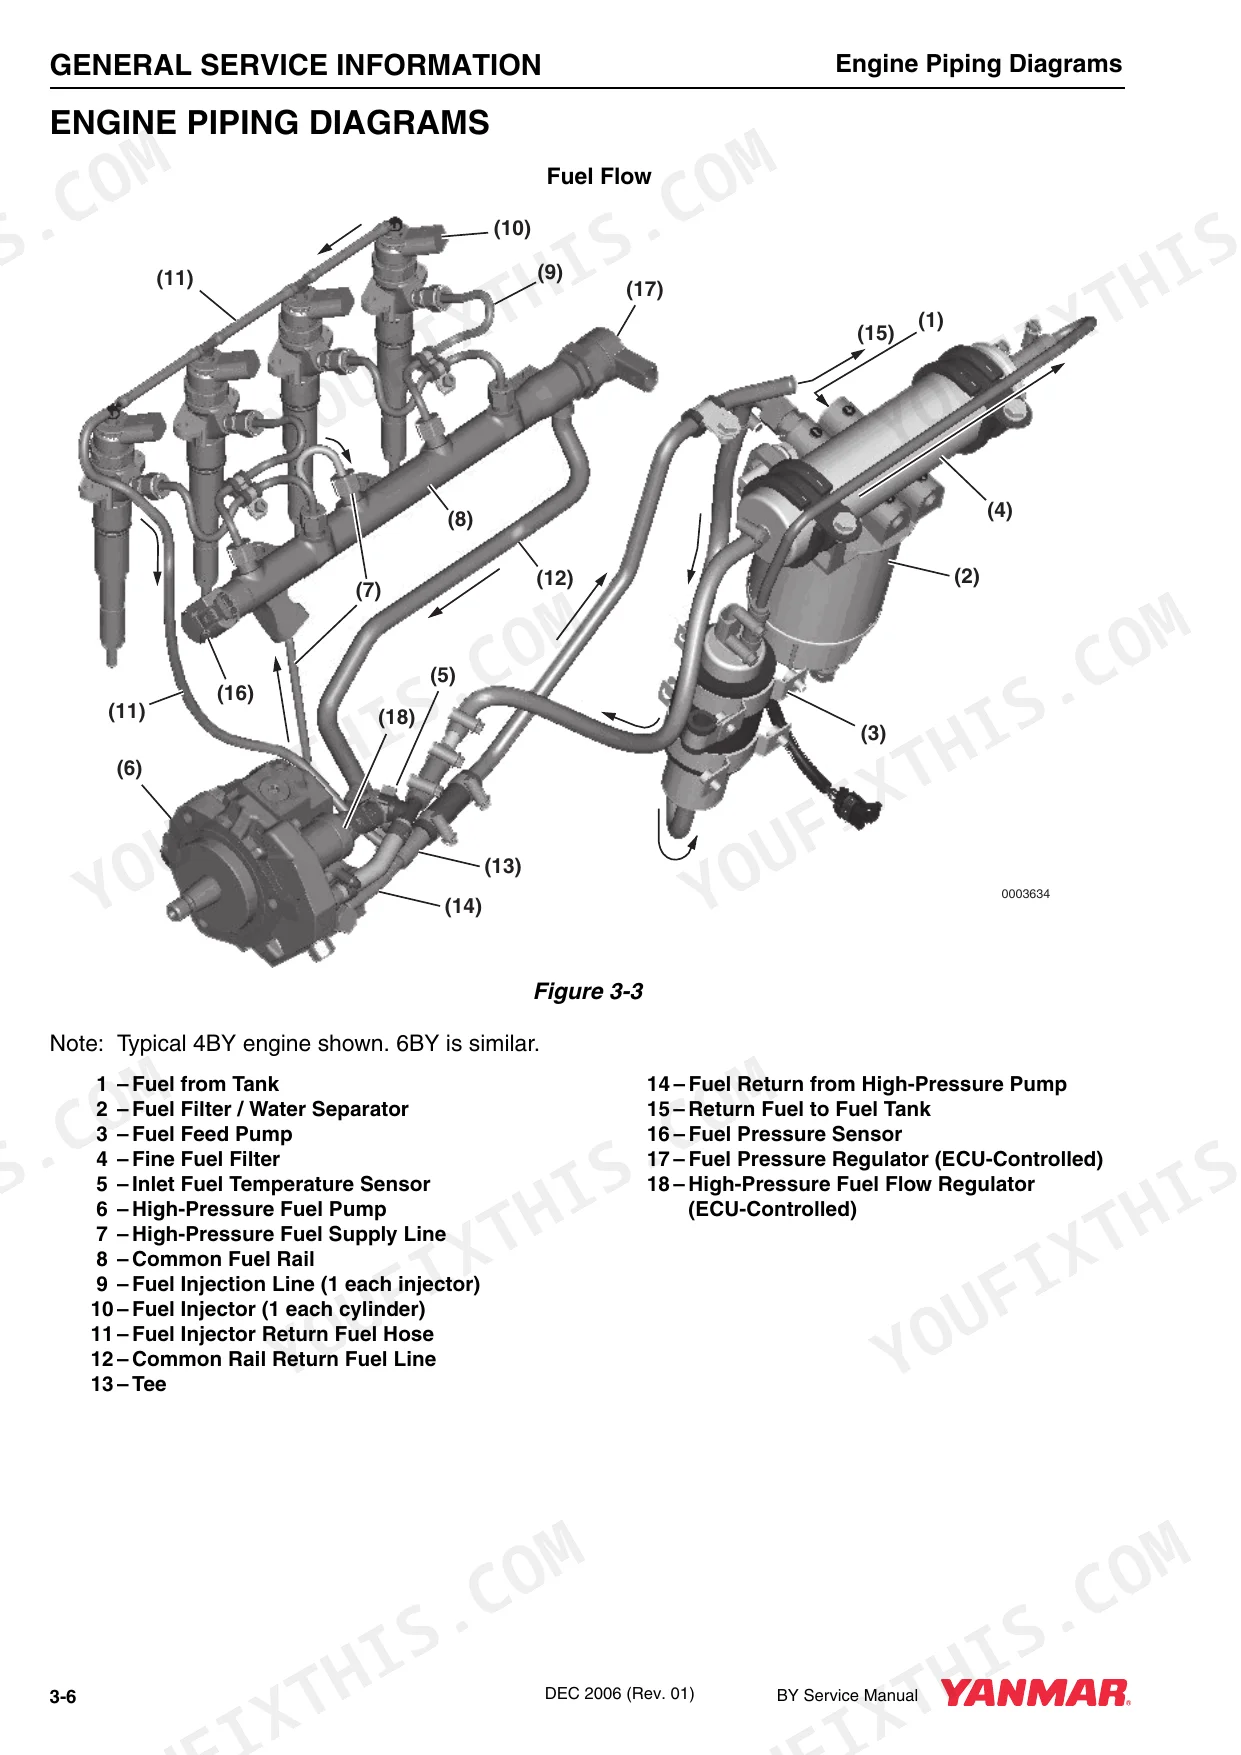
| Fuel System | 117-138 | Safety Precautions, Specifications, Special Service Tools, Fuel System Components, Fuel Flow Diagram, Tests and Adjustments, Repair |
| Cooling System | 139-158 | Before You Begin Servicing, Specifications, Special Service Tools, Measuring Instruments, Cooling Flow Diagram, Tests and Adjustments, Repair |
| Lubrication | 159-170 | Specifications, Special Service Tools, Measuring Instruments, Tests and Adjustments, Repair |
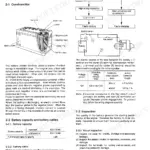
| Turbocharger | 171-178 | Specifications, Special Service Tools, Sealants and Compounds, Tests and Adjustments, Repair |
| Starter Motor | 179-184 | Before You Begin Servicing, Starter Motor Specifications, Starter Motor Troubleshooting, Remove and Install Starter Motor |
| Alternator | 185-190 | Before You Begin Servicing, Specifications, Repair |
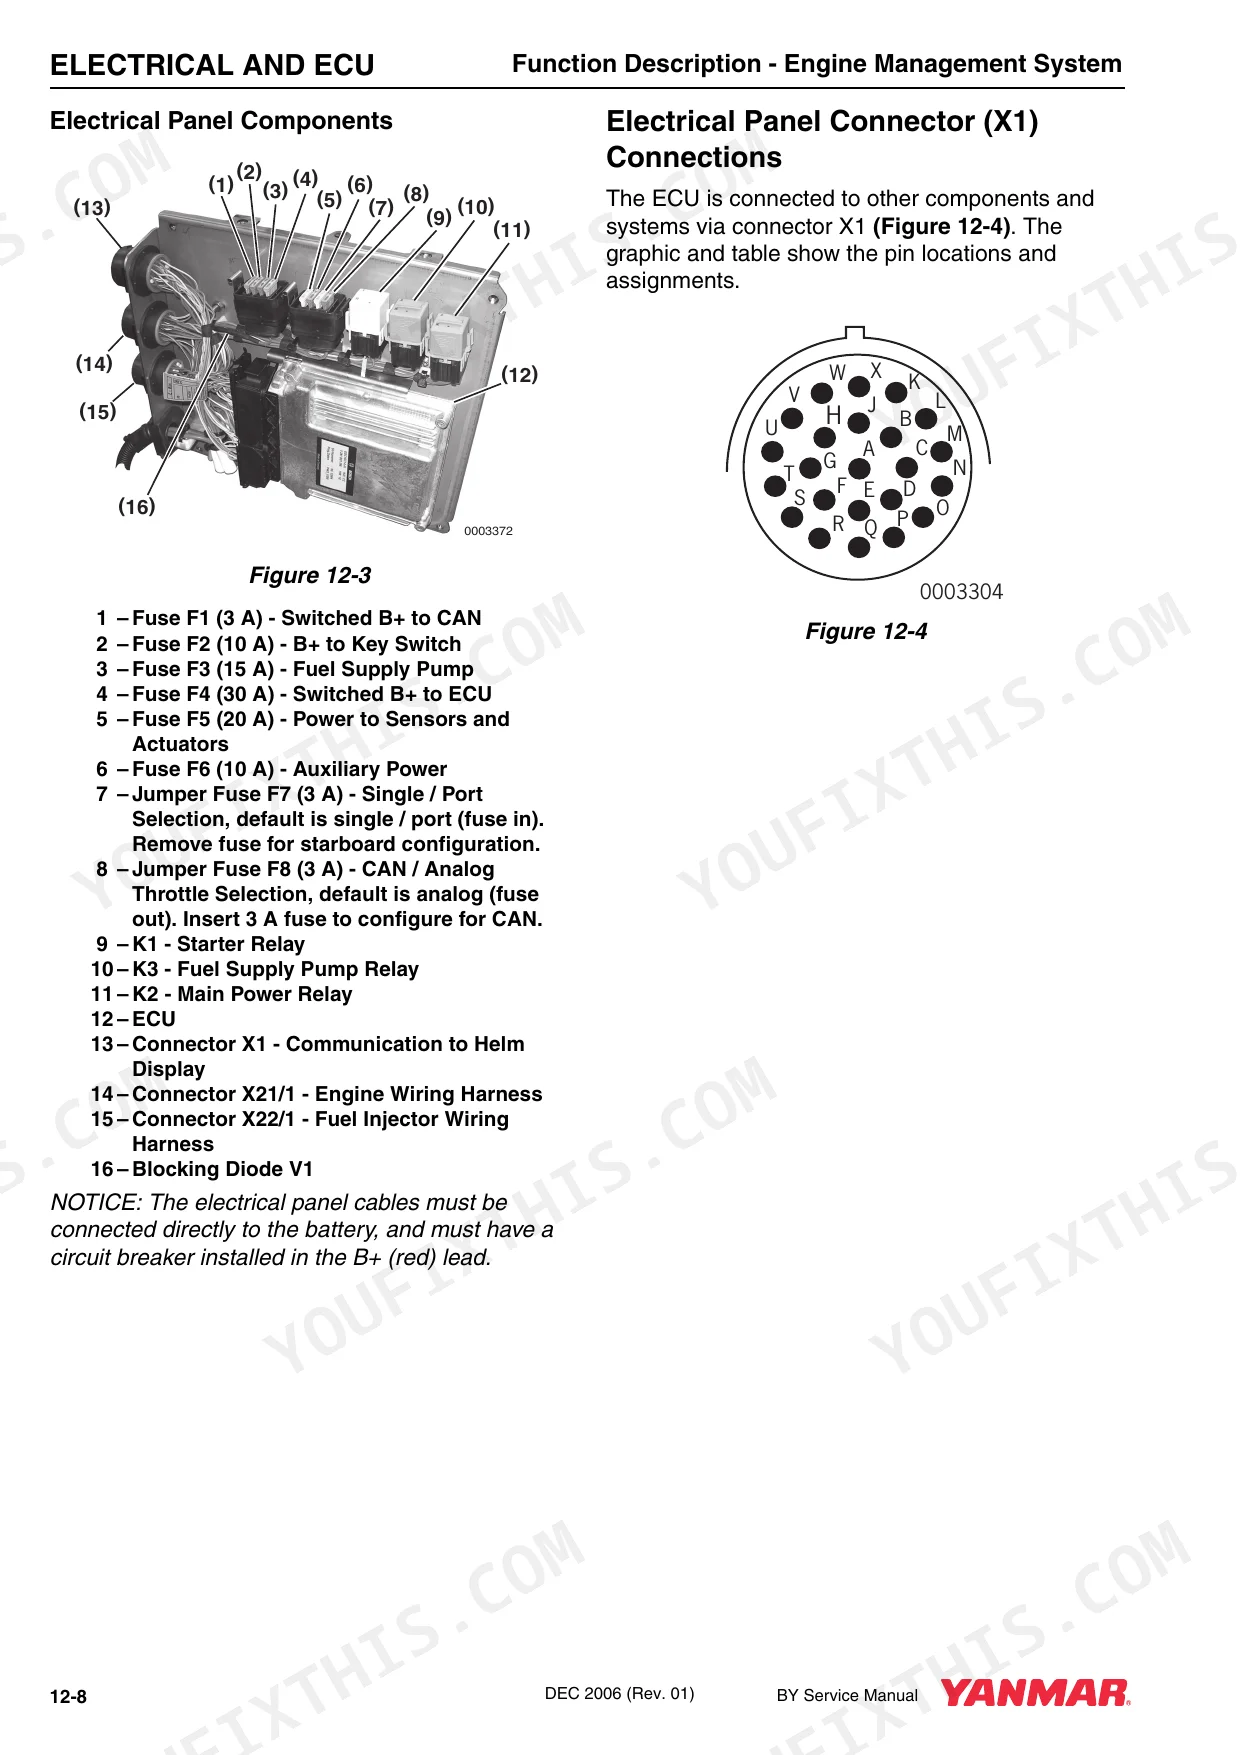
| Electrical and ECU | 191-218 | Specifications, Function Description - Engine Management System, Component Tests, Repair |
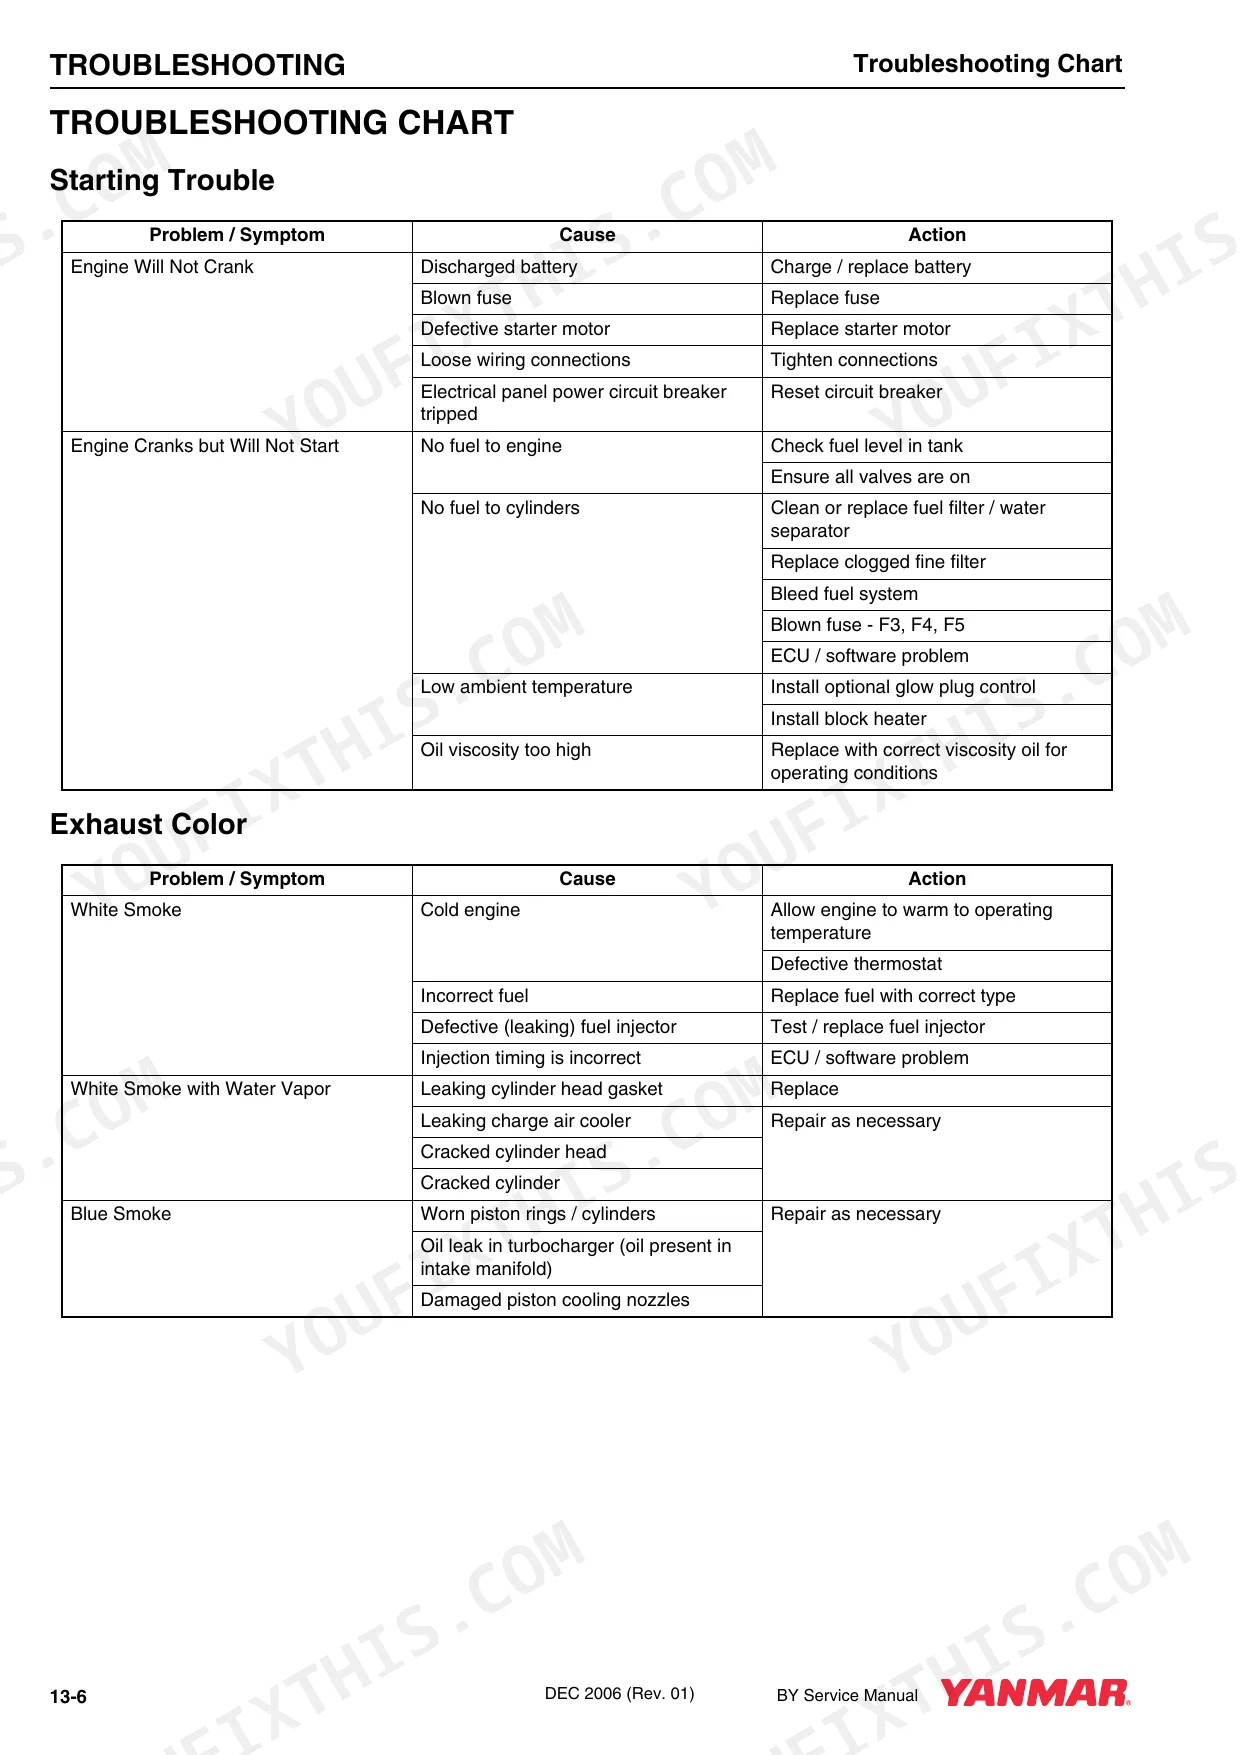
| Troubleshooting | 219-232 | Engine Faults and Torque Limitations, Troubleshooting Chart, Trouble Codes, After Troubleshooting or Repair |
Quick Reference Specifications
| Specification | Value | Page |
|---|---|---|
| Cylinder Head Bolts Torque - First | 80 N·m (59 ft-lb) | p. 54 |
| Cylinder Head Bolts Torque - Second | Loosen all bolts at least 180° | p. 54 |
| Fuel Fine Filter Replacement Interval | Every 250 hours or one year, whichever comes first | p. 39 |
| Fuel Filter / Water Separator Element Replacement Interval | Every 250 hours or one year, whichever comes first | p. 39 |
| Fuel Supply Line Minimum Diameter | 8 mm (0.315 in.) | p. 21 |
| High-Pressure Fuel Line Union Nut Torque | 23 N·m (204 in.-lb) | p. 120 |
| Rubberized Hoses (Fuel and Water) Replacement Interval | Every 500 hours or 2 years, whichever comes first | p. 41 |
| Hose Clamps Torque - 5 mm Hex Head | 1.0 - 1.5 N·m (8.9 - 13 in.-lb) | p. 31 |
| Seawater Pump Impeller Replacement Interval | Every 250 hours or one year, whichever comes first | p. 40 |
| Seawater Pump Belt Replacement Interval | Every 250 hours or one year, whichever comes first | p. 40 |
| Air Filter Element Replacement Interval | Every 500 hours or 2 years, whichever comes first | p. 40 |
| Zinc Anode Torque | 25 N·m (18 ft-lb) | p. 142 |
Yanmar 4BY, 6BY Common Problems This Manual Covers
Yanmar BY series engine cranks but will not start after fuel filter change or fuel starvation p. 120
Check the fuel feed pump pressure during cranking on page 120. Verify the pressure reaches a minimum of 5.0 bar (73 psi). Bleed the fuel system completely without engaging the starter motor. Replace the fuel fine filter every 250 hours or one year to prevent future restrictions.
Manual Section: Fuel System Tests and RepairOverheating, coolant loss, or repeated high-temperature alarms triggering immediate shutdown during normal operation p. 40
Inspect the seawater pump impeller and replace it every 250 hours or one year according to the schedule on page 40. Measure the LLC concentration and verify it remains between a minimum of 30% to a maximum of 60%. Check all cooling hoses for salt leaks.
Manual Section: Periodic Maintenance Schedules and ProceduresExhaust-water leaks, saltwater intrusion, or heavy corrosion around the mixing elbow and related cooling hoses p. 41
Remove and inspect the mixing elbow for severe corrosion. Replace the zinc anodes if they have less than half their original size remaining as shown on page 41. Torque the new zinc anodes to 25 N·m (18 ft-lb) during installation to prevent saltwater intrusion into the engine.
Manual Section: Cooling System Tests and RepairStarter motor damage or repeated no-crank conditions after attempted fuel system bleeding or priming procedures p. 182
Test the starter motor functionality using the diagnostic procedures on page 182. Verify the starter nominal power output reaches 2.0 kW. Never use the starter to prime dry fuel lines. Inspect the starting circuit wiring and confirm the battery holds sufficient charge under load before replacing components.
Manual Section: Starter Motor Troubleshooting and RepairFrequently Asked Questions
How do I reset the alarm on a Yanmar 4BY/6BY?
The manual indicates that after troubleshooting or repair, you should check and clear any trouble codes that are registered in the Engine Control Unit (ECU). This action is implied to clear associated alarms, though a direct 'reset alarm' procedure is not explicitly detailed. For example, after replacing the ECU, you must "Check and delete any trouble codes that are registered in the ECU after the work has been completed." as stated on page 212.
What do Yanmar 4BY/6BY error codes mean?
Yanmar 4BY/6BY error codes, also referred to as Diagnostic Trouble Codes (P-codes), indicate specific system failures or out-of-normal range signals detected by the ECU. For example, P0088 signifies 'Fuel Rail Pressure System Deviation' where the 'Fuel rail pressure out of range' can cause the engine to reduce or shut off, as detailed in the 'Trouble Codes' section starting on page 228.
How do I clear fault codes on a Yanmar 6BY?
To clear fault codes on a Yanmar 6BY, you need to check and delete any trouble codes that are registered in the Engine Control Unit (ECU) after completing any repairs. This process is mentioned as a final step in many repair procedures, such as after replacing the Fuel Volume Regulator, where it states to "Check and delete any trouble codes that are registered in the ECU after the work has been completed." on page 217. The manual implies the use of a diagnostic tester for this action.
What is the torque spec for the Yanmar 4BY/6BY cylinder head bolts?
The cylinder head bolts for both 4BY and 6BY engines require a specific torque-turn sequence. The initial torque is 80 N·m (59 ft-lb), followed by loosening all bolts 180°, then a second torque of 50 N·m (37 ft-lb), and finally two additional 90° turns. New bolts must always be used and should not be washed off their coating, as specified in the 'Cylinder Head Torque Specification' table on page 74.
How quickly can I access this manual after buying?
A 232-page Service Manual in searchable PDF format, available the moment you complete checkout. View on computer, tablet, or phone, with no shipping wait.
Are there any print restrictions on this manual?
The PDF is DRM-free. Print whatever sections you need to take out to the shop. Standard letter or A4 paper works.
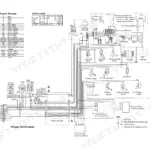
Are electrical wiring diagrams included in this Yanmar 4BY, 6BY, BY series?
Yes, this Yanmar 4BY, 6BY, BY series Service Manual includes complete electrical wiring diagrams, wire routing, and connector pinouts.
Reviews
There are no reviews yet.