


![New Holland D150 Repair Manual [Crawler Dozer]](https://youfixthis.com/wp-content/uploads/2012/02/Manual_Download-300x300.jpg)
Part of the New Holland Repair Manuals.
Factory repair coverage for every system on your disc mower-conditioner fills these 234 pages (OEM #40143110). Wiring schematics and hydraulic diagrams map the full electrical circuit and cylinder routing. Step-by-step procedures walk through drivelines, slip clutch tear-down, three gearbox rebuilds, full cutter bar disassembly, conditioner roll replacement, and all four hydraulic cylinders: master, slave, tilt, and tongue swing. Torque the cutter bar mounting bolts to 250 ft. lbs. (339 N·m) and set conditioner roll gap between 1/64" and 1/8" before every season. Reference figures run from the 13'3" cutting width to the 3000 RPM disc speed, cited where the procedures call for them. When your mower goes down at the worst time of year, pull this up on your tablet, walk to the machine, and start wrenching. Bookmarked by section and keyword-searchable throughout.
What's Inside This New Holland 1431 Manual
| System | Pages | Key Topics |
|---|---|---|
| Safety | 5-8 | - |
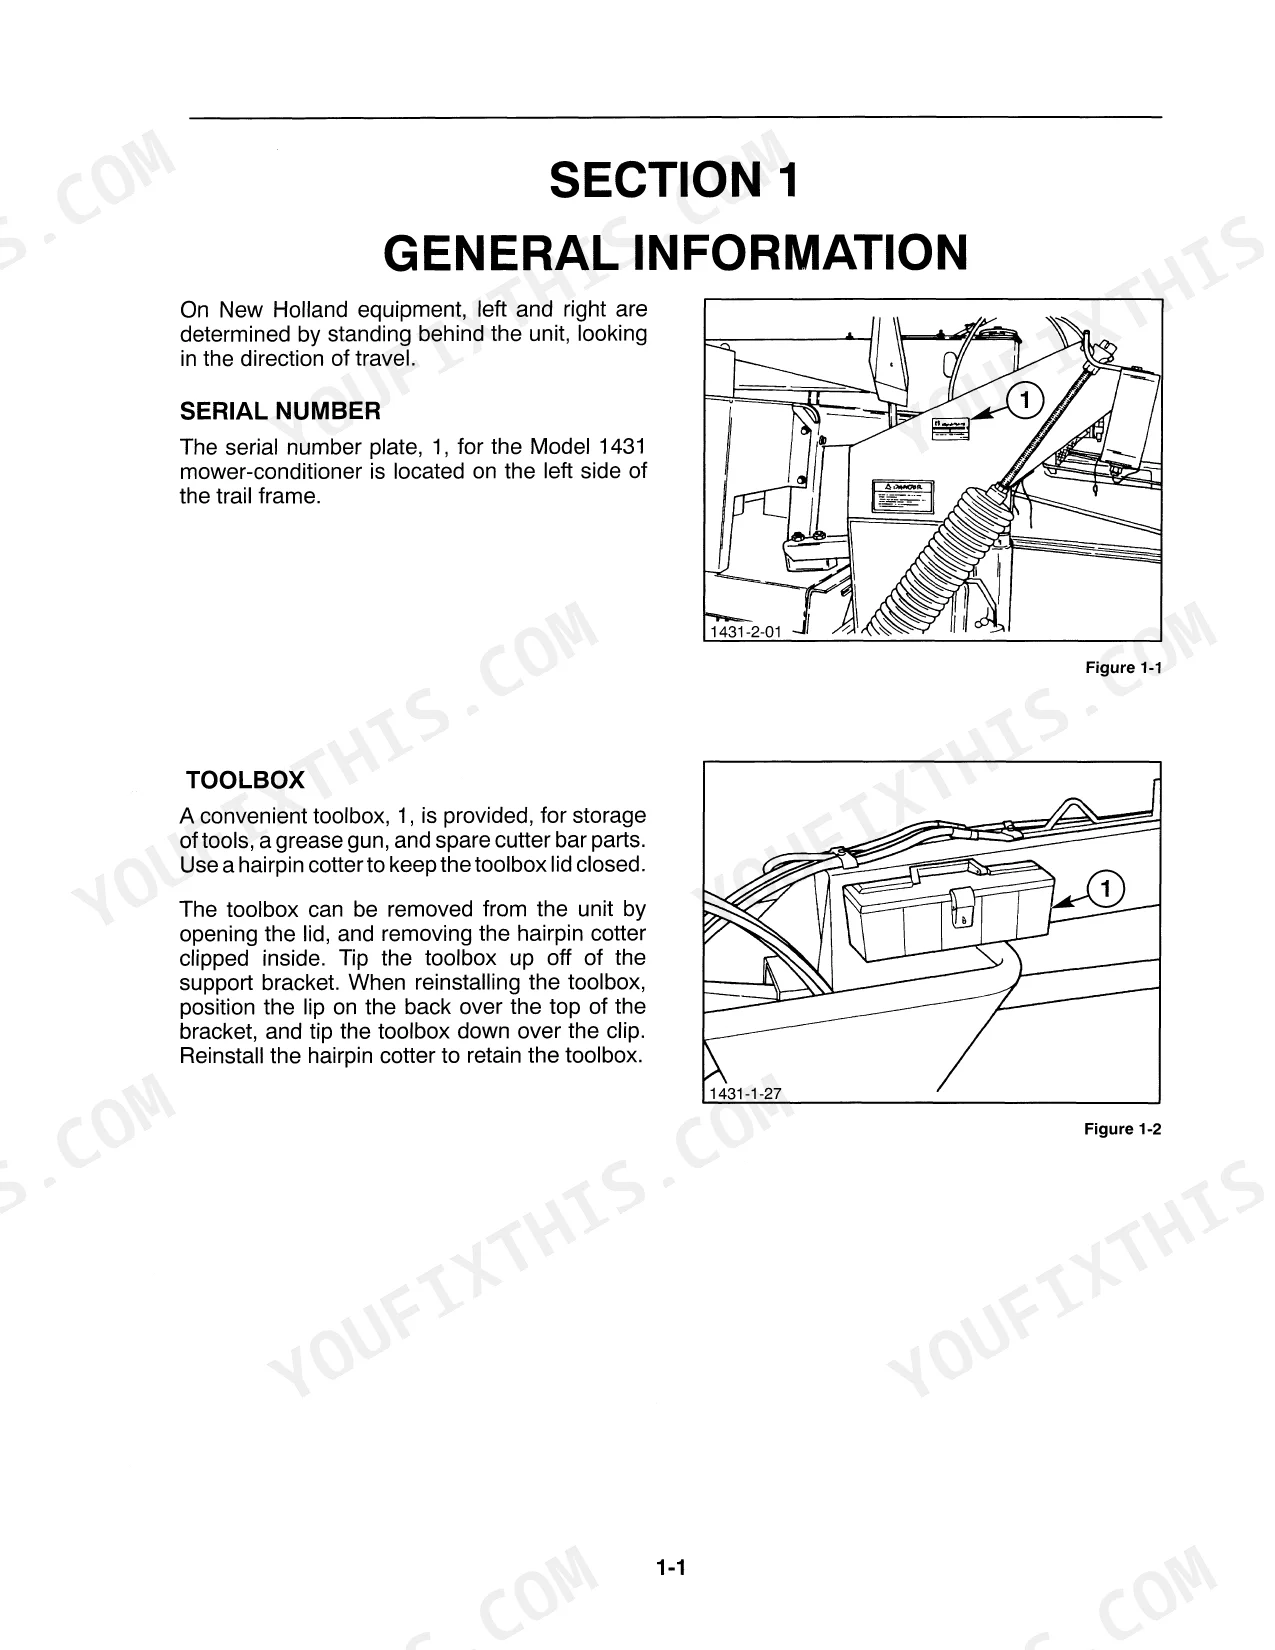
| General Information | 9-26 | Serial Number, Toolbox, Shielding, Tractor Requirements, Tractor Drawbar Dimensions, Option 1, Option 2, Bumper Extensions |
| Adjustments | 27-36 | Swathing, Windrowing, Conditioning (Roll Pressure), Unplugging the Conditioner Rolls, Roll Gap, Roll Timing, Conditioner Belt, Cutter Bar Flotation |
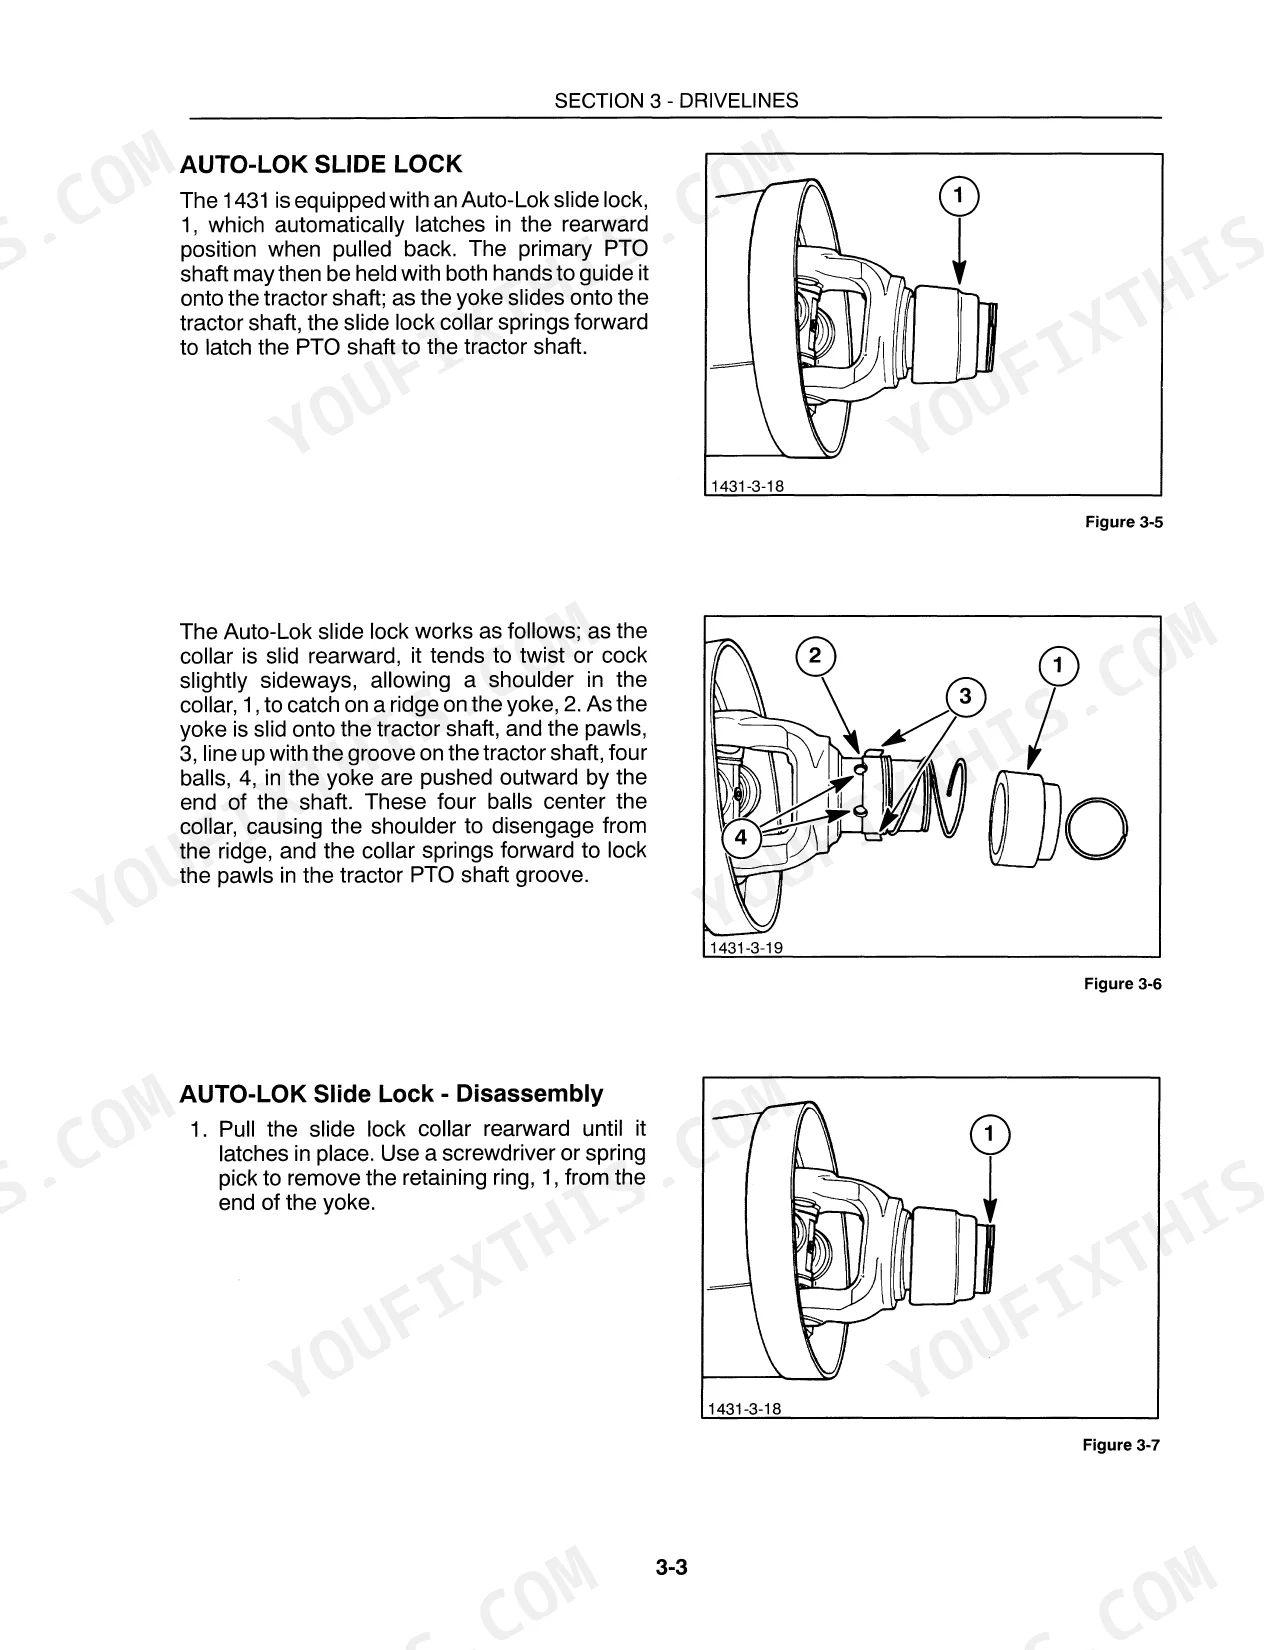
| Drivelines | 37-56 | Introduction, Auto-Lok Slide Lock, Auto-Lok Slide Lock - Disassembly, Auto-Lok Slide Lock - Assembly, Drive Shaft Removal and Installation, Standard Driveline Guards - Disassembly, Primary Driveline Guards - Disassembly, Driveline Guards - Inspection |
| Slip Clutch | 57-68 | Introduction, Slip Clutch - Run-In, Slip Clutch - Wear Inspection, Slip Clutch - Removal, Slip Clutch - Disassembly, Slip Clutch - Inspection, Slip Clutch - Reassembly, Overrunning Clutch - Disassembly |
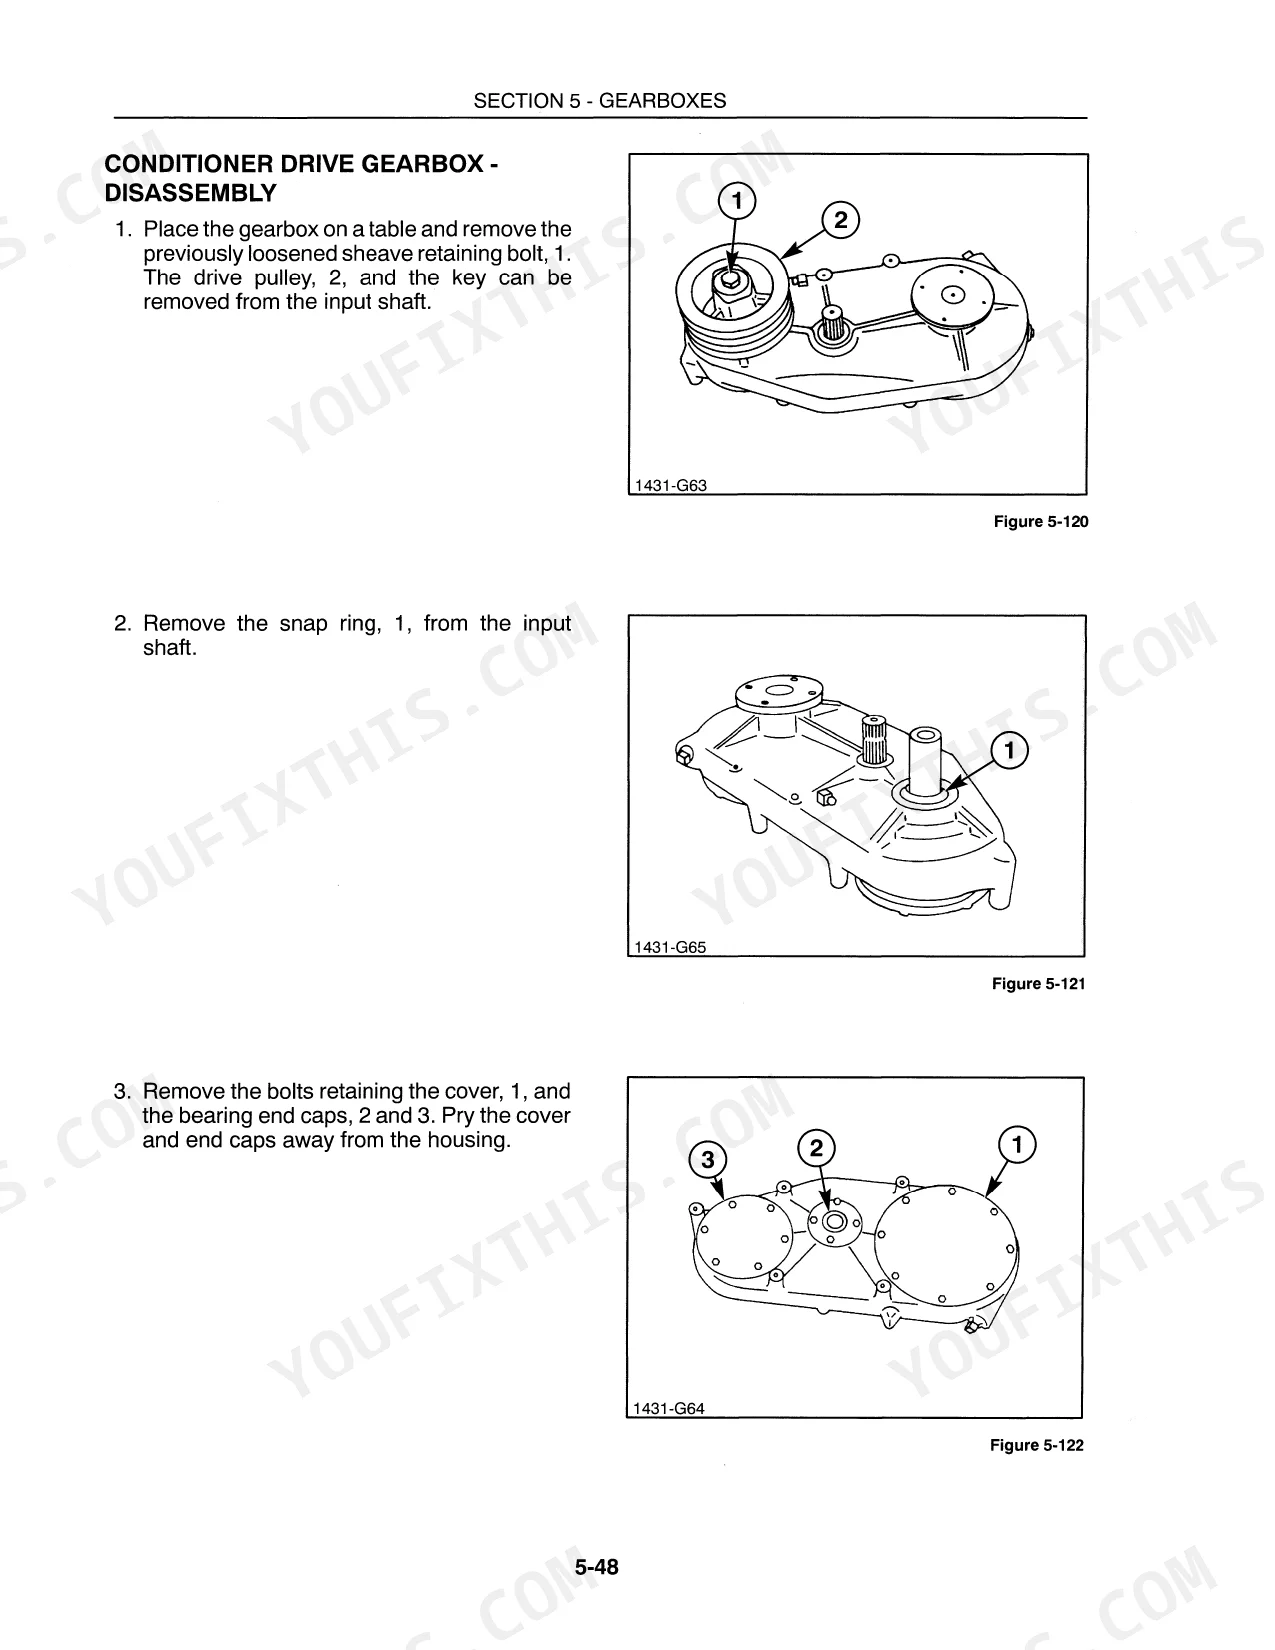
| Gearbox | 69-124 | Introduction, Header Drive Belt Replacement, Right Side Drive Belt, Left Pedestal Shaft - Disassembly, Left Pedestal Shaft - Assembly, Center Pivoting Gearbox - Removal, Center Pivoting Gearbox - Disassembly, Parts Identification |
| Cutter Bar | 125-160 | Type, No. of Discs, Knives per Disc, Disc Cutting Diameter, Disc Drive, Disc Speed, Cutting Height, Cutter Bar Angle |
| Conditioner Rolls and Drive | 161-186 | Introduction, Conditioner Belt Adjustment, Conditioner Belt Replacement, Conditioner Roll Drive Shaft - Removal, Conditioner Roll Drive Shaft - Disassembly |
| Hydraulic Cylinders | 187-204 | Introduction, Hydraulic Diagram, Bleeding Air From the Lift Cylinders, Lift Cylinder Removal, Master Cylinder - Disassembly, Master Cylinder - Inspection, Master Cylinder - Assembly, Slave Cylinder - Disassembly |
| Electrical System | 205-220 | Introduction, Wiring Schematic, Trailer Connector Repair, Grease Fittings, Gearboxes, PTO Slide Collar, Primary PTO, Front 80° Cv Joint |
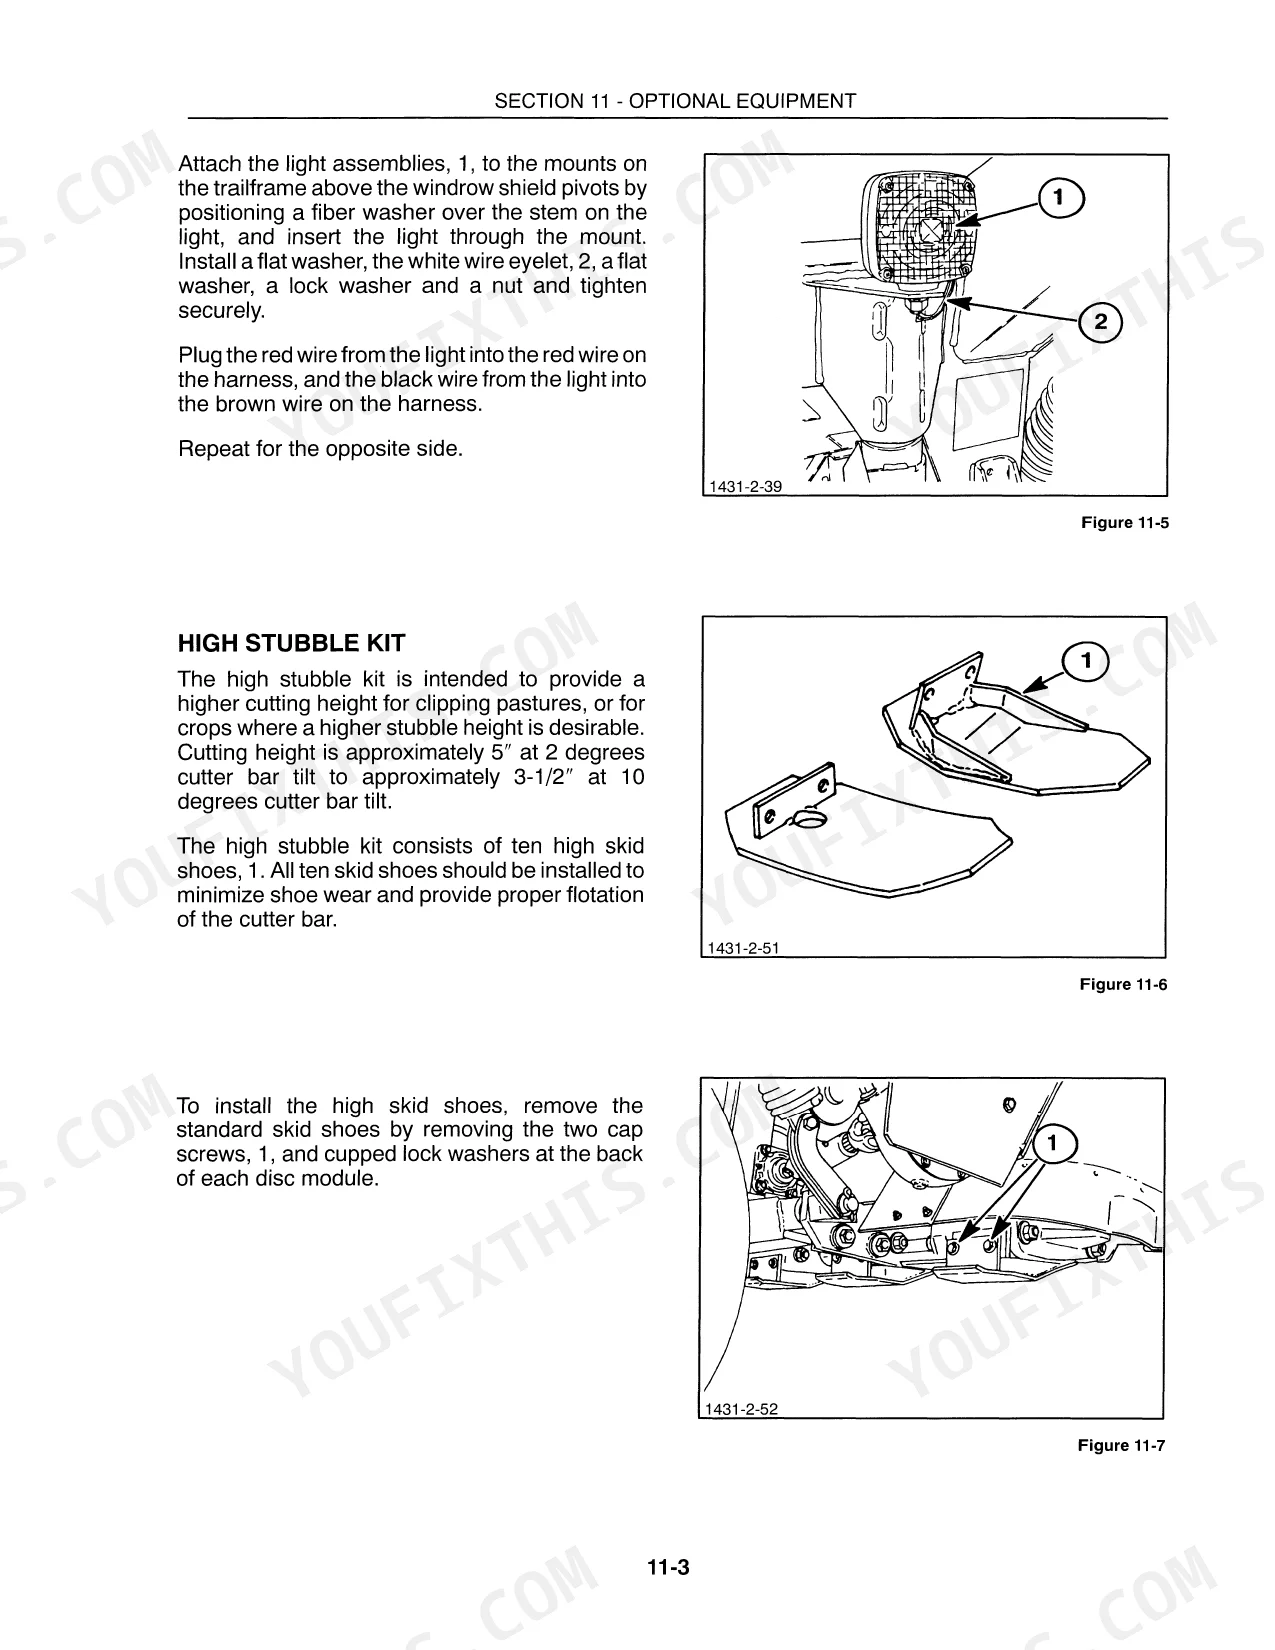
| Optional Equipment | 221-223 | Safety Chain, Bumper Extensions, Trailing Light Kit, High Stubble Kit |
| Troubleshooting | 224-228 | Crop Conditioning, Knife Performance, Cutter Bar Flotation, Windrow Formation, Material Flow, PTO Speed |
| Specifications | 229-230 | Overall Dimensions, Driveline, Header, Cutter Bar, Conditioner, Performance |
Quick Reference Specifications
| Specification | Value | Page |
|---|---|---|
| Cutter bar tie bolts torque | 50 ft. lbs. | p. 154 |
| Gear set backlash within module | 0.005" to 0.011" | p. 147 |
| Cutter bar mounting bolts torque | 250 ft. lbs. (339 N·m) | p. 157 |
| Center Pivoting Gearbox oil capacity | 68 oz. (2000 ml) | p. 159 |
| Conditioner roll gap | 1/64" to 1/8" | p. 32 |
| Conditioner belt tension spring length | 11" (279 mm) | p. 33 |
| Output shaft end play | 0 - 0.002" (0 - 0.05 mm) | p. 155 |
| Center Pivoting Gearbox oil type | API GL5 80W90 gear oil | p. 159 |
| Overall Width | 13'3" (4000 mm) | p. 229 |
| Weight | 5600 lbs. (2557 kg) | p. 229 |
| Tractor PTO HP Requirement | 90 HP (67 KW) or greater | p. 229 |
| Hydraulic Pressure Capability | 1500 PSI (104 bar) | p. 229 |
New Holland 1431 Common Problems This Manual Covers
Intermodule drive shafts twist off or break during heavy cutting conditions
Remove the damaged shaft and inspect both end yokes for twisted splines or bent tubes. Adjust gear set backlash at each module as shown on page 147. Follow the Auto-Lok slide lock reinstallation steps on page 39. Verify all module mounting bolts are tight before re-engaging the PTO at 1000 RPM.
Manual Section: Drivelines Repair p. 39Module bearing fails after insufficient lubrication, upper cutter bar components run hot and seize
Inspect the upper module for heat discoloration, rough bearing rotation, or visible axial play before pulling the assembly. Measure output shaft end play; anything beyond 0.002" (0.05 mm) per the spec on page 155 means the bearing must be replaced. Repack all grease fittings after assembly. Dry bearings at 3000 RPM disc speed fail quickly and expensively.
Manual Section: Cutter Bar Repair p. 155Cutterbar pivots, wobbles, or shifts side-to-side at the head attachment points during operation
Lift the header and check every greasable pin and bushing at the cutterbar attachment points for side-to-side play. Torque the cutterbar mounting bolts to 250 ft. lbs. (339 N·m) as specified on page 157, then torque the tie bolts to 50 ft. lbs. shown on page 154. Replace any bushing with visible oval wear before it damages the surrounding castings.
Manual Section: Cutter Bar Repair p. 157Conditioner rolls leave stems uncrushed or cause leaf damage and uneven field drying
Adjust the roll gap at both ends to 1/64" to 1/8" as shown on page 27. Verify conditioner belt tension; the spring should measure 11" (279 mm) when loaded correctly (page 33). If leaf damage or uneven drying persists after adjustment, consult the conditioning entries in the Troubleshooting guide on page 225.
Manual Section: Adjustments p. 32Gearbox leaks oil, runs hot, or metal debris found in drained fluid at service
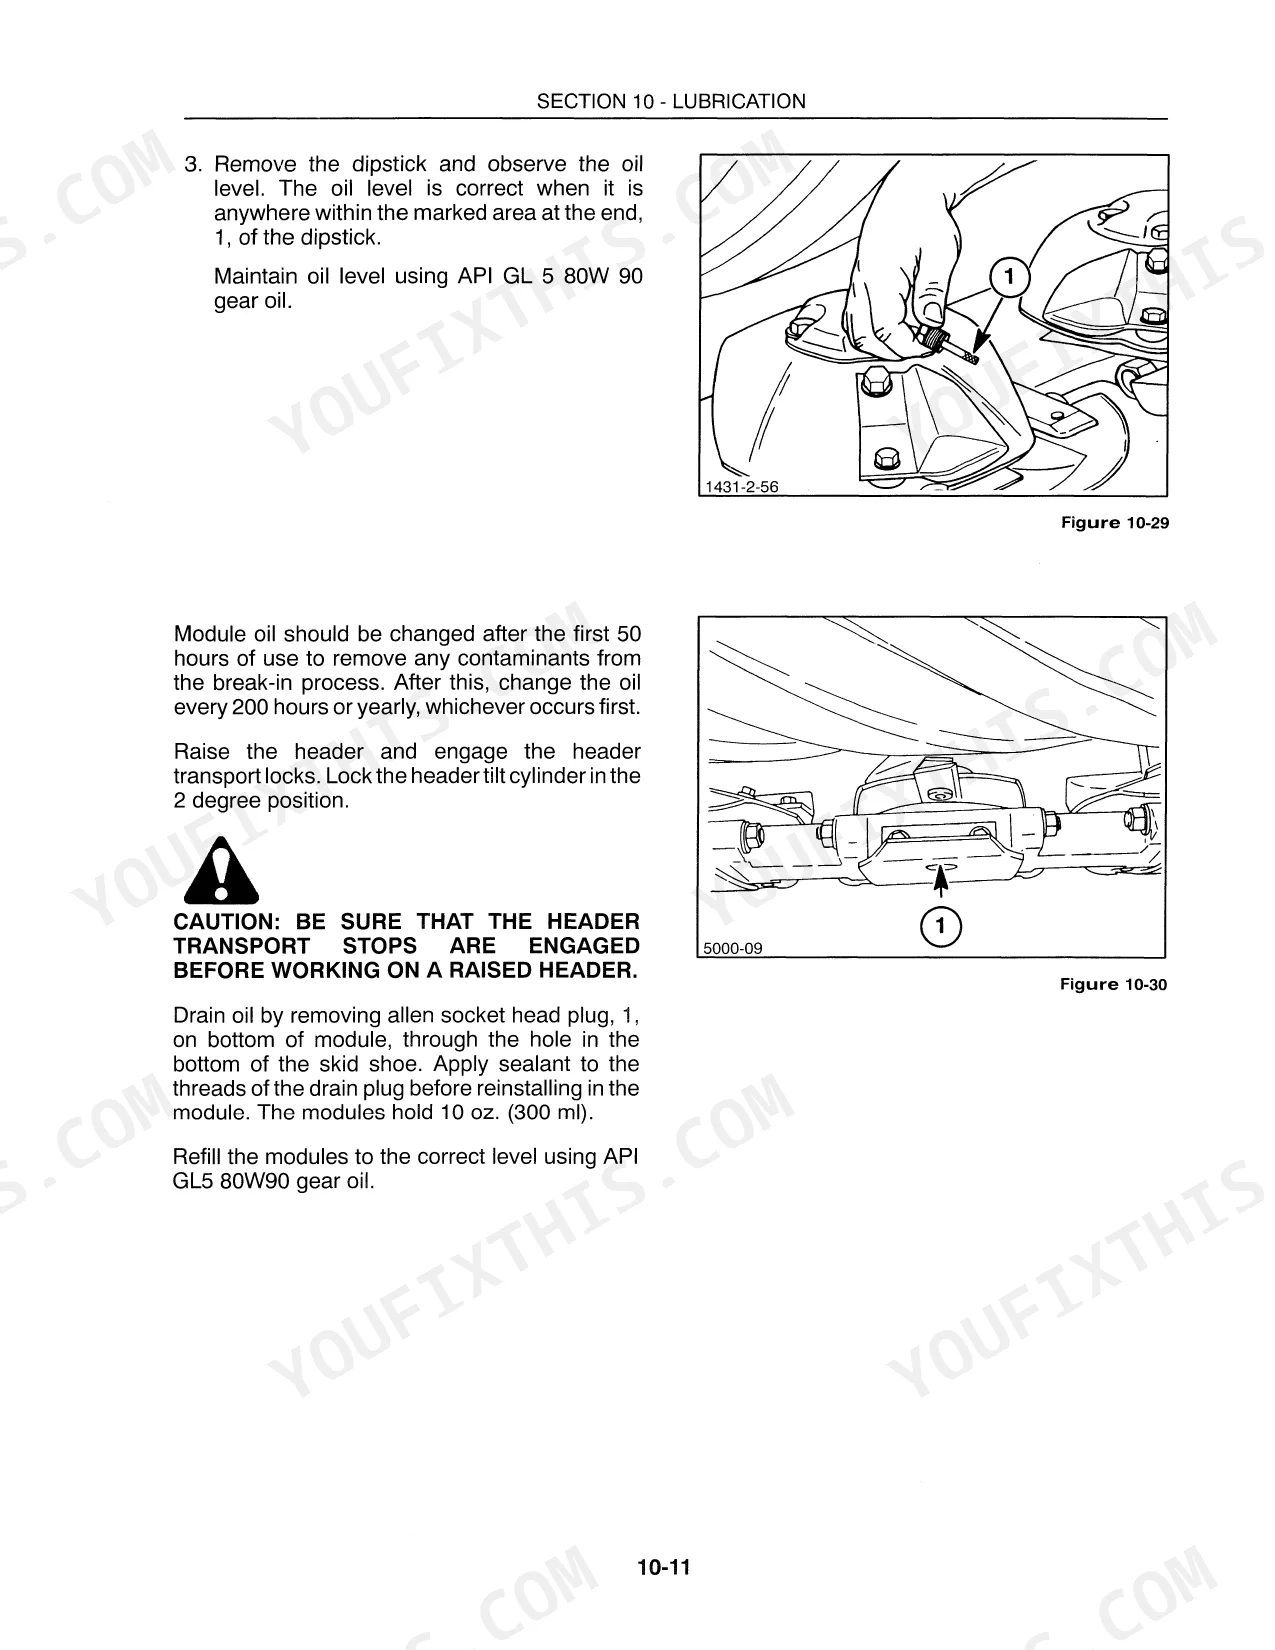
Drain and inspect the center pivoting gearbox for metal particles, discolored oil, or milky fluid indicating water intrusion. Refill with API GL5 80W90 gear oil to the 68 oz. (2000 ml) capacity shown on page 159. Check all seals for weeping and verify fill plug torque against the torque chart before returning to service.
Manual Section: Gearboxes Repair p. 159Frequently Asked Questions
How do I reset the New Holland 1431 discbine?
Reset or run-in the clutch by operating the tractor at 1/3 throttle and engaging the PTO for several seconds until the slip clutch visibly smokes. Disengage the PTO and shut the tractor off. If the clutch does not slip, it must be disassembled to unlock the friction discs, per the "SLIP CLUTCH - RUN-IN" procedure on page 61. p. 61
How do I bleed or prime the hydraulic system on a New Holland 1431?
Start by loosening the hose swivel fitting, 1, at the upper end of the slave cylinder. Hold the tractor valve in the lower position for 10 to 15 seconds to release air. Repeat if the cylinders do not extend far enough to clear all air, per the "BLEEDING AIR FROM THE LIFT CYLINDERS" section on page 190. p. 190
What causes the New Holland 1431 to stop cutting or plug up?
Plugging or poor cutting usually traces to crowding of uncut material, missing or dull knives, or buildup on the cutter bar. Knives can also break from cutting too low in stony ground, and soil packs onto the bar in very wet crops, as outlined in the "TROUBLESHOOTING" section on pages 225-226. p. 225
How do I adjust the cutterbar on a New Holland 1431?
Adjust cutter bar flotation with the flotation springs, 1, at each end of the header. Cutting height changes with header angle, set through the hydraulic tilt cylinder, 1. For a 6-degree tilt, run the pin through the plate slots and the front rod hole, 1; for a 10-degree tilt, store the pin in the lower plate holes, 1, per "SECTION 2 - ADJUSTMENTS" on pages 33-36. p. 33
How quickly can I access this manual after buying?
This 234-page searchable PDF is ready to download the moment you buy. It works on any device, so you can pull it up on your phone while you're under the hood. No shipping, no waiting.
Are there any print restrictions on this manual?
Yes, print as many copies as you want; there are no restrictions. Plenty of mechanics print only the section they need and carry it to the shop floor.
Does this New Holland 1431 manual include wiring diagrams?
Yes. Full electrical schematics are included, with wire colors, connector locations, and circuit descriptions.