


Part of the New Holland Repair Manuals.
Need factory rebuild specs for a New Holland BR7060 or BR7070 round baler? OEM #84275654 runs 977 pages and covers every system, from PTO driveline and brakes through belt pressing, net wrapping, and ejection. You'll find hydraulic schematics for the tailgate lift and belt tension circuits, full wiring diagrams for the Bale Command Plus™ and AutoWrap™ systems, and troubleshooting across hydraulics, pressing, and electrical faults. Bale Command Plus™ error code tables, operator panel calibration steps, and a belt failure analysis chapter on lacing, tracking, and slippage are all here. Set the net wrapper knife spring to 289-295 mm and torque the reel bearing to 61 N·m (45 lb ft). Your baler is down. Get the right numbers, not forum guesses. It's bookmarked by section, so pull it up on your phone, search by keyword, and get back to work.
What's Inside This New Holland BR7060, BR7070 Manual
| System | Pages | Key Topics |
|---|---|---|
| General Information | 2-37 | Introduction, Precautionary Statements, Personal Safety, Machine Safety and Information, Safety, The Round Baler, Towing the Round Baler, Operating the Round Baler |
| Implement Driveline | 38-145 | PTO Driveline, PTO Constant Velocity, Front PTO and Cv U-Joint (Disassembly, Inspection, Replacement, Assembly, Installation) |
| Brakes | 146-203 | Brake Drum, Brake Shoes and Brake Cylinder, Brake Drum (Removal, Inspection, Installation), Brake Shoes (Removal |
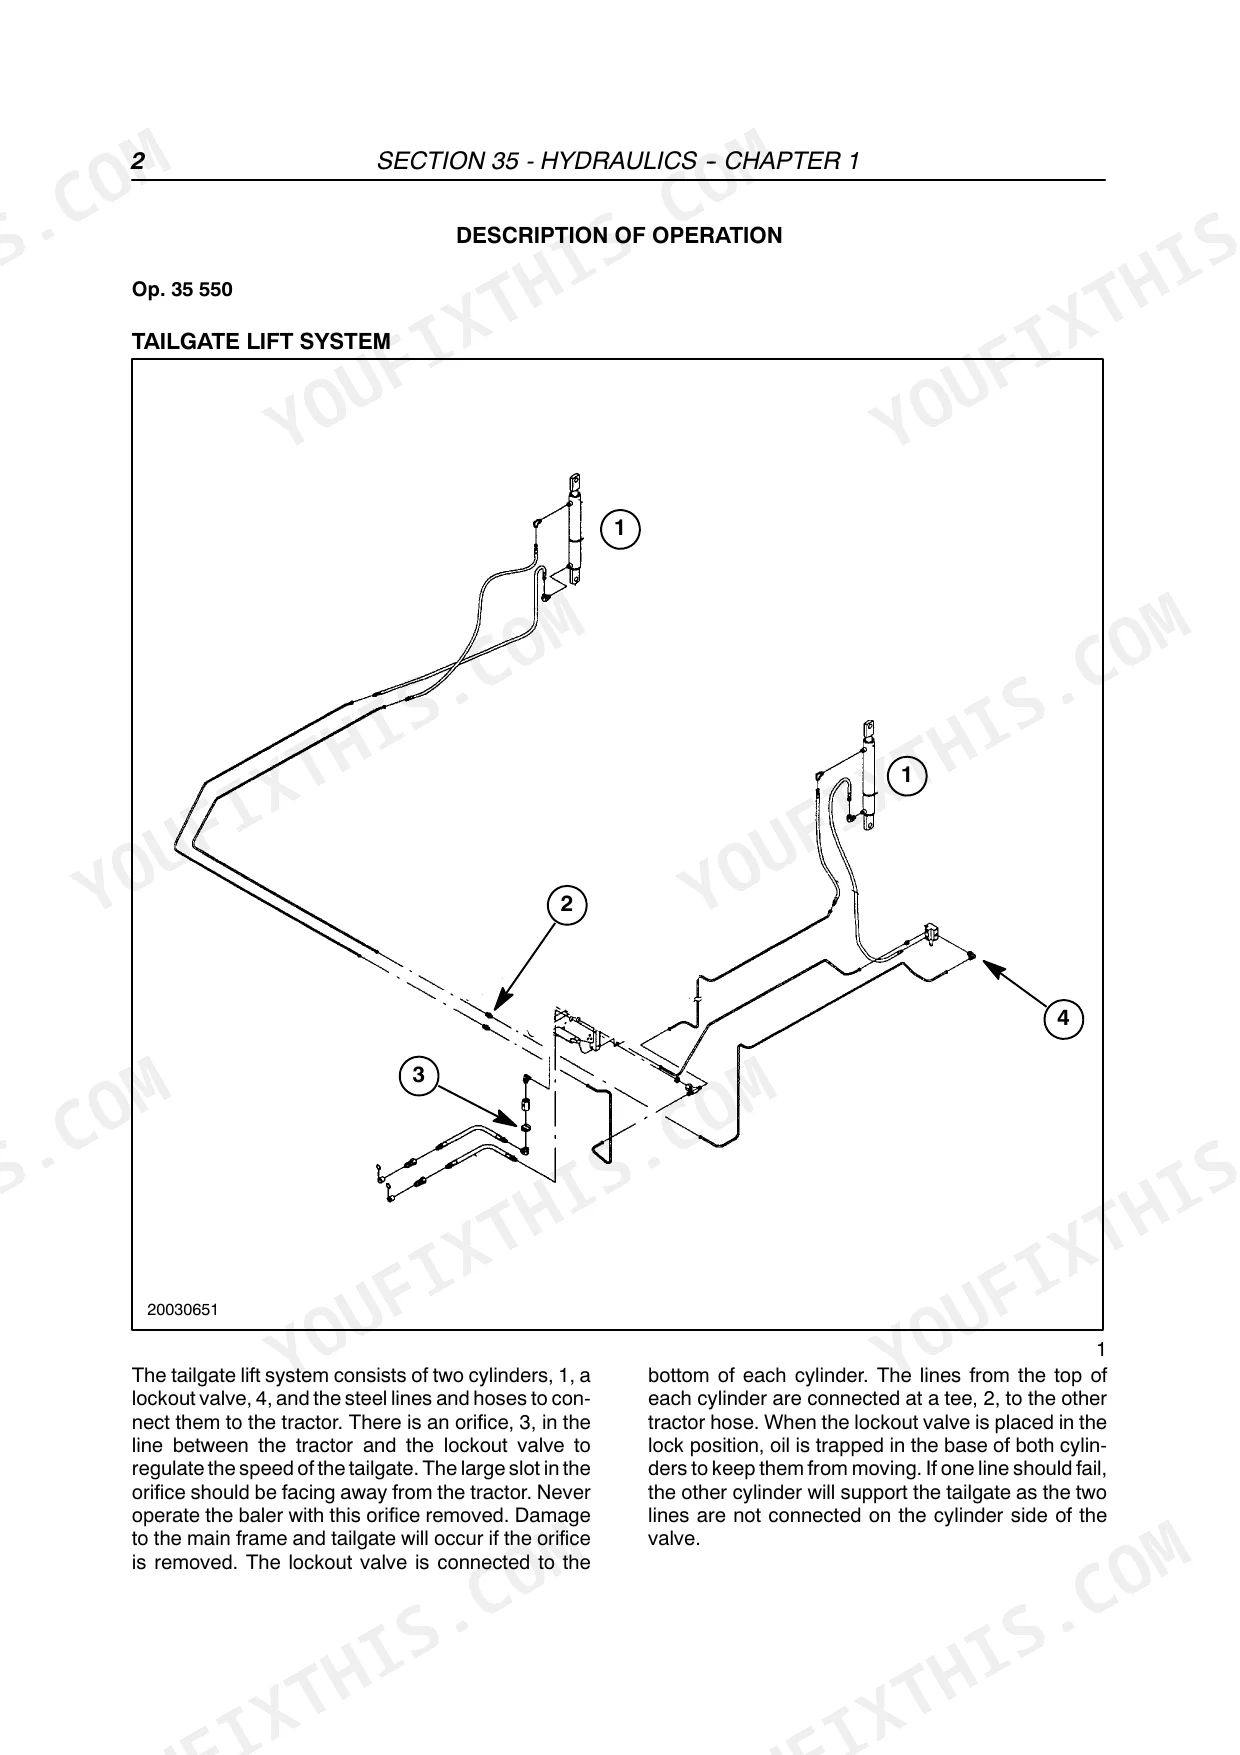
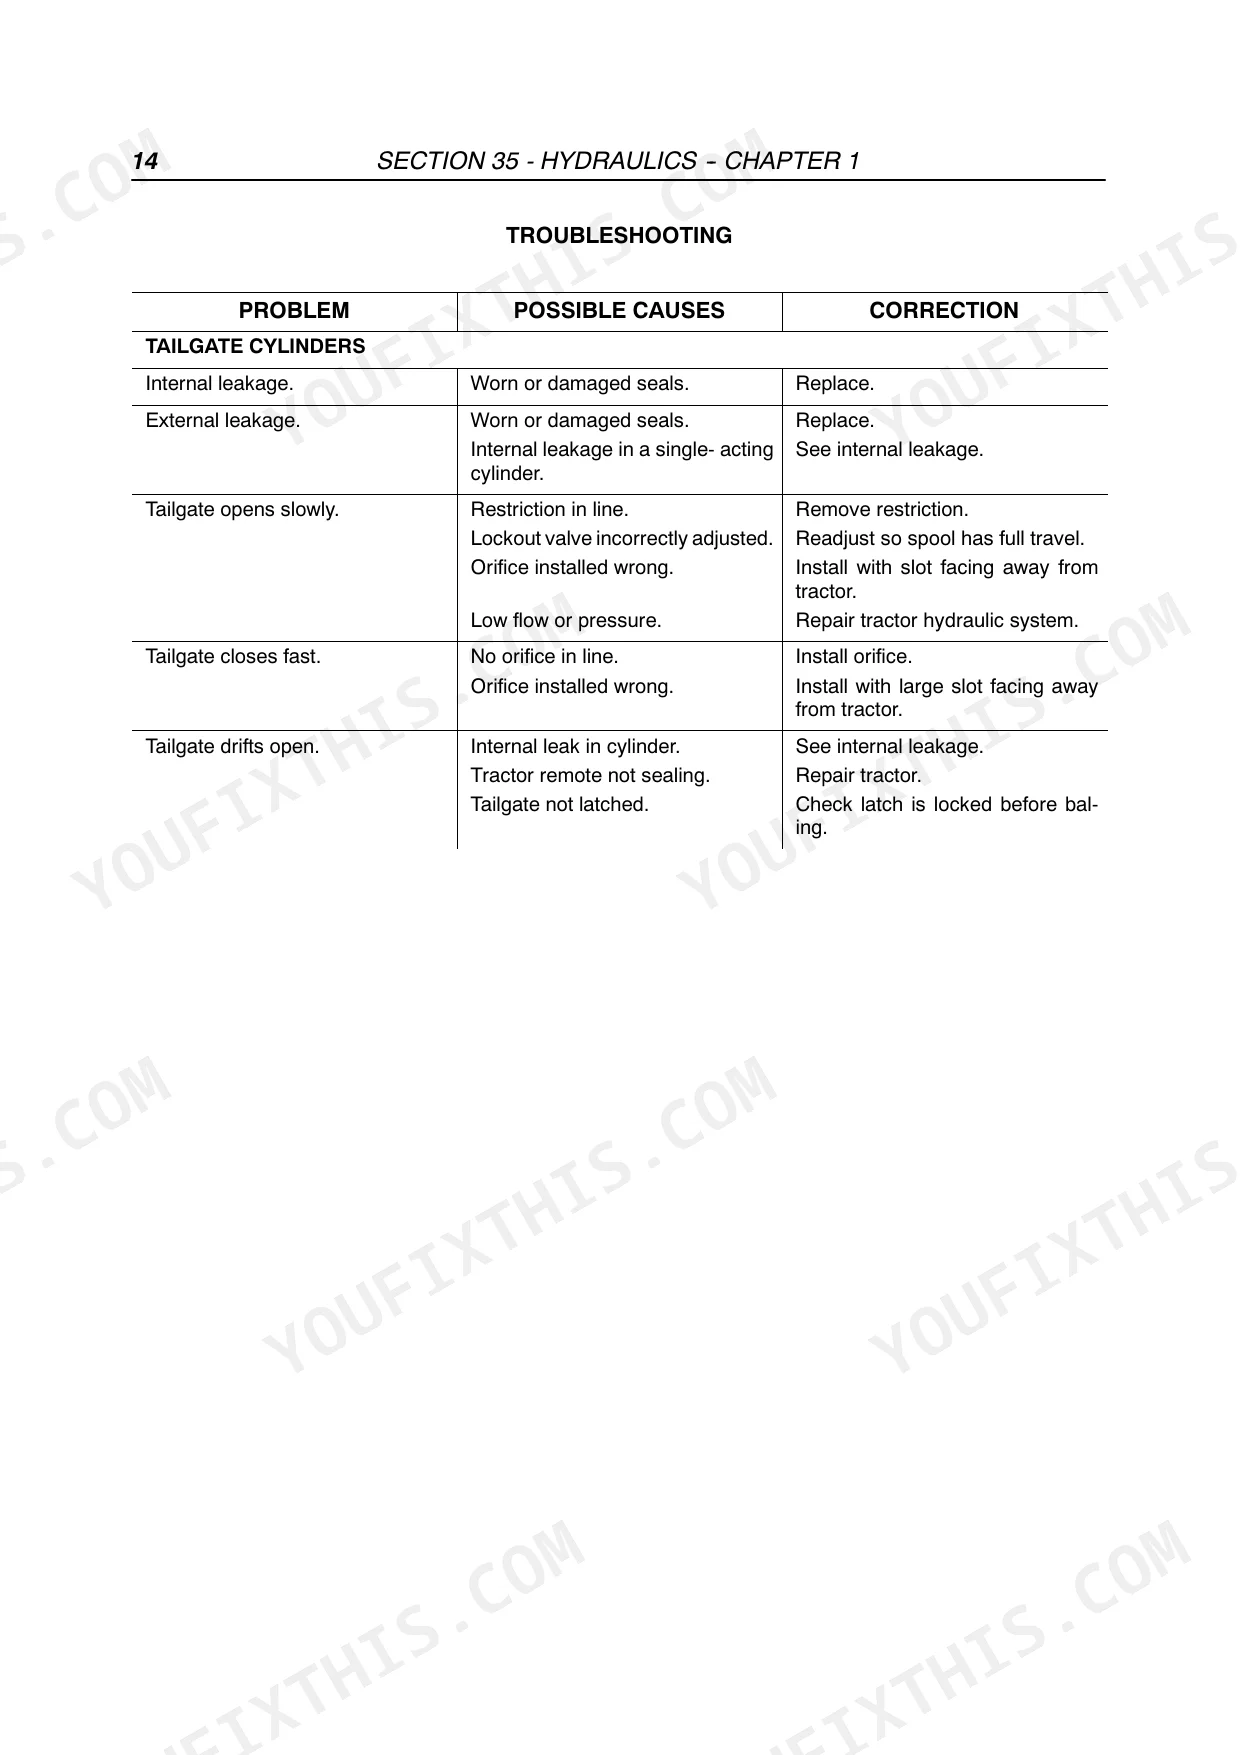
| Hydraulics | 204-263 | Tailgate Lift System, Tailgate Cylinder (Removal, Disassembly, Inspection, Assembly, Installation), Tailgate Lockout Valve (Adjustment, Testing, Replacement) |
| Frame | 264-335 | Tailgate, Tailgate Replacement (Removal, Inspection, Disassembly, Assembly, Installation), High Hitch |
| Axles and Wheels | 336-341 | Axle, Tire Pressure, Wheel Torques, Wheel Bearings |
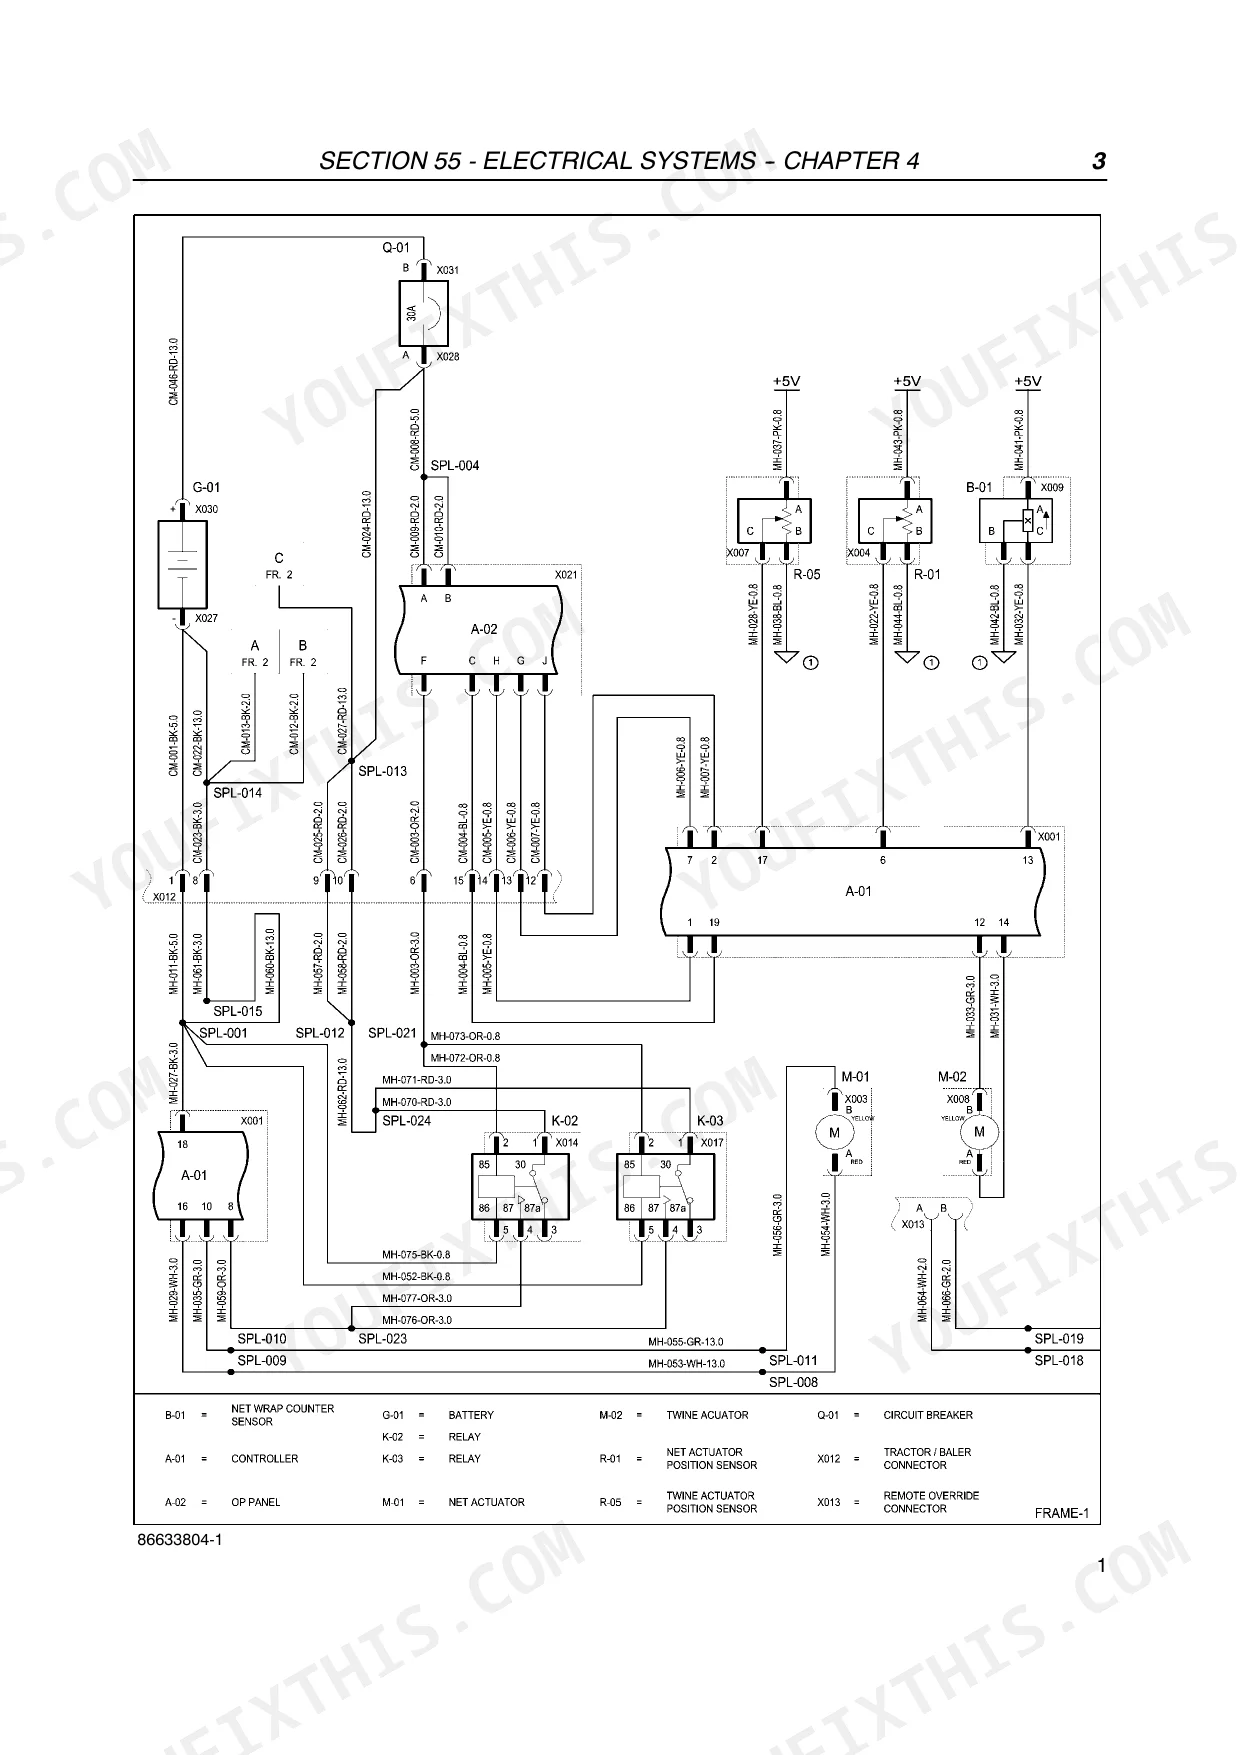
| Electrical Systems | 342-501 | Definition of Terms (Electricity, Voltage, Current, Resistance, Open Circuit, Short Circuit, Continuity, Voltage Drop, Diode, Solenoid, Relay) |
| Product Feeding | 502-663 | Wide Pickup with Stuffer - 1.8 M, Wide Pickup with Stuffer (Removal, Installation), Tines and Guards (Removal, Cam Bearing (Removal |
| Pressing | 664-847 | Take Up Arm, Belts, Laces, Belt Failure Analysis, Additional Information, Belt Tension (Removal), Endless Belt (Replacement), Belt Storage |
| Wrapping | 848-955 | Net Wrapper Mechanical System, Adjustments (Knife Spring, Knife Link, Brake Spring, Brake Link, Duckbill Spring, Duckbill Baffle, Knives) |
| Ejection | 956-959 | Description of Operation, Overhaul, Bale Ejector Components, Assembly |
| Shielding | 960-977 | Side Doors, Gas Spring, Latch, Door Stop, Net Wrapper Boxes, Twine Boxes |
Every system also includes operation and overhaul.
Quick Reference Specifications
| Specification | Value | Page |
|---|---|---|
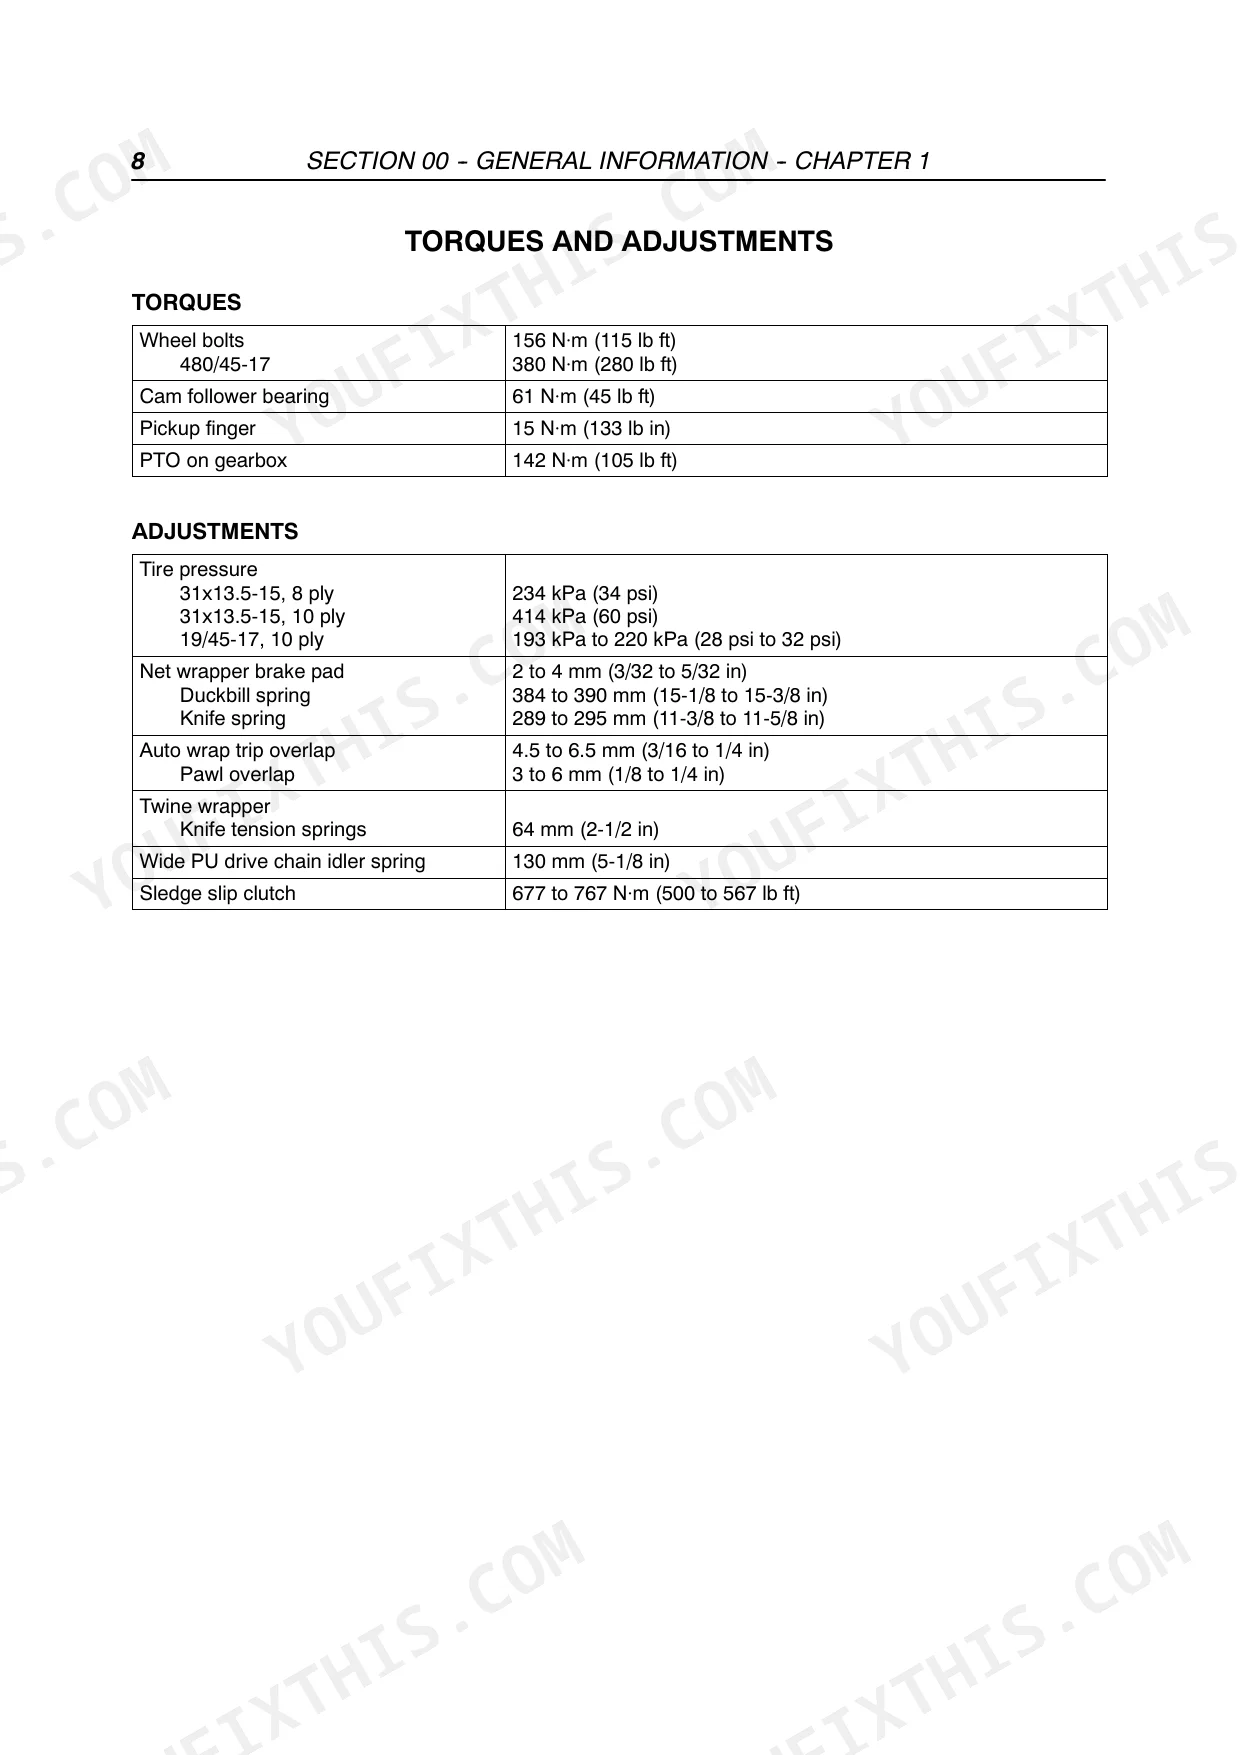
| Reel bearing torque (part of pickup) | 61 N·m (45 lb ft) | p. 522 |
| Cam follower bearing torque | 6 N·m (45 lb ft) | p. 9 |
| Follower roll bearing replacement criteria | Replace if inner bore indicates cast housing has spun | p. 827 |
| Knife spring length setting | 289 to 295 mm (11-3/8 to 11-5/8 in) | p. 856 |
| Knife replacement criteria | Sharpen if cut edge of net starts to get ragged | p. 859 |
| Pickup finger torque | 15 N·m (133 lb in) | p. 9 |
| Wheel bolts torque | 156 N·m (115 lb ft) | p. 9 |
| PTO on gearbox torque | 142 N·m (105 lb ft) | p. 9 |
| Tire pressure 31x13.5-15, 10 ply | 414 kPa (60 psi) | p. 9 |
| Net wrapper brake pad clearance | 2 to 4 mm (3/32 to 5/32 in) | p. 9 |
| Minimum Hardware Tightening Torque M10, Class 10.9, Plated W/ZnCr | 79 N-m (58 lb ft) | p. 11 |
| Hydraulic Tube Fitting Torque 1/8 inch - 27 | 13 N-m (10 lb ft) | p. 16 |
New Holland BR7060, BR7070 Common Problems This Manual Covers
New Holland BR7060 pickup bearing running hot or making grinding noise after high bale count
Inspect the follower roll and stripper roll bearings in the pressing section. Replace the follower roll bearing if the inner bore shows the cast housing has spun (page 827); replace the stripper roll bearing if rotation is rough or the seals have failed (page 828). For pickup reel bearings, torque replacements to 61 N·m (45 lb ft) per page 522.
Manual Section: Pressing p. 827Bale Command Plus warning light flashes, knives do not reach full extend or retract position
Enter Bale Command Plus diagnostic mode and run the twine wrap actuator potentiometer adjustment. Verify the knife position sensor confirms the full-extend and full-retract end stops. If the sensor reads out of range, check the actuator linkage and adjust the knife spring length to 289 to 295 mm (11-3/8 to 11-5/8 in).
Manual Section: Electrical Error Codes TroubleshootingTailgate opens slowly during bale ejection or drifts open while baling
Work through the tailgate cylinder troubleshooting for slow-open and drift-open conditions. Inspect the tailgate lockout valve for internal bypass and confirm its adjustment. Verify hydraulic tube fitting torques at 13 N·m (10 lb ft) for 1/8-27 fittings. If the cylinder keeps drifting, disassemble and inspect the seals per the Hydraulics section starting on page 204.
Manual Section: Tailgate Cylinders TroubleshootingPressing belts slipping or showing cracks, fraying, and premature lace wear
Examine every belt for cracking, fraying, and lace wear using the Belt Failure Analysis guide starting on page 664. Replace any belt showing exposed cords or torn laces. Store replacement belts flat, away from heat and UV. Torque all M10 class 10.9 hardware to a minimum of 79 N·m (58 lb ft) during reassembly.
Manual Section: Pressing p. 664Density cylinder pressure drops during baling or cannot reach maximum bale density setting
Run through the density cylinder troubleshooting sequence. Confirm pressure drops to 0 when the bale is ejected; if it does not, suspect internal leakage or a stuck valve. Check for missing or reversed orifices per the hydraulic troubleshooting. Inspect all line connections and torque 1/8-27 tube fittings to 13 N·m (10 lb ft).
Manual Section: Density Cylinders TroubleshootingPTO driveline vibrating excessively or CV U-joint clicking loudly during field operation
Trace the CV U-joint and front PTO driveline for worn or damaged components per the Implement Driveline section starting on page 38. Study the exploded parts view to spot worn cups or bearing kits needing replacement. Confirm the PTO on the gearbox is torqued to 142 N·m (105 lb ft) and PTO speed matches 540 RPM.
Manual Section: Implement Driveline p. 38Frequently Asked Questions
Why does my BR7060 stop when the bale is full but not wrap or count bales?
A full bale that won't wrap or count usually points to a fault in the Net Bale Wrap System. When the WRAP BALE pointer, 2, flashes, one circuit (the net actuator position potentiometer, wrap counter sensor, or net actuator) has sat out of home or pre-cut position for 10 seconds or more, which triggers the ERROR message and alarm. Check the wrap counter sensor for a 1.5 mm (1/16 in) gap between the sensor and the magnet.
How do I reset Bale Command Plus on a BR7060 or BR7070?
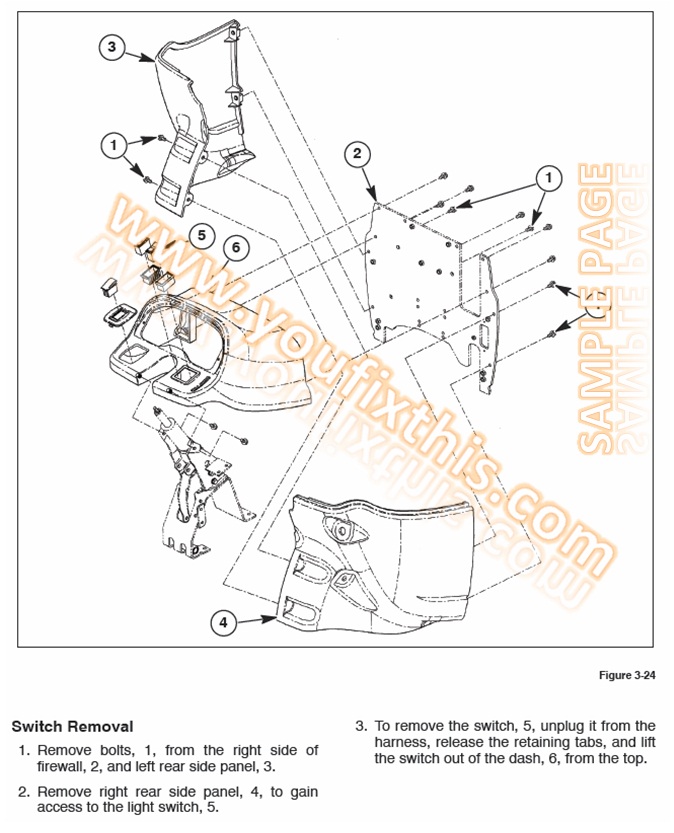
Resetting Bale Command Plus on a BR7060 or BR7070 means entering and exiting the setup/diagnostic mode. Press and hold the OPEN BOOK key for two seconds; the alarm sounds, confirming the controller has left setup/diagnostic mode and returned to normal operation. For a deeper reset, download the software with the EST (Electronic Service Tool), connecting the serial cable, 1, to the EST as shown in the instructions.
What does a BR7060 actuator excessive amp draw indicate?
The manual doesn't use the phrase 'excessive amp draw' for a BR7060 actuator, but it does flag an ERROR message and alarm when a net actuator circuit sits out of home or pre-cut position for 10 seconds or more. That points to an electrical fault in the actuator circuit, which can show up as excessive amp draw from binding, shorts, or motor failure. Troubleshoot the actuator circuit per the Electrical Systems section.
How do I clear error codes on a New Holland BR7060/BR7070 baler?
Certain codes, such as 'Er 1' for a stalled net or twine actuator, clear on their own after 10 seconds. Other displays clear when you leave the setup/diagnostic mode: press and hold the OPEN BOOK symbol for two seconds, and the alarm sounds as the controller returns to normal operation. Either way, the real fix is resolving the underlying fault behind the code.
How quickly can I access this manual after buying?
This is a 977-page searchable PDF ready for immediate download. It works on any device, so pull it up on your phone while you're under the hood. No shipping, no waiting.
Can I print this manual?
The PDF is DRM-free, so print whatever sections you need for the shop. Standard letter or A4 paper works.
Does this New Holland BR7060, BR7070 manual include wiring diagrams?
Included. The New Holland BR7060, BR7070 Service Manual covers complete wiring harness diagrams, electrical circuits, and connector pinouts.


Reviews
There are no reviews yet.