


Part of the Yanmar Repair Manuals.
Pick up the Yanmar 3TNV service manual PDF (OEM M9961-02E050) and you get 214 pages of factory-issued procedures covering the 3TNV82A, 3TNV84(T), 4TNV84(T), 3TNV88, and 4TNV88 industrial diesel engines from 1997 through 2008. Inside: full wiring diagrams with circuit routing, lubrication and fuel system schematics, a complete troubleshooting section with quick-reference charts and compression pressure diagnostics, and exploded-view drawings for cylinder head, gear train, cylinder block, and turbocharger assemblies. You also get a tiered periodic maintenance schedule, from the initial 50-hour break-in check through every 2,000-hour overhaul interval, with procedures for each service point. Set intake and exhaust valve clearance to 0.15-0.25 mm; torque the fuel filter element to 20-24 Nm. Your engine is down and every hour it sits costs money. Bookmarked sections and keyword search mean you spend less time hunting and more time wrenching.
What's Inside This Yanmar TNV Series (3TNV82A–4TNV106T) Manual
| System | Pages | Key Topics |
|---|---|---|
| Preface | 3 | Tnv Series Engines, Indirect Injection System, Us Epa Certification, California Arb Certification, 97/68/EC Directive, Engine Specifications and Components |
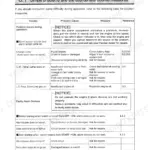
| Safety Labels | 4 | Basic Safety Rules, Safety Precautions, Inspection Procedures, Maintenance Procedures, Danger, Warning, Caution, Notice |
| Safety Precautions | 5-8 | Service Area, Work – Wear (Garments), Tools, Electrical, Waste Management, Further Precautions |
| Precautions for Service Work | 9-11 | Precautions for Safety, Preparation for Service Work, Precautions in Disassembly, Precautions for Inspection and Measurement, Precautions for Reassembly |
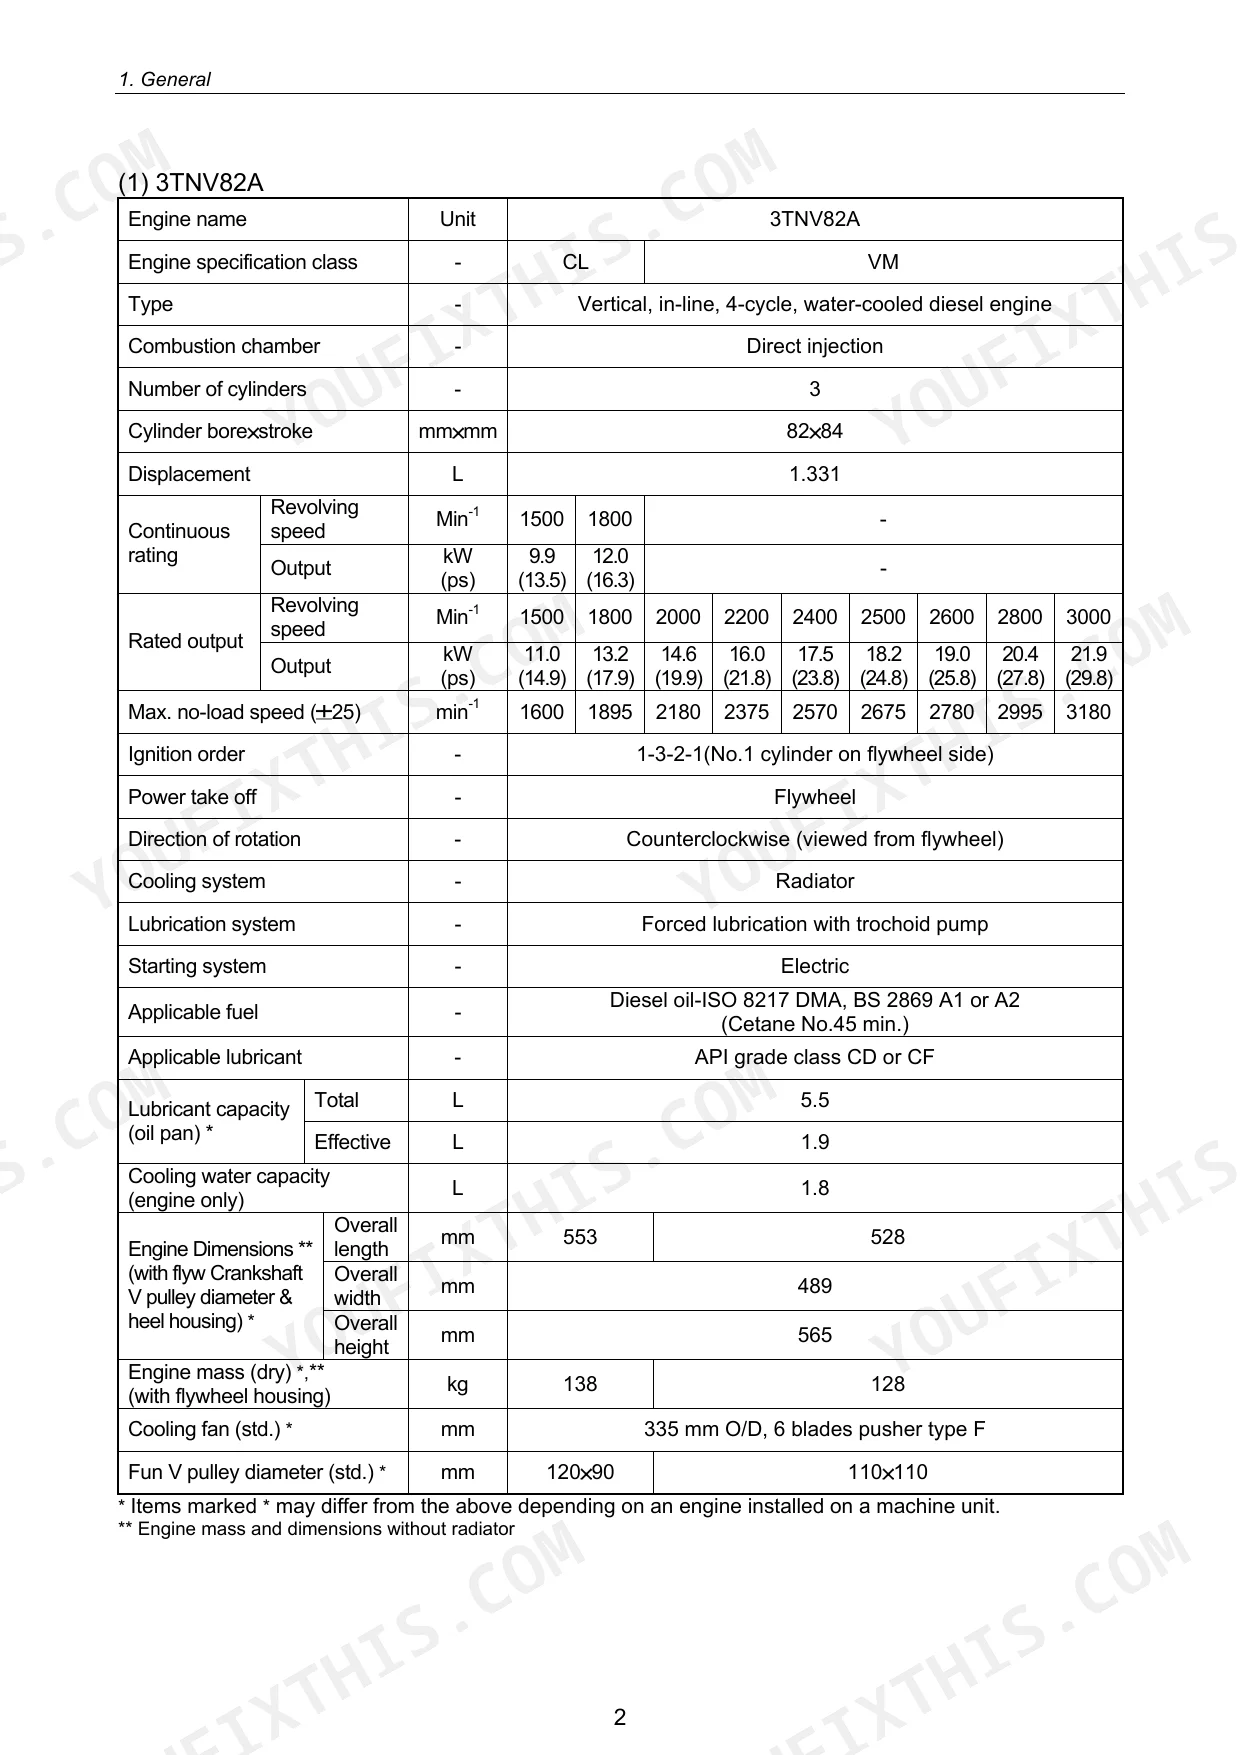
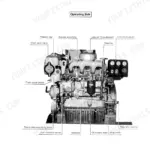
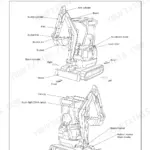
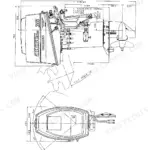
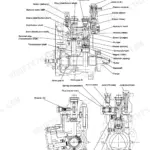
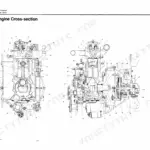
| General | 17-37 | Engine Nomenclature, Specifications, Fuel Oil, Lubricating Oil and Cooling Water, Engine External Views, Structural Description |
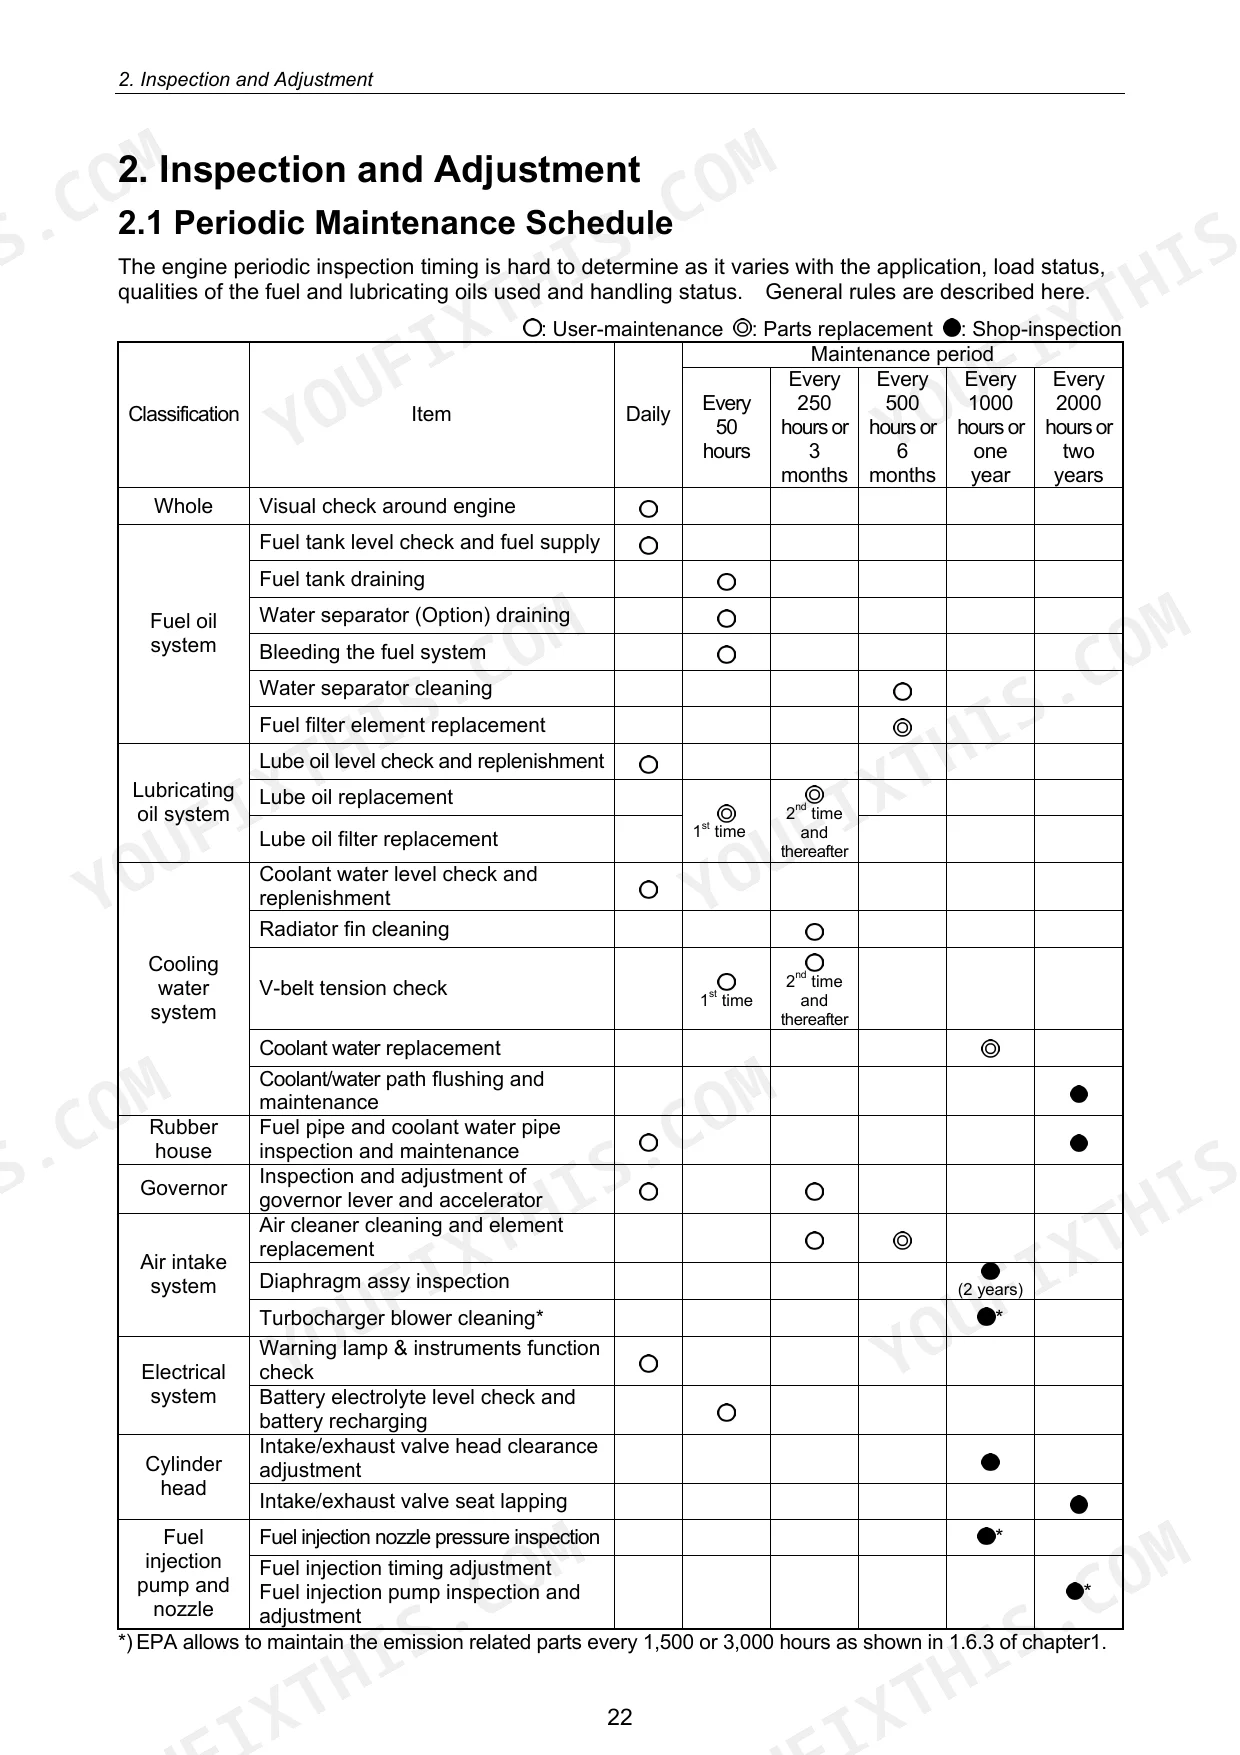
| Inspection and Adjustment | 38-68 | Periodic Maintenance Schedule |
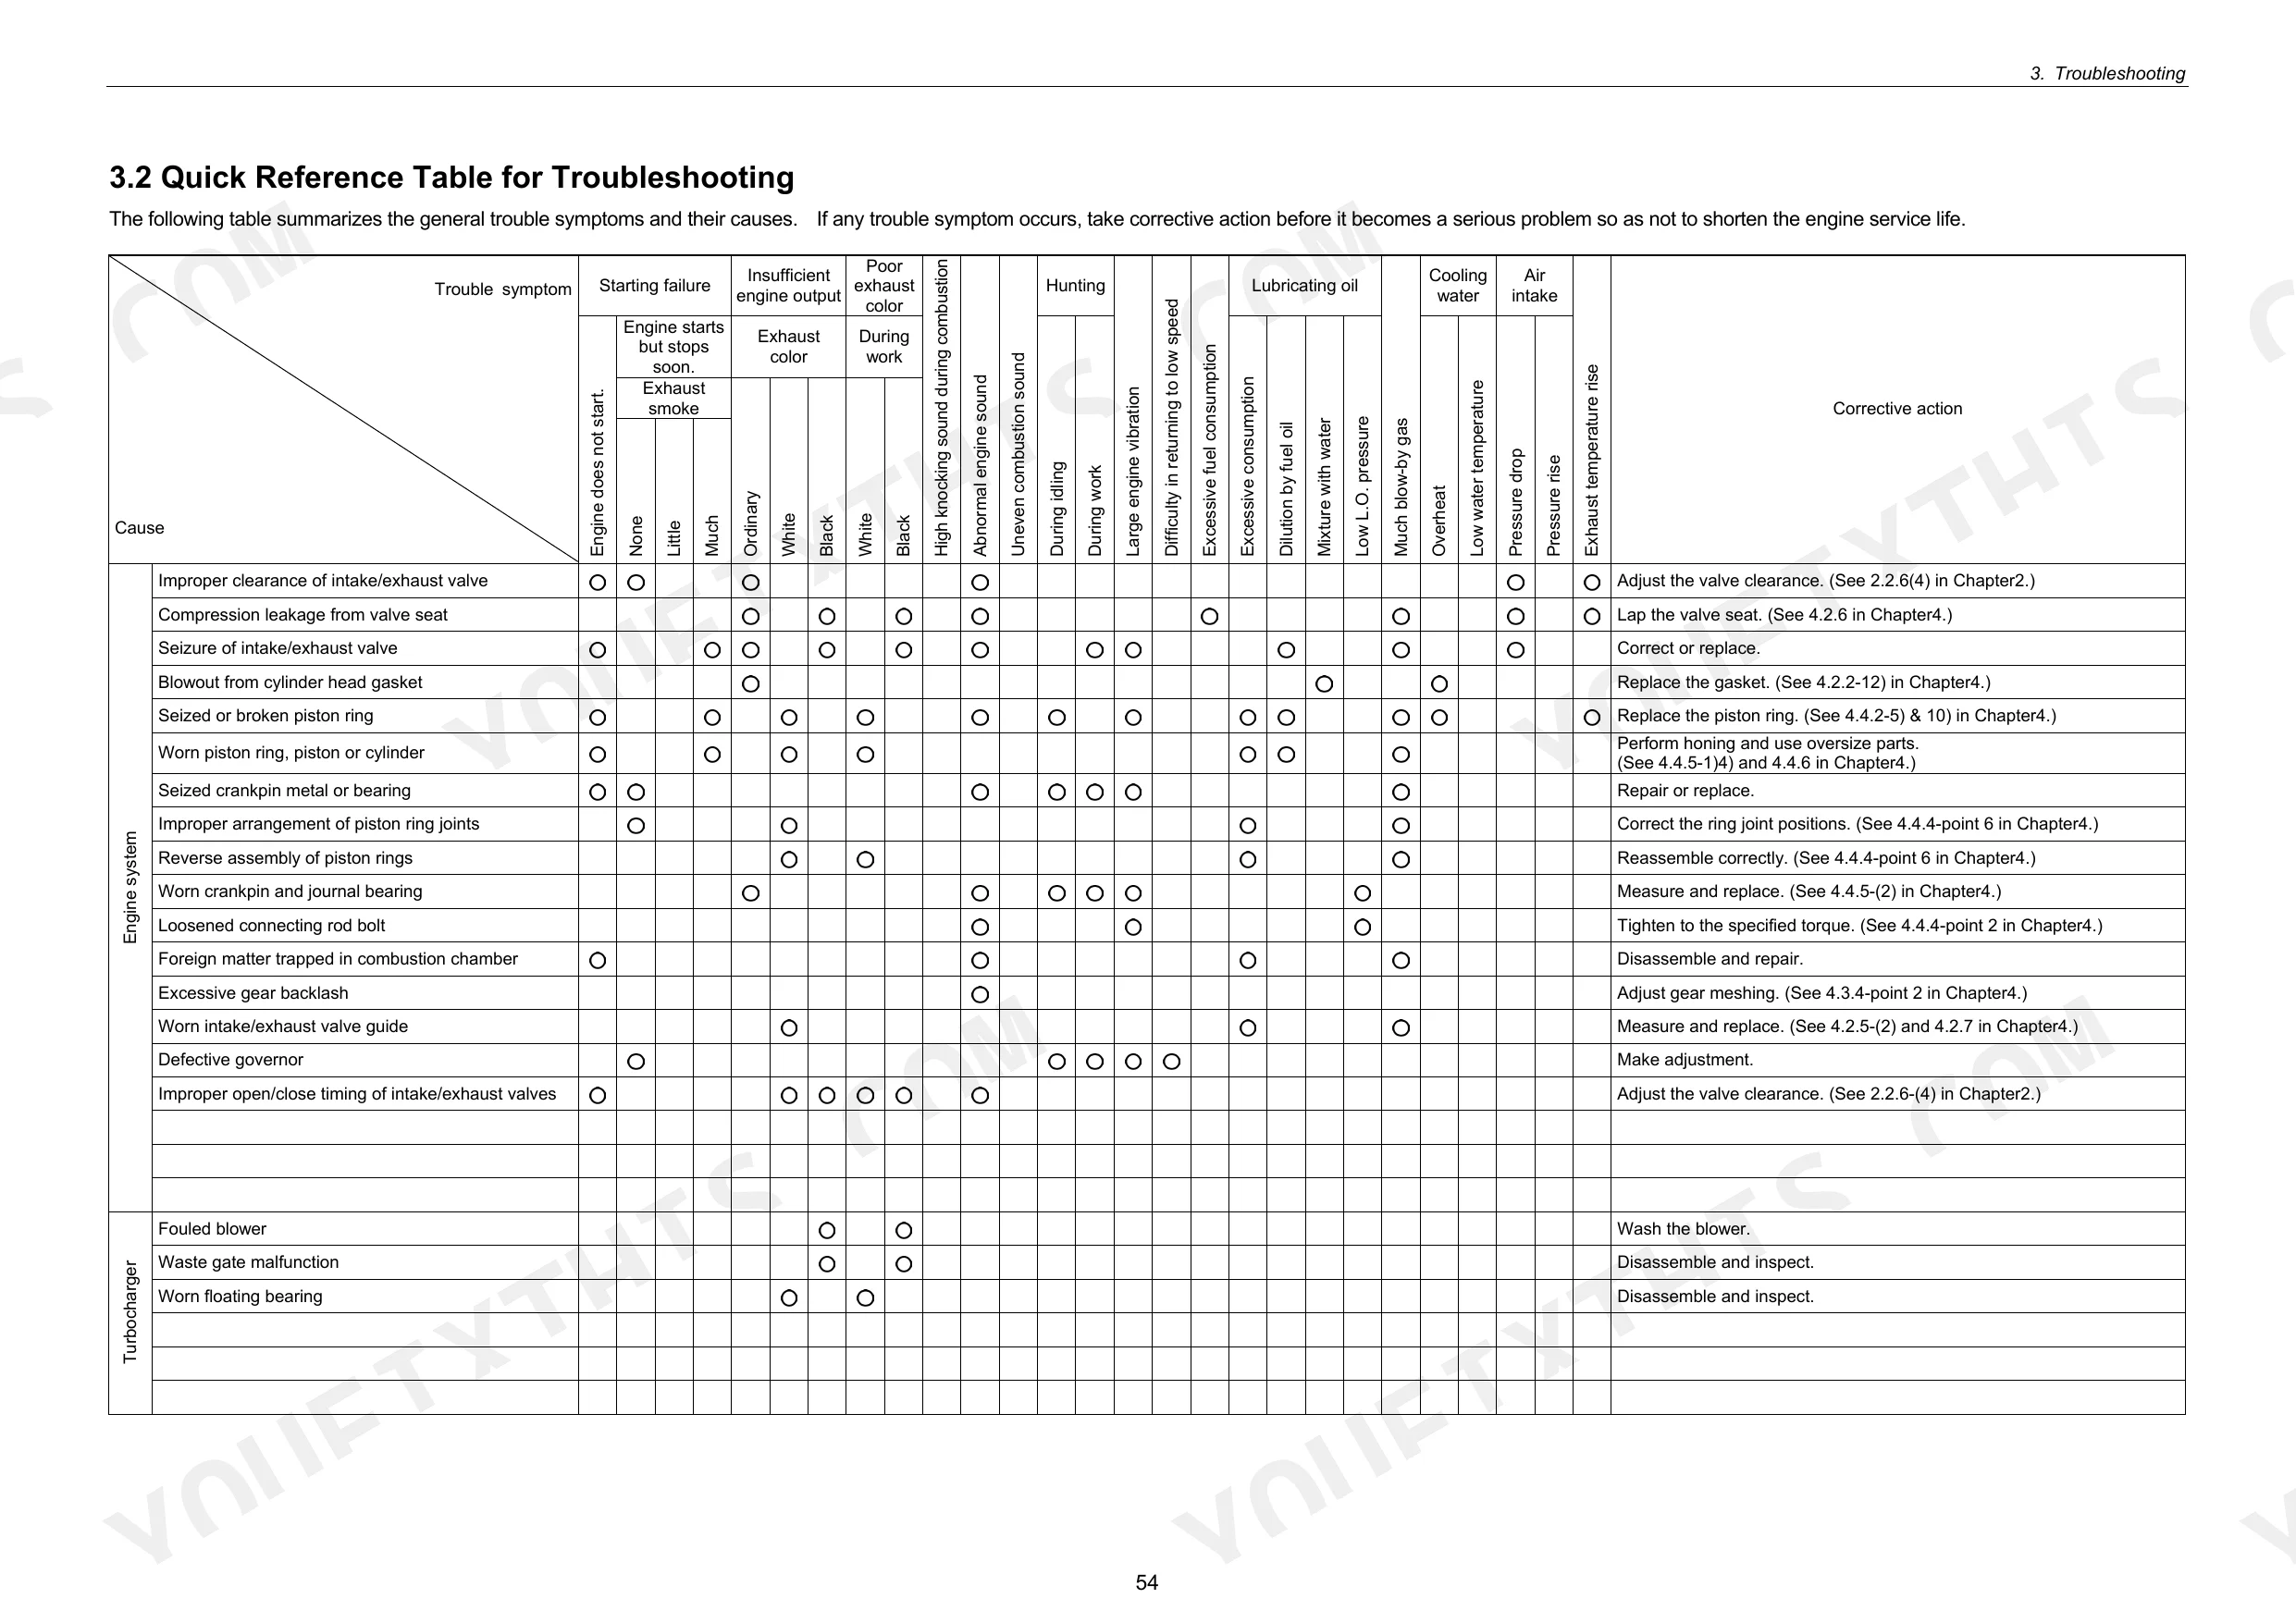
| Troubleshooting | 69-74 | Preparation Before Troubleshooting, Quick Reference Table for Troubleshooting, Troubleshooting by Measuring Compression Pressure |
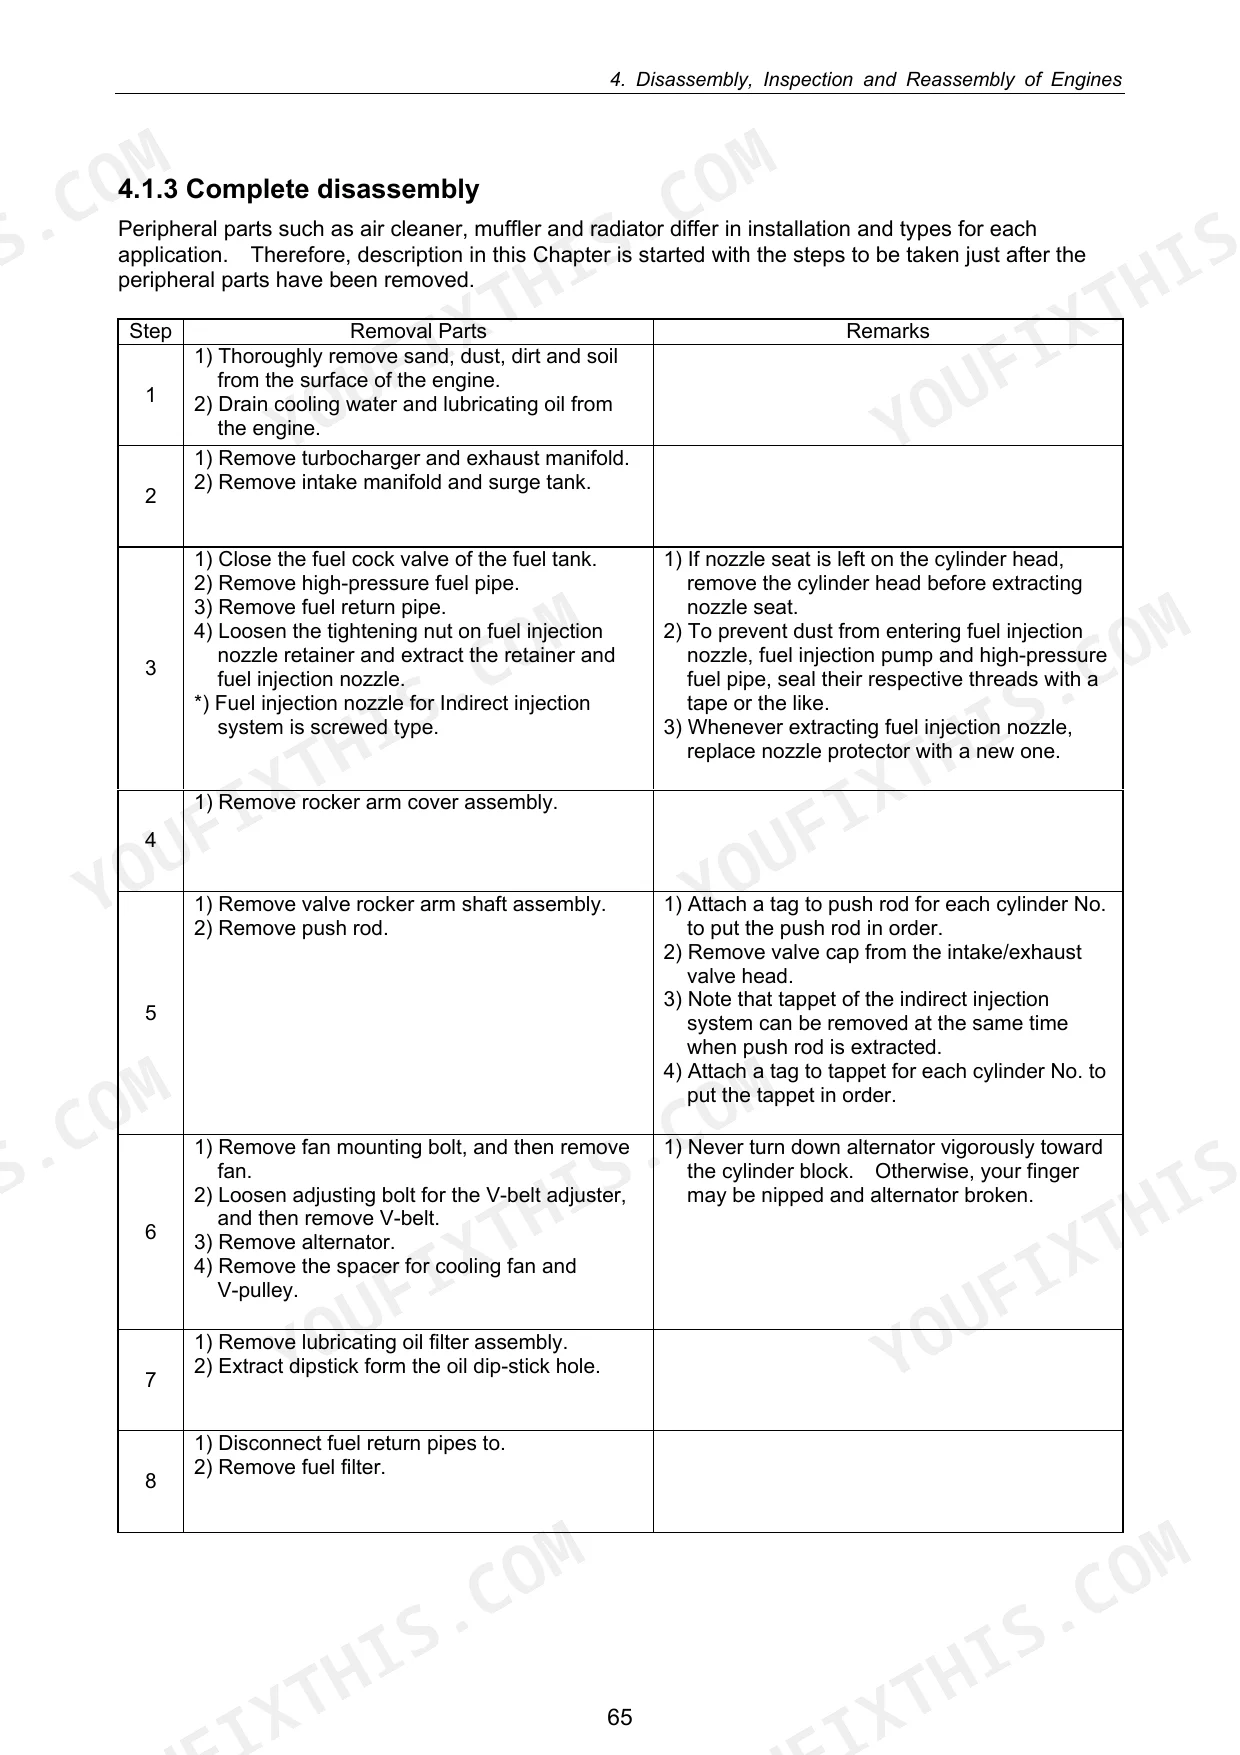
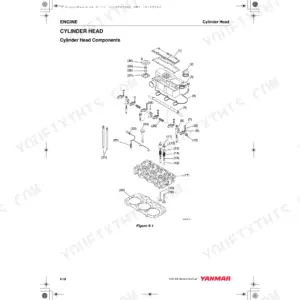
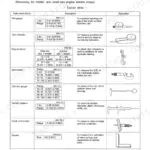
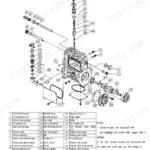
| Disassembly, Inspection and Reassembly of Engines | 75-123 | Complete Disassembly and Reassembly (Introduction, Special Service Tools, Precautions Before and During Reassembly, Operation), Cylinder Head: Disassembly |
| Lubrication System | 124-127 | Lubrication System Diagram, Trochoid Pump Components, Disassembly, Servicing Points, Parts Inspection and Measurement (Trochoid Pump Inspection and Measurement) |
| Cooling System | 128-129 | Cooling Water System, Cooling Water Pump Components, Disassembly (Reverse the Procedure Below for Assembly), Servicing Points |
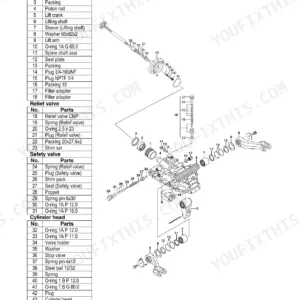
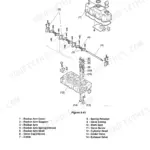
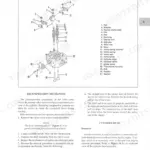
| Fuel Injection Pump/Governor | 130-133 | Introduction, Fuel Injection Pump (Fuel System Diagram, External View and Components, Disassembly Procedure, Assembly Procedure, Servicing Points) |
| Turbocharger: Disassembly, Inspection and Reassembly | 134-155 | Structure and Functions, Service Standards and Tightening Torque, Periodic Inspection Procedure, Disassembly Procedure, Washing and Inspection Procedure, Reassembly Procedure |
| Starting Motor | 156-191 | For 4Tnv94L/ 98, For 4Tnv106(T) |
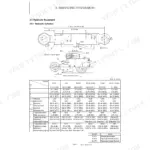
| Alternator | 192-195 | The 40A Alternator for 3TNV84 and Other Models |
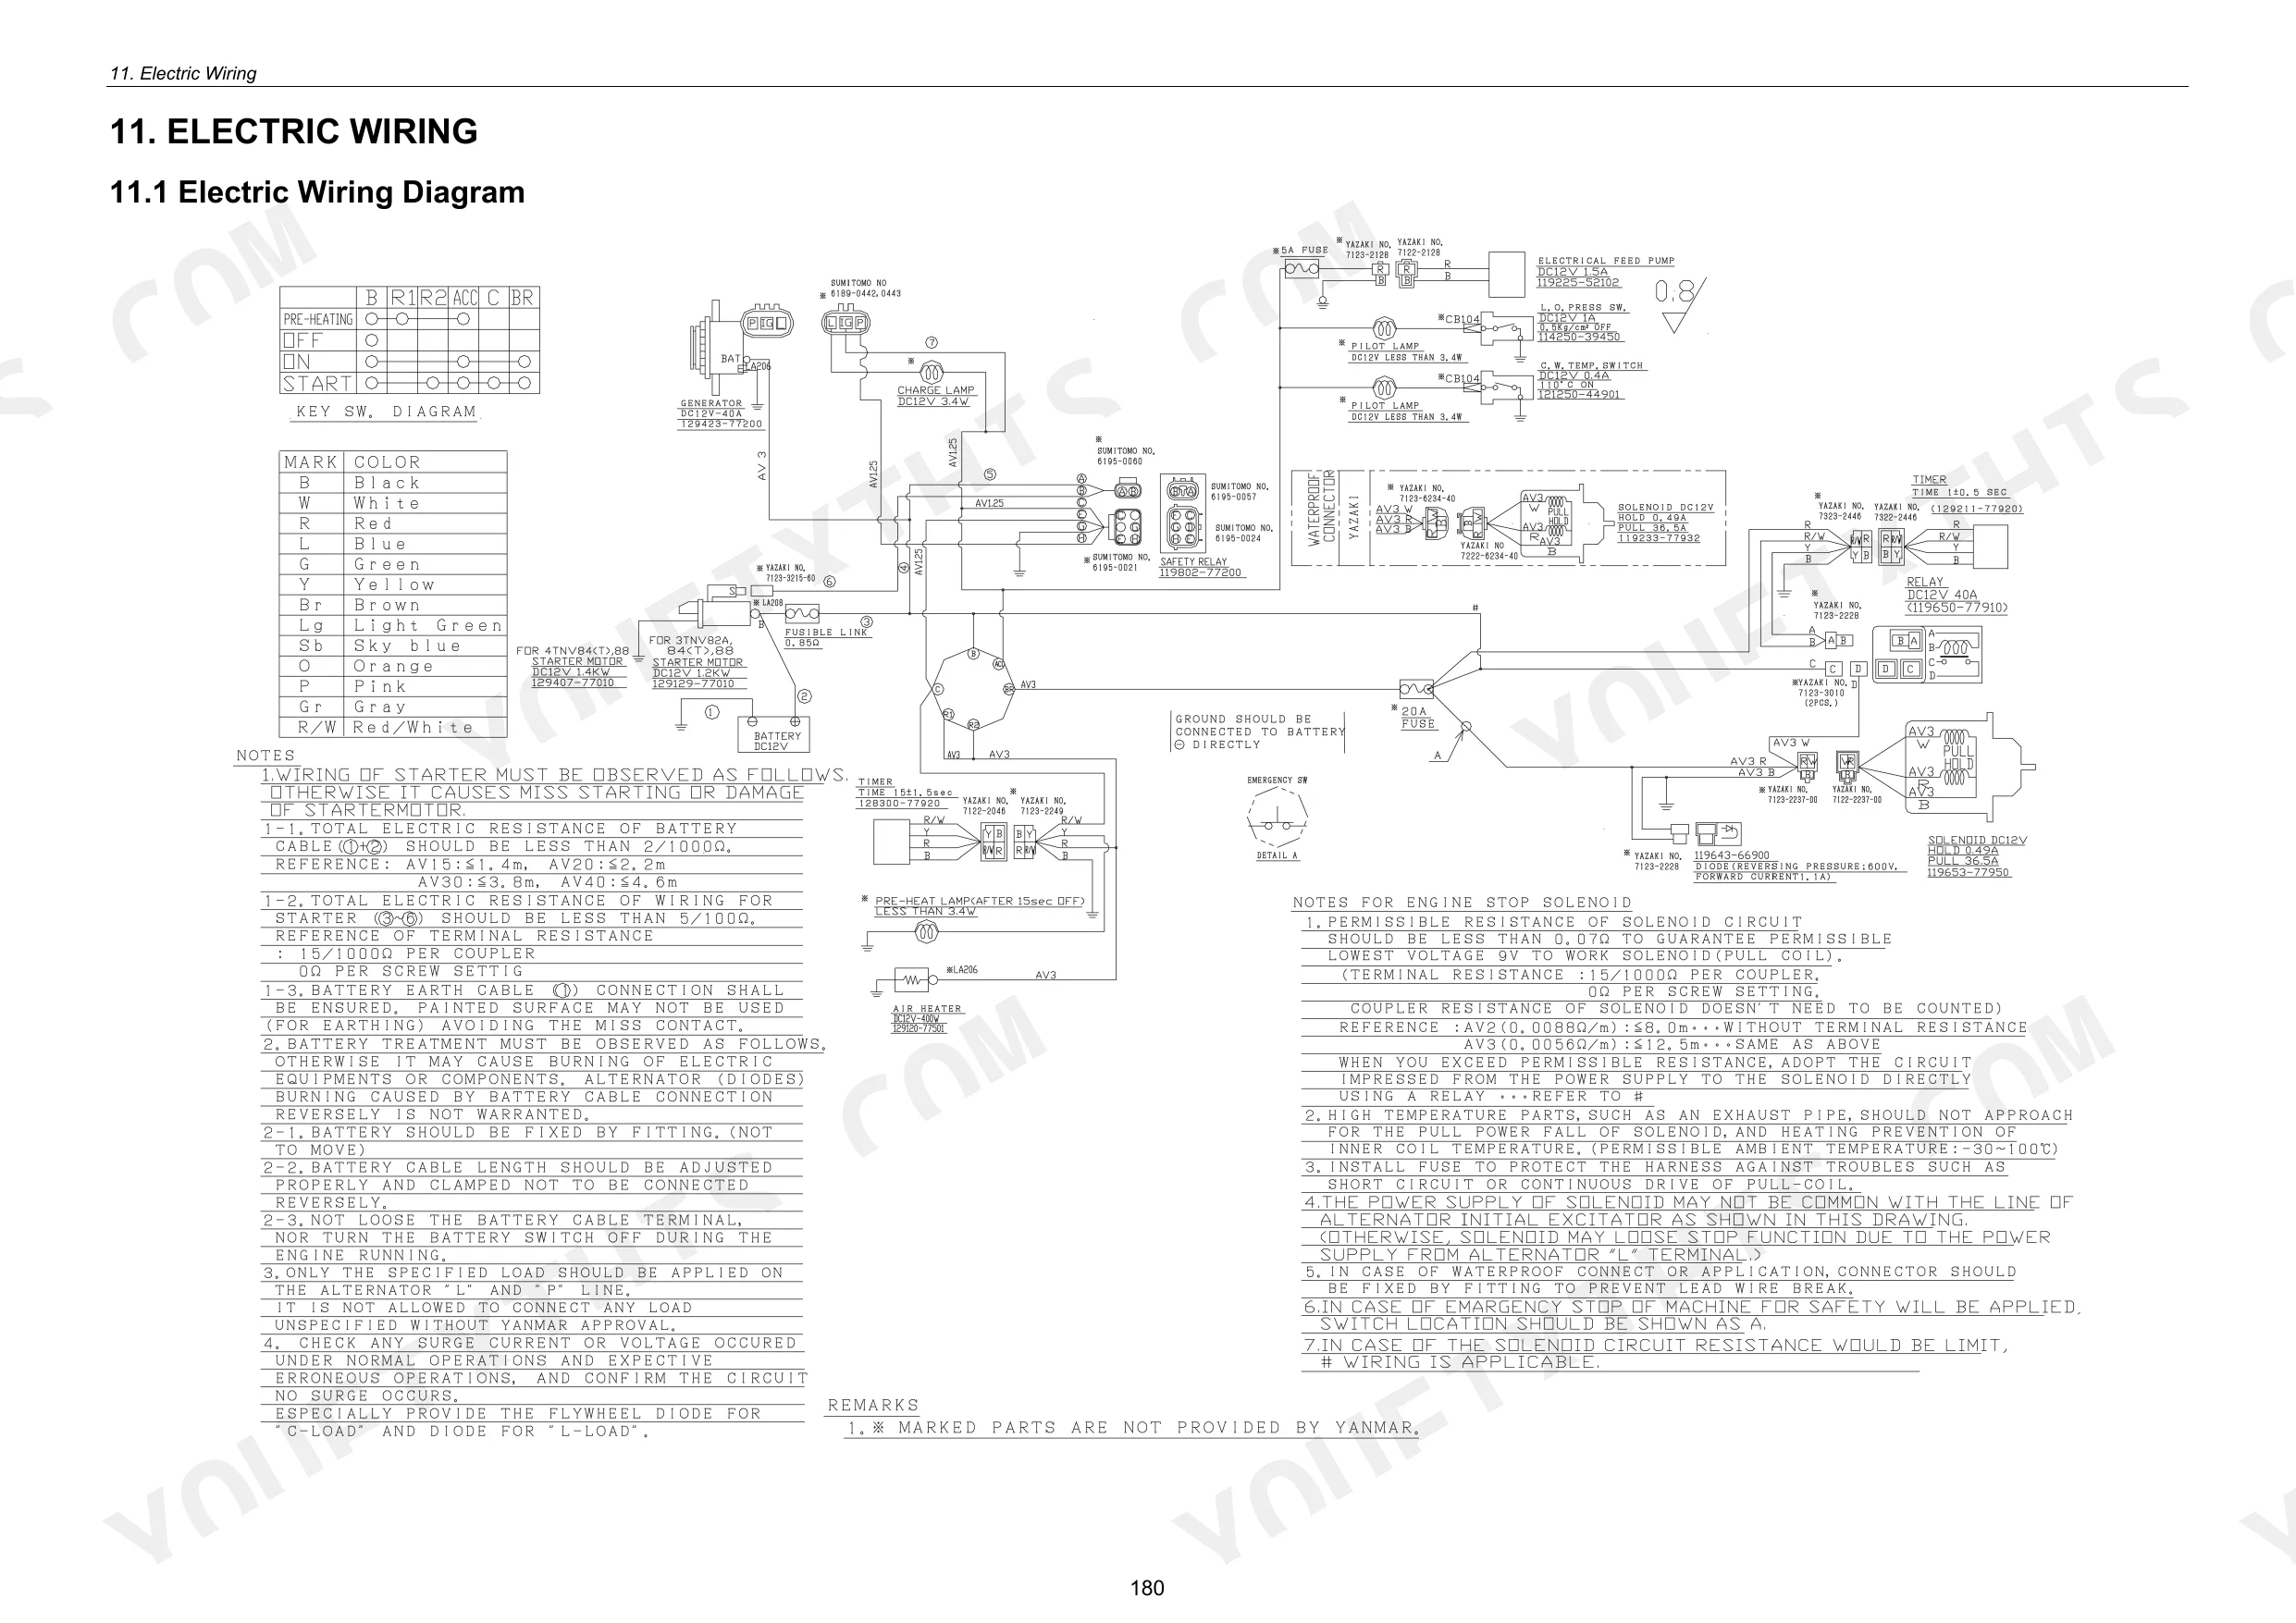
| Electric Wiring | 196-200 | Electric Wiring Diagram, Precaution on Electric Wiring |
| Service Standards | 201-211 | Engine Tuning, Engine Body, Lubricating Oil System (Trochoid Pump) |
| Tightening Torque for Bolts and Nuts | 212-213 | Tightening Torques for Main Bolts and Nuts, Tightening Torques for Standard Bolts and Nuts |
| Backcover | 214 | - |
Quick Reference Specifications
| Specification | Value | Page |
|---|---|---|
| 4TNV94L/98 | ||
| Cylinder head bolt tightening torque | 103.1~112.9 Nm (10.5~11.5 kgf·m) | p. 212 |
| 4TNV106(T) | ||
| Cylinder head bolt tightening torque | 188.0~197.8 Nm (19.0~20.0 kgf·m) | p. 212 |
| 3TNV82A~98 | ||
| Intake/exhaust valve head gap (standard valve clearance) | 0.15~0.25 mm | p. 201 |
| All Models | ||
| Fuel filter element replacement interval | Every 250 hours or 3 months | p. 38 |
| Air cleaner element replacement interval | Every 250 hours or 3 months | p. 38 |
| Lube oil filter replacement interval (1st time) | Every 50 hours | p. 38 |
| Lube oil filter replacement interval (2nd time and thereafter) | Every 250 hours or 3 months | p. 38 |
| Thermostat valve opening temperature (standard) | 69.5~72.5 deg C | p. 201 |
| Thermostat valve opening temperature (option) | 80~84 deg C | p. 201 |
| 3TNV82A to 4TNV106(T) | ||
| Fuel filter element tightening torque | 20~24 Nm (2.0~2.4 kgf·m) | p. 52 |
| 3TNV82A~TNV88 (CL) | ||
| Fuel injection pressure (CL models) | 19.6~20.6 MPa (200~210 kgf/cm2) | p. 59 |
| 3TNV82A~TNV88 (VM), 4TNV94L~4TNV106(T) | ||
| Fuel injection pressure (VM models, 4TNV models) | 21.6~22.6 MPa (220~230 kgf/cm2) | p. 59 |
Yanmar TNV Series (3TNV82A–4TNV106T) Common Problems This Manual Covers
Yanmar 3TNV fuel system losing prime overnight, engine cranks but will not start
Test fuel injection nozzle pressure using a pop tester. Verify pressure reaches 19.6-20.6 MPa as specified on page 59 for CL models. If pressure is low, replace the injector assembly. Bleed all air from the fuel lines before attempting to restart the engine.
Manual Section: Inspection and Adjustment p. 59Engine cranks normally but lacks power under heavy load and blows excessive white smoke
Measure standard compression pressure using the glow plug port. For the 3TNV82A, verify the reading is 3.16±0.1 MPa on page 73. Check intake and exhaust valve clearance on page 58 and adjust to 0.15~0.25 mm if needed. Recheck compression after adjusting the valvetrain.
Manual Section: Troubleshooting p. 73Coolant temperature spiking rapidly during normal operation, accompanied by abnormal squealing noise from front cover
Inspect the V-belt tension deflection between the alternator and crank pulley. Adjust the tension to 10~14 mm as directed on page 43. Drain the system and remove the cooling water pump. Replace the whole cooling water pump assembly if necessary according to page 129.
Manual Section: Cooling System p. 129Low oil pressure warning light flickering at low idle when the engine is hot
Drain the crankcase and replace the lube oil filter. Torque the new filter to 20~24 N·m as specified on page 52. Refill the crankcase with fresh oil. For the 4TNV106(T), verify the engine oil capacity total is 14.0 L on page 29.
Manual Section: Inspection and Adjustment p. 52Frequently Asked Questions
How do I adjust valve lash on a YANMAR 3TNV/4TNV?
Valve lash, or intake/exhaust valve clearance, should be adjusted while the engine is cold. Set the No.1 cylinder to compression Top Dead Center (TDC). For 2-valve cylinder heads, insert a thickness gauge between the rocker arm and valve cap; for 4-valve heads, between the rocker arm and valve bridge. Adjust the clearance to 0.15~0.25 mm for 3TNV82A~98 models and 0.25~0.35 mm for 4TNV106(T) models using a 0.2 or 0.3 mm thickness gauge. p. 58
What are the replacement specifications for fuel filter?
The fuel filter element should be replaced at specified intervals. For 3TNV82A~4TNV88 models, use part number 119802-55800. For 4TNV98(T)~4TNV106(T) models, use part number 123907-55800. The tightening torque for installation is 20~24 N·m (2.0~2.4 kgf·m). p. 52
What are the replacement specifications for air filter element?
The air cleaner element should be replaced if it is damaged, excessively dirty, or oily. The manual emphasizes periodic cleaning and replacement when necessary, especially in dusty conditions, but does not provide specific part numbers or detailed specifications for the replacement element. p. 50
How do you fix yanmar 3TNV fuel system losing prime overnight, engine cranks but will not start?
Test fuel injection nozzle pressure using a pop tester. Verify pressure reaches 19.6-20.6 MPa as specified on page 59 for CL models. If pressure is low, replace the injector assembly. Bleed all air from the fuel lines before attempting to restart the engine. p. 59
How quickly can I access this manual after buying?
You get a 214-page searchable PDF that downloads instantly after checkout. Open it on your laptop, tablet, or phone, and bring it right to the shop floor.
Am I able to print pages from this manual?
Yes, print as many copies as you want, and there are no restrictions. Many mechanics print the section they need and bring it to the shop floor.
Does this Service Manual have electrical diagrams?
Yes, full electrical schematics are included with wire colors, connector locations, and circuit descriptions.

Reviews
There are no reviews yet.