


Part of the Kubota Repair Manuals.
Mounting a 4-point hitch and K-Connect drive system to your BX2810 or BX2811 means getting dozens of bolts, hoses, and sub-assemblies in the right order. This 52-page Owner Manual PDF (OEM #OM0455QH-A) covers that job step by step: front adaptor installation, subframe mounting, hydraulic hose routing, and the BX2811 drive kit, each with exploded parts views. A troubleshooting chart tackles hard-to-connect couplers, rattling mechanical engagement, and driveline vibration, while the maintenance schedule lays out 20-hour, 40-hour, and twice-yearly intervals. Grease the telescopic driveline joint every 20 hours, and refer to the Torque Specification Table on page 48 for all fastener values. Skip hunting for torque values in YouTube comments. Download it, jump to any bookmarked section by keyword, and get back in the field.
What's Inside This Kubota BX2810, BX2811 Manual
| System | Pages | Key Topics |
|---|---|---|
| Introduction | - | To the Purchaser, To the Dealer, To the Purchaser and the Dealer, Product Category, Safety First, Legal Disclaimer, California Proposition 65 |
| Table of Content | - | Operation (Controls, Procedure for Connecting and Disconnecting the Equipment, Precautions to Follow Before Each Connection, Procedure to Follow to Connect the Equipment, Precautions to Follow Before Each Disconnection, Procedure to Follow to Disconnect the Equipment) |
| Safety Information | - | During Operation |
| General Safety Information - Pictograms | - | Pressure in the Hydraulic Circuit Stays at Pressure Even After the Engine Stops. Before Removing Parts, Such As Hydraulic Devices From the Machine |
| Safety Labels | - | Important: Keep All Decals Clean and Legible. Replace All Missing, Illegible, Or Damaged Decals |
| Estimated Assembly Time | - | Refer to the Following Table for the Estimated Assembly Time to Open the Package and Assemble the Equipment, Point Hitch a Shape BX2810, Drive System K-Connect BX2811 |
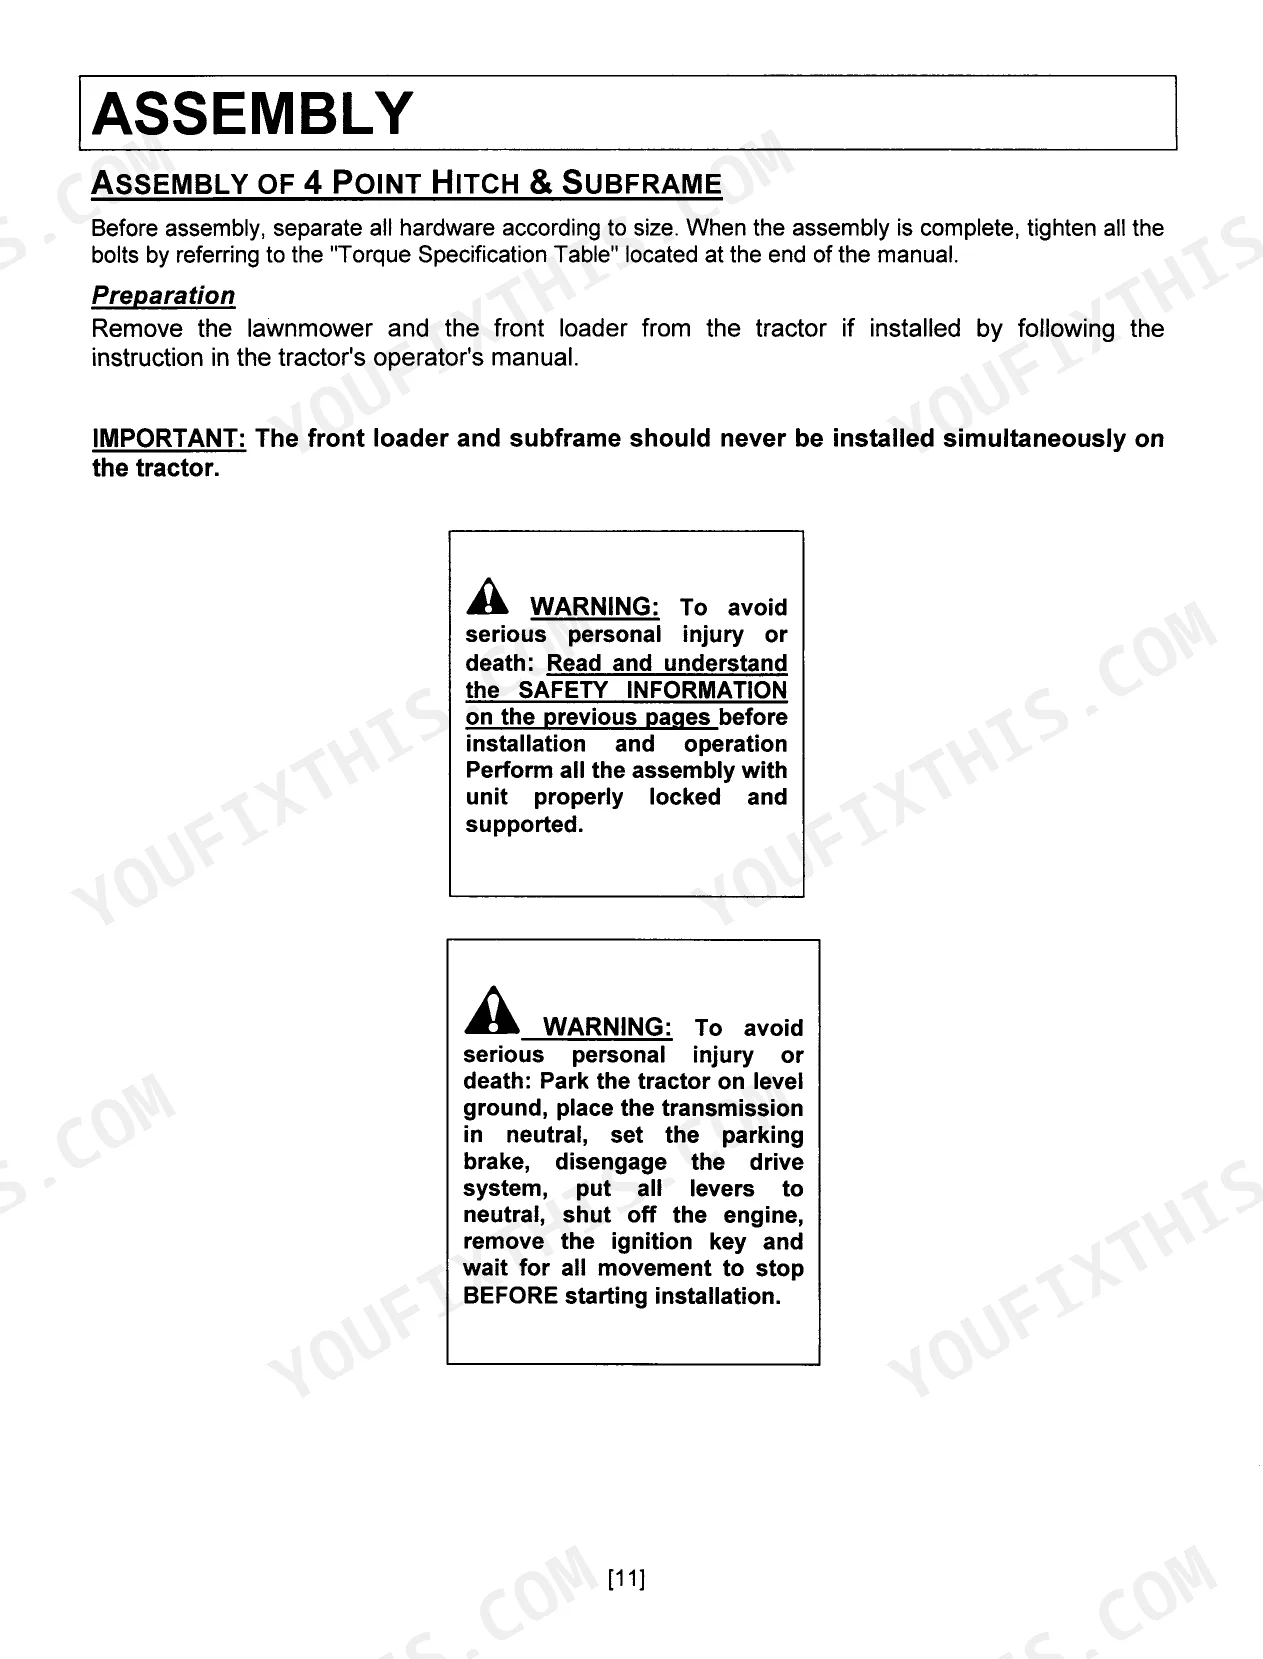
| Assembly | - | Assembly of 4 Point Hitch and Subframe, Installation of Front Adaptor, Subframe Assembly, Installation of the Hydraulic Components, Installation of the Subframe on the Tractor |
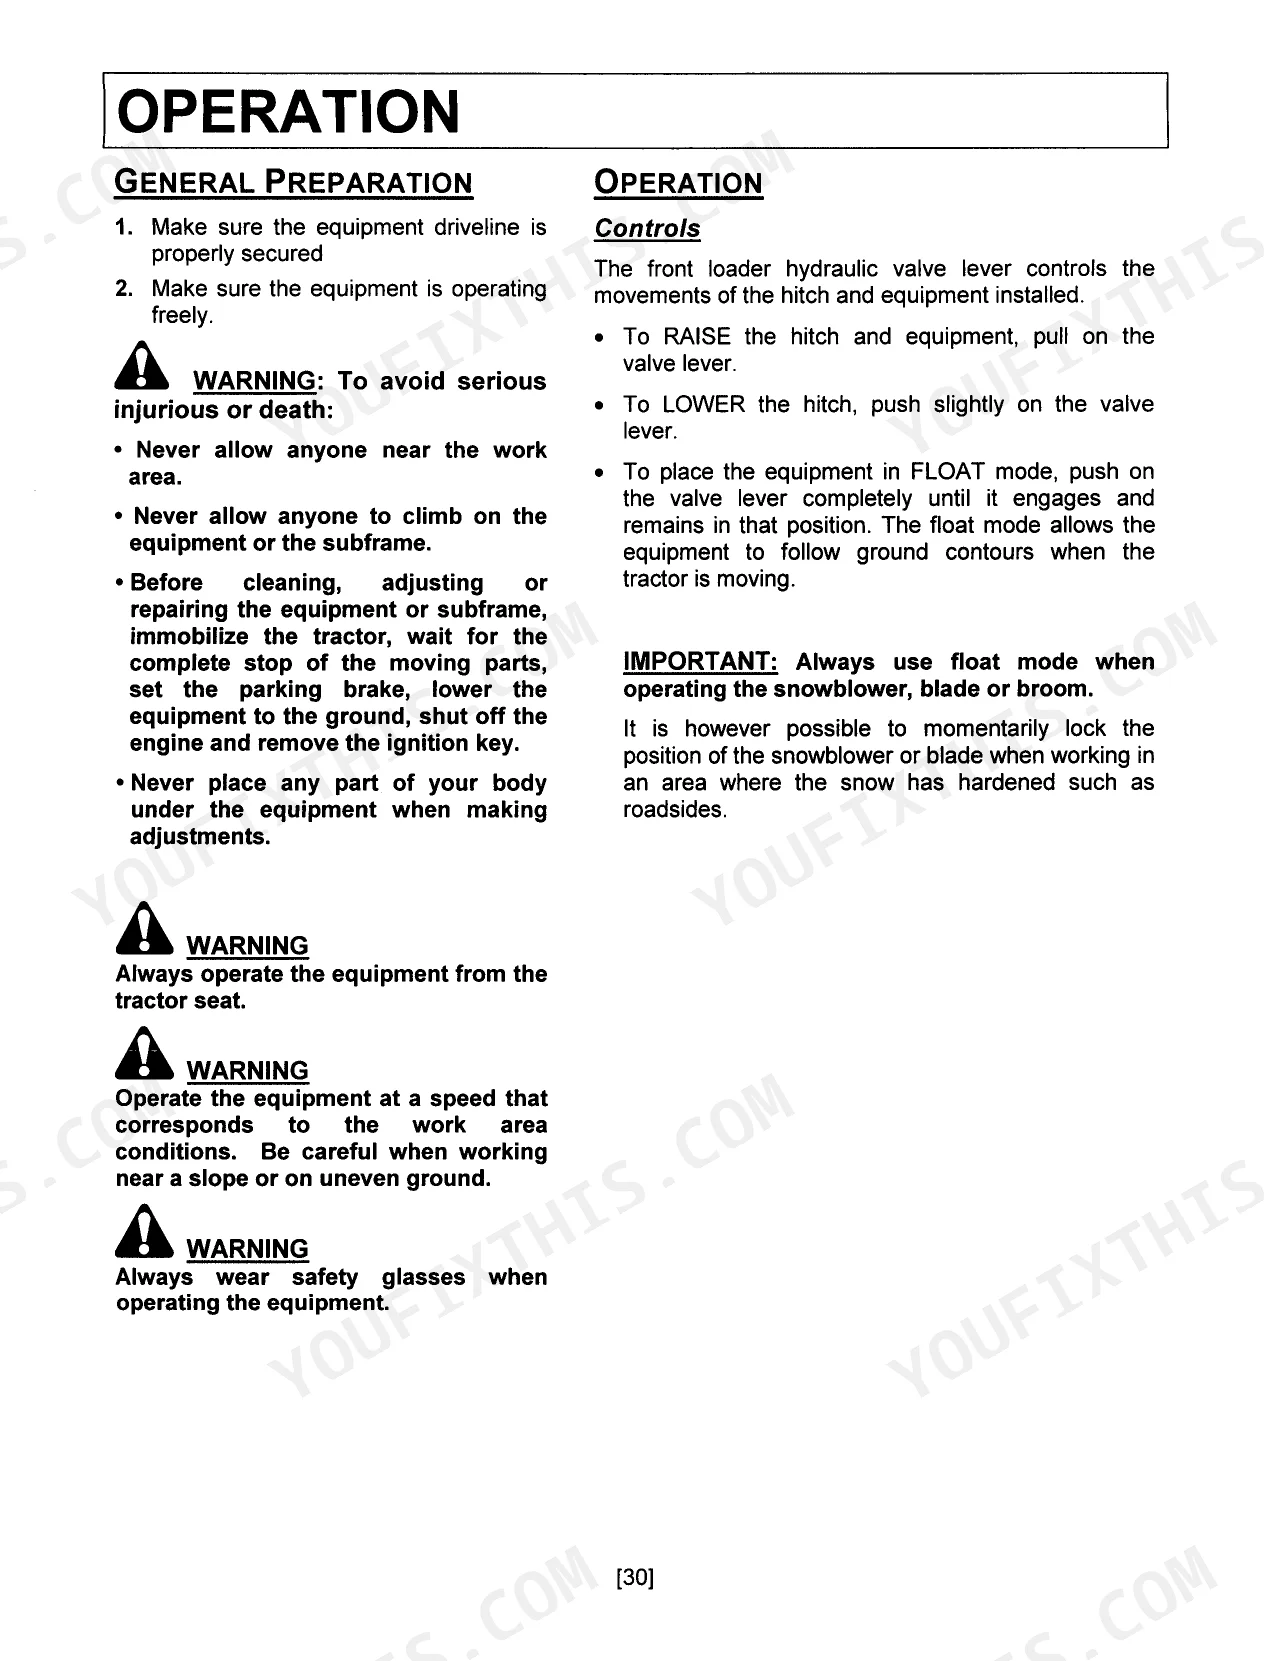
| Operation | - | Procedure for Connecting and Disconnecting the Equipment (Précautions to Follow Before Each Disconnection, Procedure to Follow to Disconnect the Equipment), Figure 17, Figure 17a |
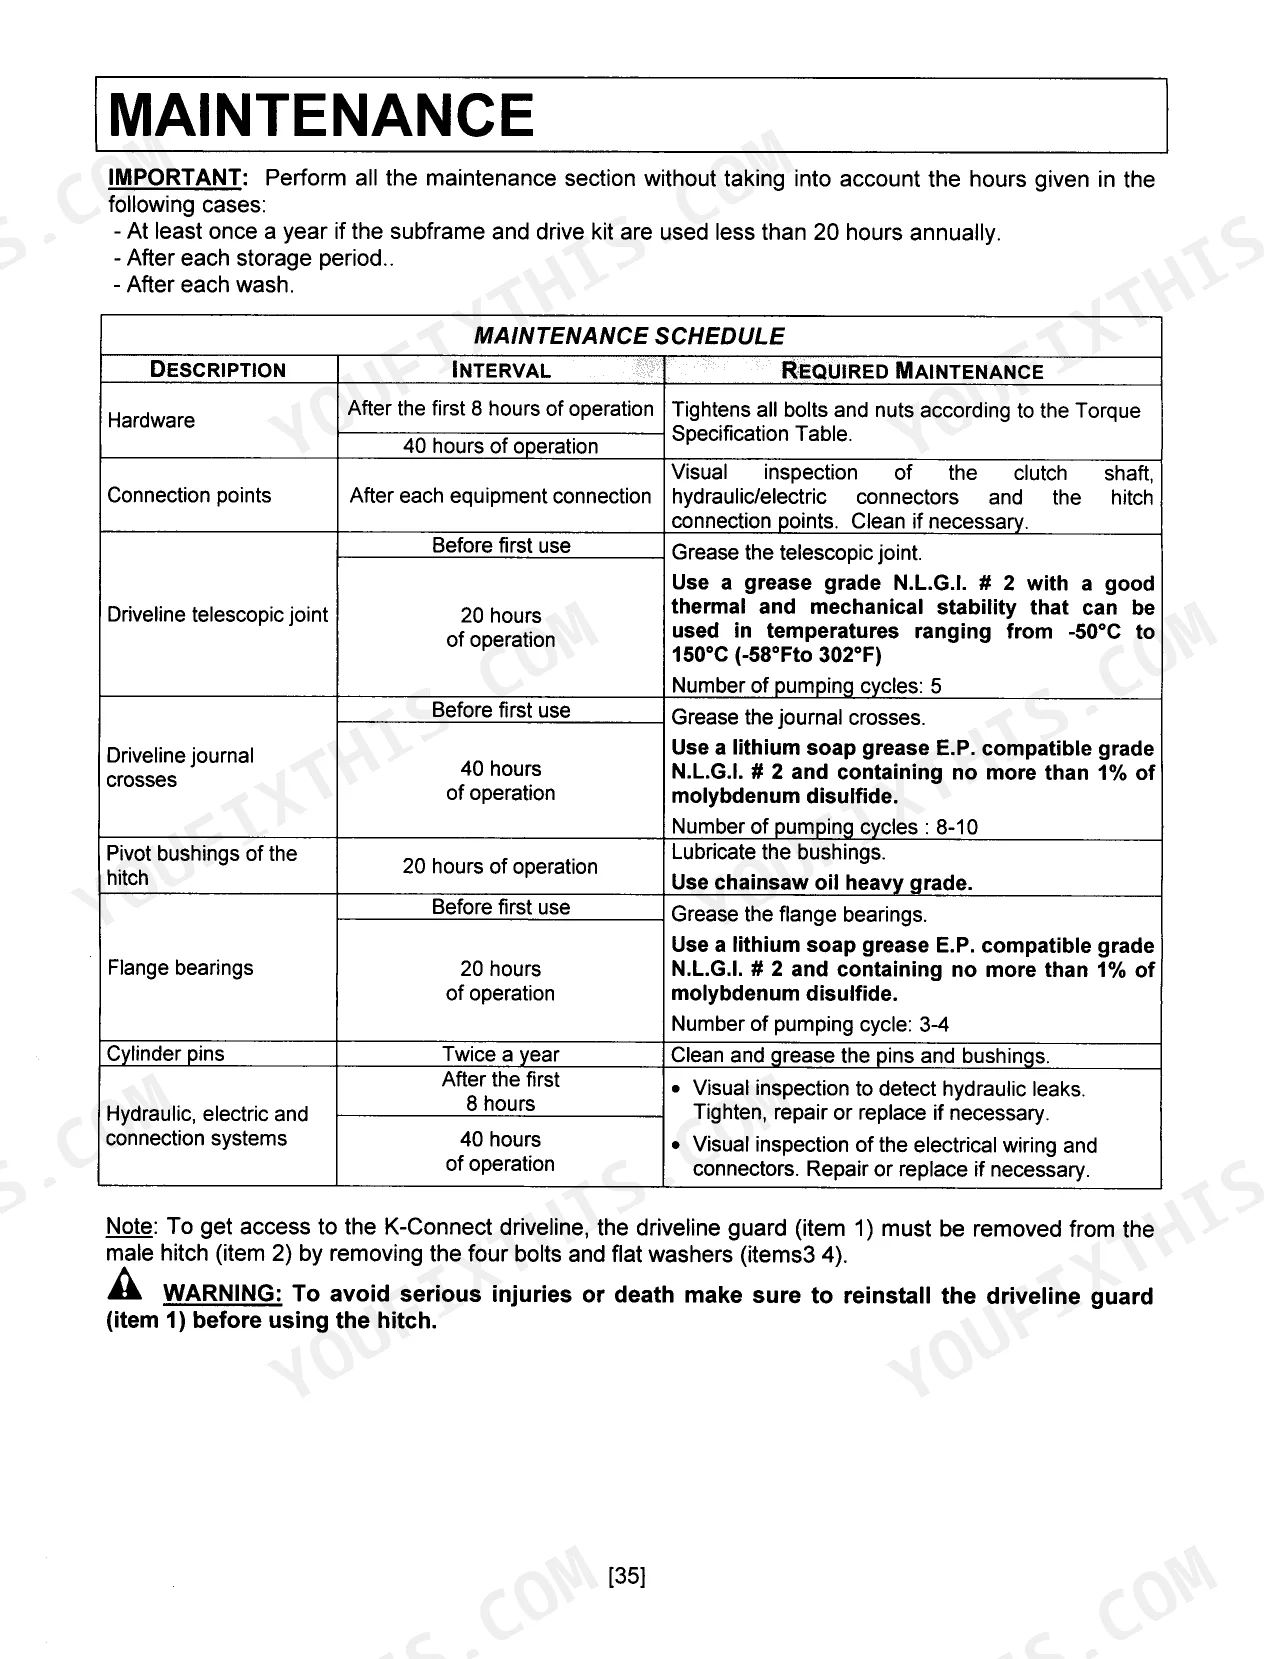
| Maintenance | - | 20 Hrs, Twice a Year, 40 Hrs |
| Troubleshooting | - | Problem, Possible Cause, Corrective Mesures, After Connecting the Equipment, Mechanical Engagement Produces a Rattling Sound and Is Hesitant |
| Storage | - | Before Storing the Subframe or Implement, Certain Precautions Should Be Taken to Protect It From Deterioration, Clean the Subframe and Implement Thoroughly |
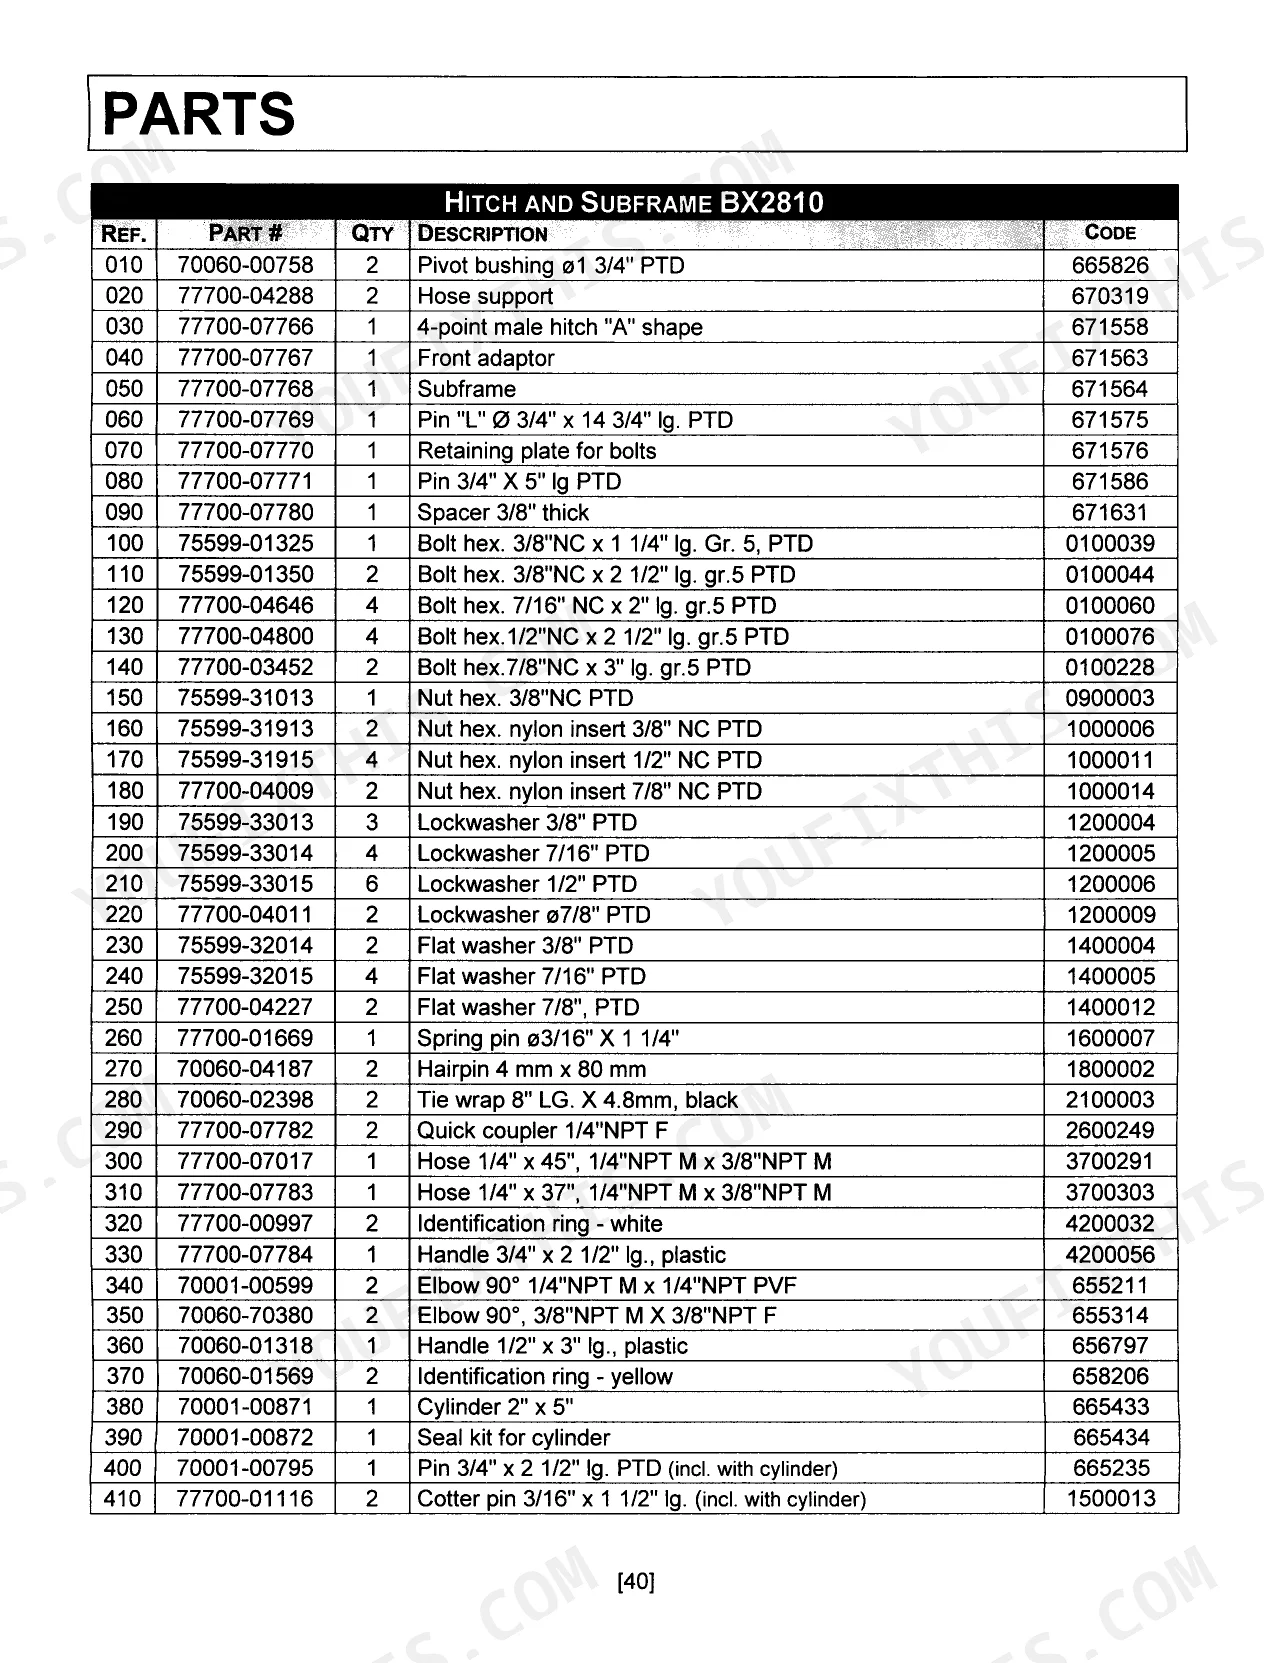
| Parts | - | Hitch and Subframe BX2810, Drive System K-Connect BX2811, Fixed Driveline 70060-02186, Driveline 77700-06666 |
| Available Equipment | - | Snowblower BX2816, Commercial Snowblower 55 BX2822, Blade Hd BX2812, Rotary Broom 60 BX2814 |
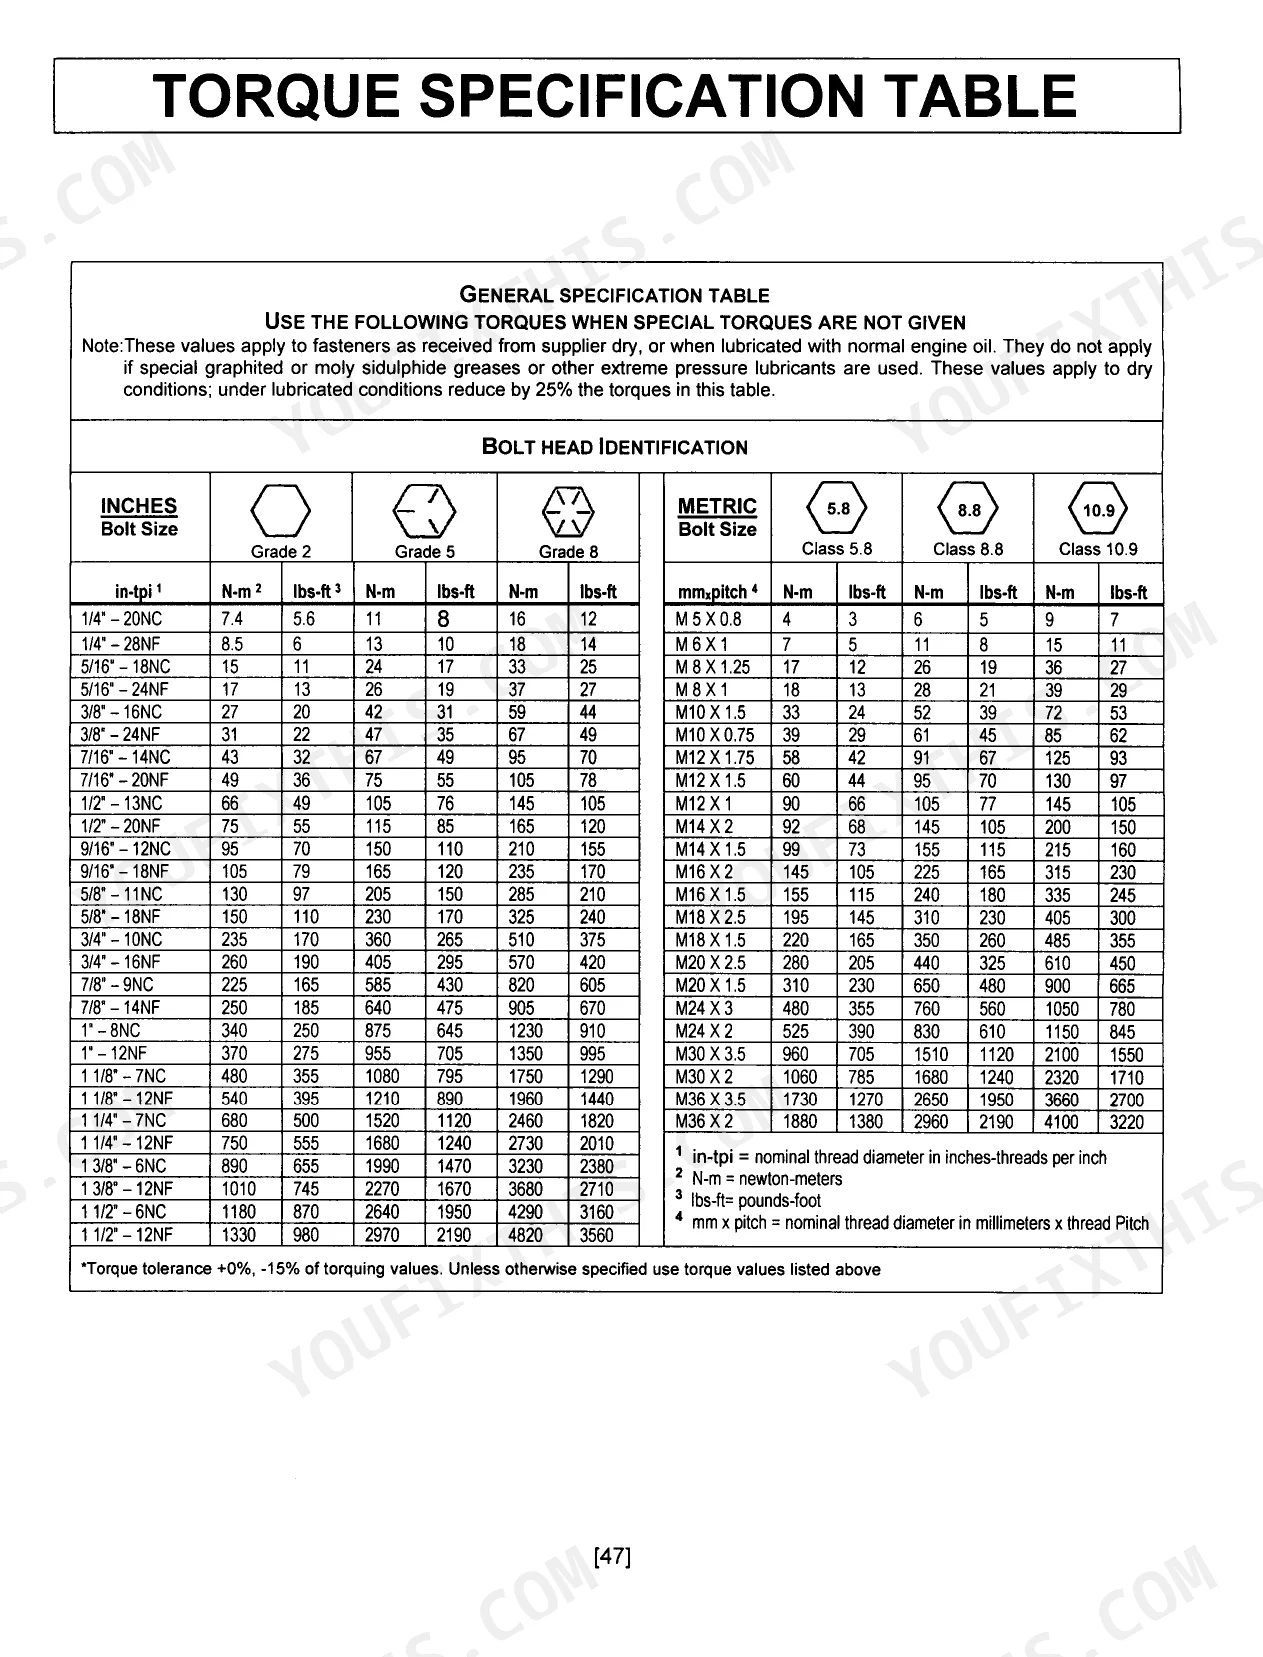
| Torque Specification Table | - | Use the Following Torques When Special Torques Are Not Given, Bolt Head Identification, Inches Bolt Size, Metric Bolt Size |
| Adapter Installation Process | - | Orb Thread Identification & Torque |
Quick Reference Specifications
| Specification | Value | Page |
|---|---|---|
| BX2810 | ||
| Torque for 1/2"-13NC Grade 5 bolts (front adaptor to tractor frame) | 105 N-m (76 lbs-ft) | p. 48 |
| Torque for 3/8"-16NC Grade 5 bolts (front adaptor to tractor frame) | 42 N-m (31 lbs-ft) | p. 48 |
| BX2811 | ||
| Torque for 1/4"-20NC Grade 5 bolts (anti-friction guides, driveline) | 11 N-m (8 lbs-ft) | p. 48 |
| Torque for 3/8"-16NC Grade 5 bolts (engagement lever, connection support, flange bearings) | 42 N-m (31 lbs-ft) | p. 48 |
| All Models | ||
| Driveline telescopic joint grease interval | 20 hours | p. 36 |
| Driveline telescopic joint pumping cycles | 5 | p. 36 |
| Driveline journal crosses grease interval | 40 hours | p. 36 |
| Pivot bushings of the hitch lubrication interval | 20 hours | p. 36 |
| Flange bearings grease interval | 20 hours | p. 36 |
| Torque for 1/4"-20NC bolt (Grade 5) | 11 lbs-ft | p. 48 |
| Torque for 3/8"-16NC bolt (Grade 5) | 42 lbs-ft | p. 48 |
| Torque for 1/2"-13NC bolt (Grade 5) | 105 lbs-ft | p. 48 |
Kubota BX2810, BX2811 Common Problems This Manual Covers
Kubota BX2810 4-point hitch won't lower or doesn't respond after connecting implement
Check the hydraulic selector valve under the seat and verify it is fully open. Inspect couplers for blockage or trapped pressure; note that hydraulic circuit pressure stays active after engine shutdown (page 8). Walk through the corrective procedures on page 38. While you are in there, confirm 1/2"-13NC front adaptor bolts are torqued to 105 N-m (76 lbs-ft) per page 48.
Manual Section: Troubleshooting p. 38Engagement lever makes grinding noise or is very difficult to move in cold weather
Clean all snow and ice from around the engagement lever and shaft connection points before forcing movement. Work the lever slowly once debris is cleared. Inspect anti-friction components for damage and verify their mounting bolts are torqued to 11 N-m (8 lbs-ft) per page 48. Review all corrective steps on page 38.
Manual Section: Troubleshooting p. 38Mechanical engagement produces rattling sound and hesitates after connecting equipment at operating RPM
Connect equipment at low RPM, not at full PTO speed, and clear any residue, snow, or ice from the clutch shaft first. Inspect tension springs and clutch shafts for damage per page 38. Verify engagement lever mounting bolts are torqued to 42 N-m (31 lbs-ft) per page 48. If rattling persists, examine the driveline and connection support for cracks or deformation.
Manual Section: Troubleshooting p. 38Excessive vibration during mechanical drive operation, clutch shaft feels rough or unbalanced
Stop operation and disengage PTO immediately. Clear any residue, snow, or ice from the clutch shaft, then inspect drivelines for deformation and the connection support for cracks. Check tension springs for damage per page 38. Torque flange bearing bolts to 42 N-m (31 lbs-ft) per page 48, and grease driveline journal crosses every 40 hours per page 36.
Manual Section: Troubleshooting p. 38Unexpected hitch or drive malfunction after cleaning, servicing, or winter storage
Walk through the pre-operation inspection on page 31 before starting. Verify all components are reinstalled, no fittings are missing, and no defective parts were left in service. Confirm fastener tightness per page 35. Torque driveline guard bolts to 24 N-m (17 lbs-ft) and connection support bolts to 42 N-m (31 lbs-ft) per page 48.
Manual Section: Operation p. 31Frequently Asked Questions
What are the torque specs for the BX2810 4-point hitch bolts?
Three sizes carry the load on the BX2810 4-point hitch. The 3/8"NC x 2 1/2" Ig. gr.5 bolts (item 4, page 13) tighten to 42 N-m (31 lbs-ft). The 1/2"NC x 2 1/4" Ig. gr.5 bolts (item 5, page 13) take 105 N-m (76 lbs-ft), and the 7/16"NC x 2" lg. gr.5 bolts (item 5, page 14) go to 67 N-m (49 lbs-ft). Full figures are in the Torque Specification Table on page 48. p. 48
How do I install or remove the BX2811 K-Connect system?
Installation runs steps 1 through 8 of the "Installation of the BX2811 Drive Kit (option)" section beginning on page 22: anti-friction guides, engagement lever, connection support, tension springs, output shaft, telescopic driveline, and fixed driveline. To remove it, step 2 of "Removing the Subframe from the Tractor" (page 29) has you detach the fixed driveline (item 1) from the tractor PTO (item 2) and the subframe output shaft (item 3). Reinstallation follows step 8 of "Reinstalling the Subframe on the Tractor" on page 30. p. 22
How do I reconnect hydraulic hoses on a BX2810 front hitch?
Start by inserting the hoses (items 1-2) into the rear hose support (item 3a). Next, run the hose from the upper cylinder port to the front tractor valve coupler and the other hose to the second coupler, per Figure 7. Fit the white (item 4) and yellow (item 5) identification rings, then secure both hoses with two 8" Ig. tie wraps (item 6) and trim the excess, as detailed on page 21. p. 21
What are the replacement specifications for lift cylinder seals?
Seal replacement is handled as a kit. The Cylinder 2" x 5" (part number 70001-00871) pairs with the Seal kit for cylinder (part number 70001-00872). Both are listed in the PARTS section for the Hitch and Subframe BX2810 on page 41. p. 41
What do I get after purchasing this Kubota BX2810, BX2811 manual?
Delivery is instant. The full 52-page searchable Owner Manual downloads as soon as payment clears, ready to open on a laptop, tablet, or phone right in the shop.
Can I print this manual?
Yes. There is no DRM or copy protection, so print the whole manual or just the pages you need on any home or office printer.


Reviews
There are no reviews yet.