


Part of the Kubota Operator Manuals.
Twenty-six pages, organized so you can follow the RC54-71B and RC60-71B from first assembly to long-term storage. It opens with safety: 20-plus operating rules and four labeled hazard decals. Setup and mounting procedures follow for both front and mid/rear hanger brackets, then a maintenance checklist covering daily oil-leak checks, blade capscrew inspection, and gearbox service. The troubleshooting chart sorts seven faults, including belt slipping, uneven cut, scalping, a plugged discharge chute, and excessive vibration. For the gear box, change oil at 50 hours and every 150 hours after that; it holds 0.4 liters (0.42 qts.), while blade bolts torque to 72-87 ft-lbs. Everything is bookmarked and searchable, so on a phone, tablet, or computer you can jump to the exact section and get back to work.
What's Inside This Kubota RC54-71B, RC60-71B Operator Manual
| System | Pages | Key Topics |
|---|---|---|
| Mower Safety Labels | 3 | Label 1 Part No 70720-4715-4 (Keep All Shields in Place, Stop Engine and Wait Until Blade Stops, Keep Hands, Feet and Clothing Away, Make Sure Area of Operation Is Clear, Stop Mower Blades When Crossing Gravel Drives) |
| Service | 7-8 | When in Need of Parts or of Service, Serial Number Is Located on the Right Side of the Deck, For Your Reference, Please Record the Serial Number |
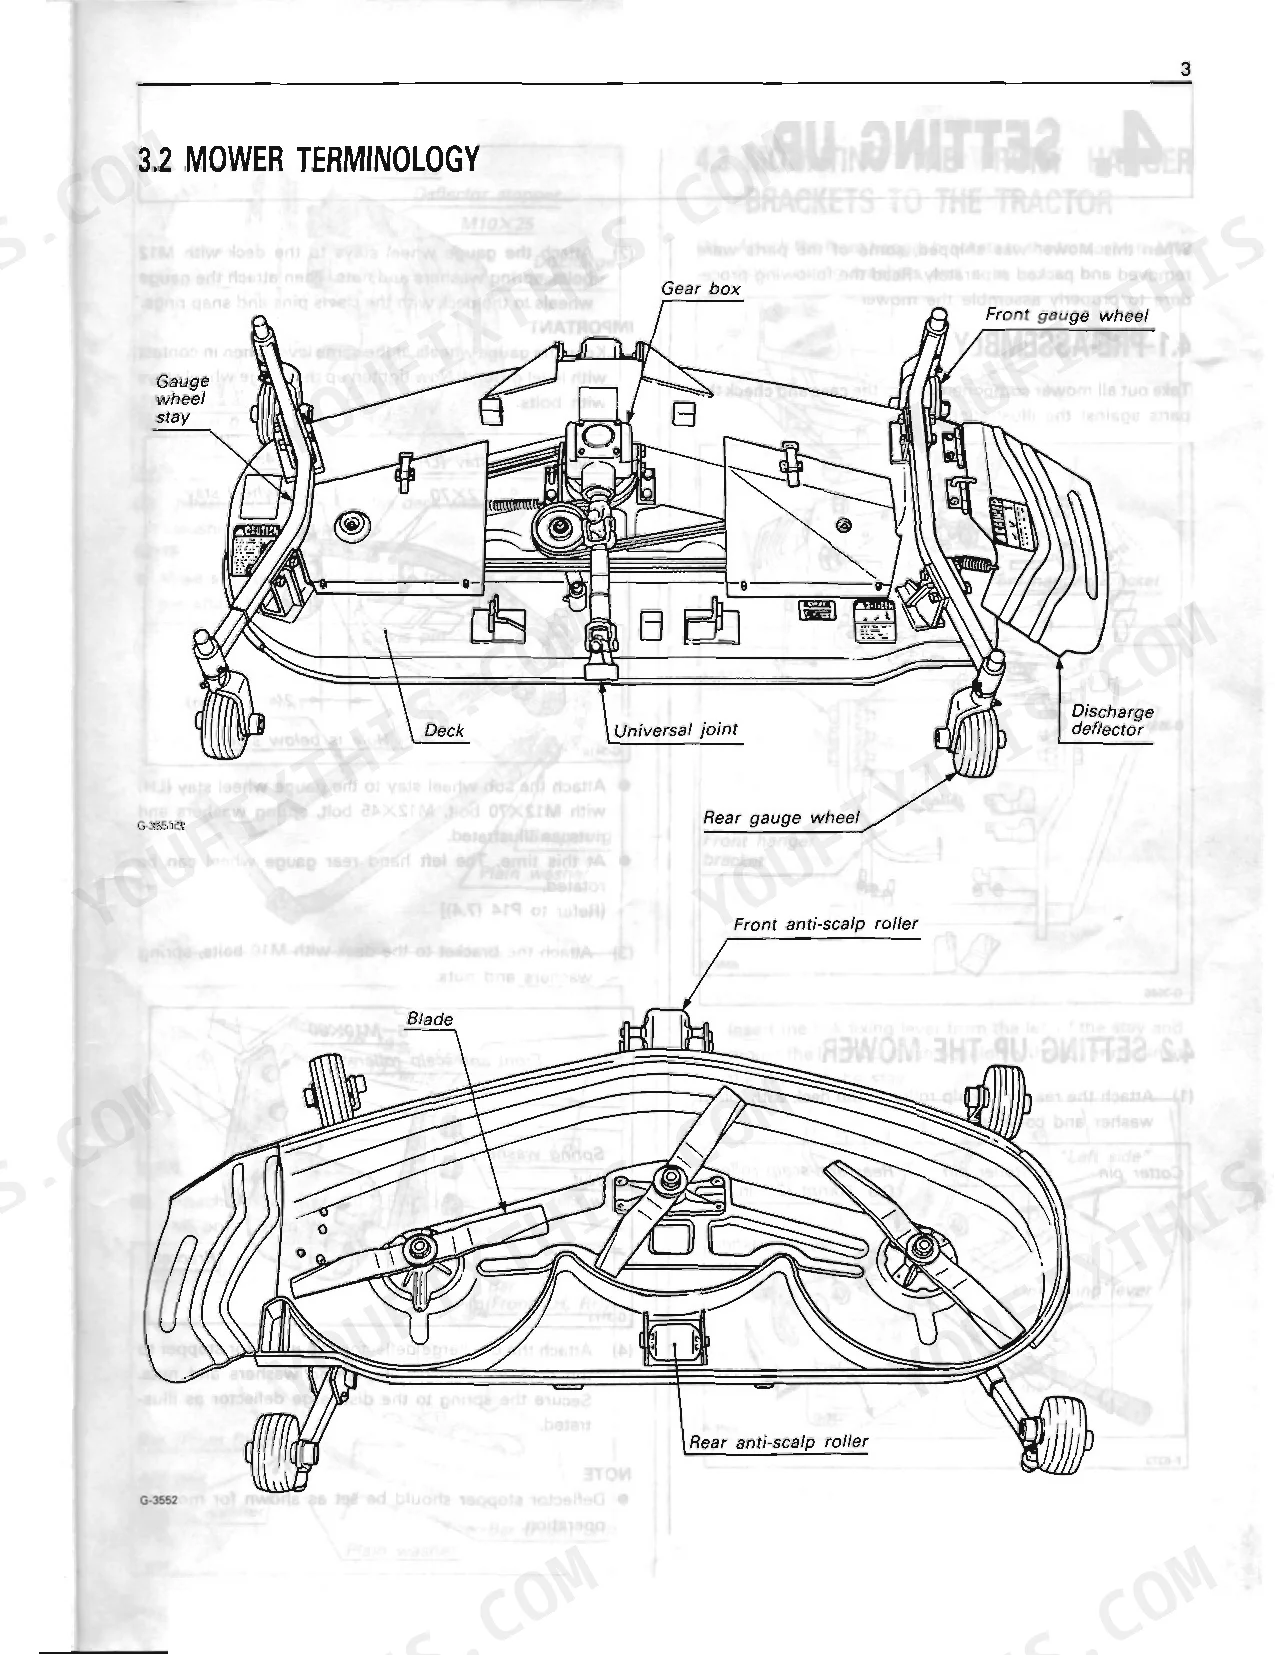
| Setting Up | 9-13 | Pre-Assembly (Take Out All Mower Components) |
| Mounting to the Tractor | 14-15 | Mounting the Mower to the Tractor, Removal of the Mower |
| Mower Adjustments | 16-17 | Front Link and Connecting Rod (Park the Tractor on Level Ground, Adjust the Height of the Four Mower Gauge Wheels, If the Front Wheels Are Not on the Ground, Attach the Front Link to the Mower, Start the Engine, Raise the Tractor Lower Links, Adjust the Turnbuckles of the Left and Right Connecting Rods) |
| Operation | 18-19 | Making the Most of Your Mower (Choose a Smooth Level Area, Size and Type of the Area to Be Mowed, Always Keep the Left Side of the Mower Toward Trees, Most Lawns Should Be Mowed to Approximately 2 to 3 Inches, On Thick or Springy Grass or Soft Ground, For Best Appearance, Grass Should Be Cut, Remove the Front Bars or Cut Grass Twice) |
| Maintenance | 20-23 | Maintenance Check List (Anything Unusual in Previous Day's Operation, Oil Leakage Check, Make Sure Blade Capscrews Are Tight, Blade Wear Check, All Hardware Check, Make Sure All Pins Are in Place, Mower Deck Cleaning, Gear Box Oil Change, Gear Box Oil Check, Greasing, Gear Box Oil Seal Change) |
| Troubleshooting | 24 | Discharge Chute Plugged, Streaking of Grass Uncut, Uneven Cut, Blades Scalping Grass, Belt Slipping, Excessive Vibration, Mower Loads Down Tractor |
| Long-Term Storage | 25 | Winter Storage (Remove the Mower Deck Covers, Slacken Off the Drive Belt Tensioner, Clean All Pulleys and Wipe with a Dry Cloth, Clean All Grass and Dirt From the Mower Deck Top) |
| Contact Information | 26 | Kubota Tractor Corporation (Western Division, Central Division, Northern Division, Southeast Division, Engine Division) |
Quick Reference Specifications
| Specification | Value | Page |
|---|---|---|
| All Models | ||
| M10 Bolt Tightening Torque | 39.2~45.1 N-m (31.1±2.2 ft-lbs) | p. 23 |
| Gear Box Oil Capacity | 0.4 ℓ (0.42 qts.) | p. 20 |
| Gear box oil change interval | first 50 hrs, then every 150 hrs | p. 20 |
| Blade bolt torque | 10 to 12 kgf·m (72 to 87 ft-lbs) | p. 22 |
| Anti-sway link nuts torque | 7.9 to 9.2 kgf·m (57.1~66.5 ft-lbs) | p. 13 |
| Stud bolt torque (mid hanger brackets) | 2 to 3 kgf·m (14.5~21.7 ft-lbs) | p. 11 |
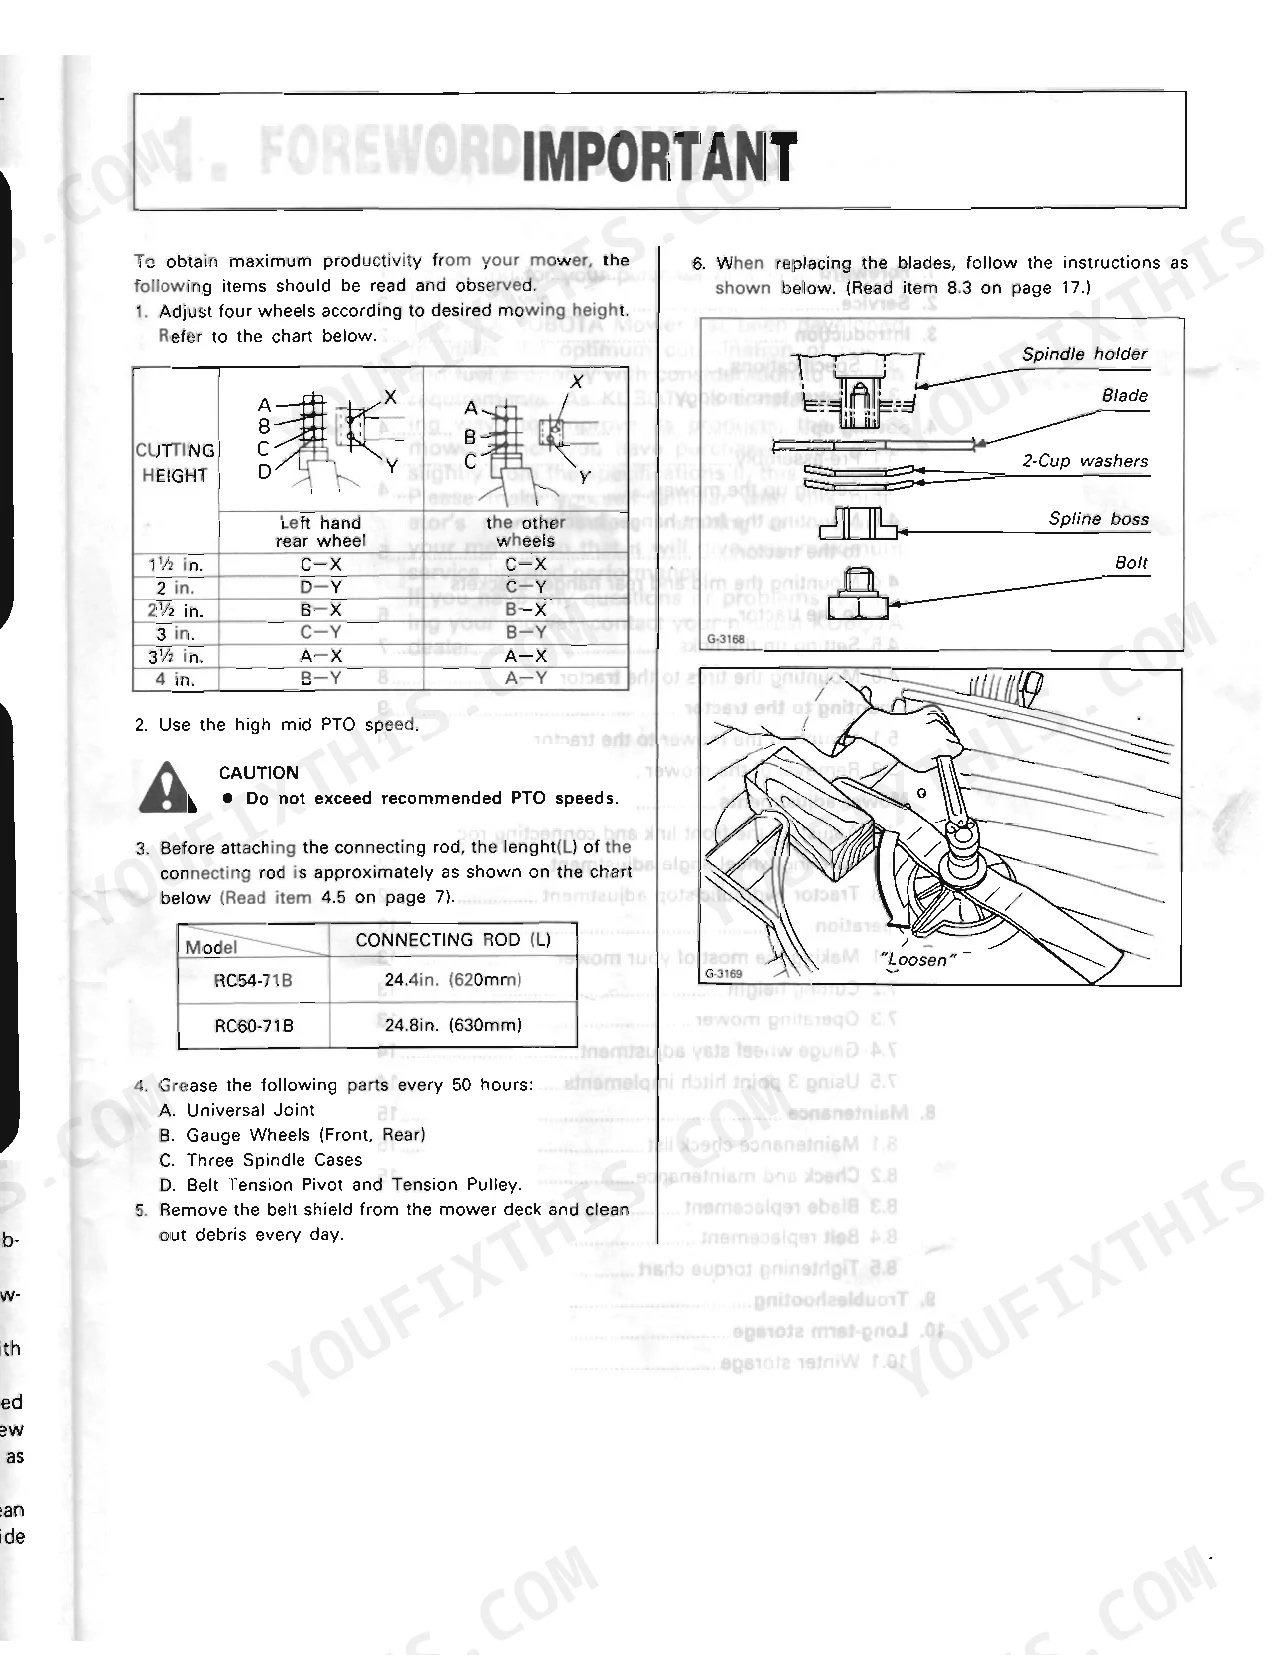
| Recommended cutting height | 2 in (50 mm) | p. 18 |
| RC54-71B | ||
| Connecting rod length | 24.4 in. (620 mm) | p. 4 |
| Cutting width | 54 in. (1372 mm) | p. 7 |
| Blade spindle speed | 3216 rpm (53.6 r/s) | p. 7 |
| RC60-71B | ||
| Connecting rod length | 24.8 in. (630 mm) | p. 4 |
| Cutting width | 60 in. (1524 mm) | p. 7 |
Kubota RC54-71B, RC60-71B Common Problems This Manual Covers
Discharge chute keeps plugging up during normal mowing (RC54-71B/RC60-71B)
Back off your ground speed and bring the engine to full rated RPM before you hit heavy grass; the troubleshooting chart on page 24 walks through it. When grass is wet or long, take a first pass at half the cutting width, then return for the full swath. Keep cutting height at or above 2 in. (50 mm) on thick or springy turf, as noted on page 18.
Manual Section: Troubleshooting p. 24Cut quality is streaky with rows of uncut grass left behind
Run the engine at full RPM and ease off ground speed until the streaking stops. Inspect the blades for damage or dull edges using the maintenance checklist on page 20, and clear any grass packed inside the deck. For thick spring growth, page 18 suggests cutting twice or pulling the front bars.
Manual Section: Troubleshooting p. 24Mower deck vibrates excessively during operation
Stop the tractor at once and set the parking brake. Look over every pulley and the underside of the deck for wrapped or clumped clippings, then check the drive belt for cracking. Confirm the blades are balanced and not bent, and that blade bolts hold 10 to 12 kgf·m (72 to 87 ft-lbs) per page 22, before you resume.
Manual Section: Troubleshooting p. 24Blades scalping and gouging low spots across uneven terrain
Level all four gauge wheels to a matching height on flat ground, following the procedure on page 16. Ease your speed sharply through corners, and raise cutting height above 2 in. (50 mm) on rough or rolling terrain. On ridged ground, make a slow scouting pass to find the high spots before you open up to full speed.
Manual Section: Mower Adjustments p. 16Drive belt slips or squeals under load
Shut down and check the belt and every pulley for packed debris, as the maintenance checklist on page 20 lays out. Look for bent blades, which load the belt against an unbalanced spin, and for worn or fraying belt surfaces. Grease the spindle shafts and the belt-tension pulley pivot every 50 hours to head off early wear on the drive.
Manual Section: Maintenance p. 20Gear box runs hot or shows oil seepage around the seal
Read the gear box oil level on page 20 and top up to the 0.4 L (0.42 qts.) capacity if it sits low, using the specified gear oil. Run the first oil change at 50 hours, then every 150 hours after. If seepage keeps on after a correct fill, inspect the seal as covered in the gear box oil seal change section on page 20.
Manual Section: Maintenance p. 20Frequently Asked Questions
What are the recommended service intervals?
A maintenance check list lays out the service intervals. Many items get a daily check, while changes and deeper inspections fall at marks like 50, 100, 150, and 200 hours. One note flags that jobs marked with a circle must be done after the first 50 hours, then every 150 hours after that. p. 20
What fluids and capacities does this machine require?
For the gear box, use SAE 90 gear oil year round, with a capacity of 0.4 ℓ (0.42 qts.). Change it after the first 50 hours, then every 150 hours after that. Greasing calls for SAE multipurpose grease on parts such as the universal joint and gauge wheels. p. 20
What torque specifications are listed?
A tightening torque chart runs through bolt sizes M8, M10, M12, and M14, with values in ft-lbs, N-m, and kgf-m. M12 bolts, for one, take 62.8~72.6 N-m (46.3~53.5 ft-lbs). The chart also lists stud bolts (2 to 3 kgf·m or 14.5~21.7 ft-lbs), anti-sway link nuts (7.9 to 9.2 kgf·m or 57.1~66.5 ft-lbs), and blade mounting bolts (10 to 12 kgf·m or 72 to 87 ft-lbs). p. 23
What format is this manual in?
A 26-page Operator Manual in searchable PDF, ready the moment your checkout clears. Open it on a computer, tablet, or phone, with no shipping wait.
Are there any print restrictions on this manual?
Print freely — single pages, whole chapters, or the full manual; the PDF ships fully unlocked.


Reviews
There are no reviews yet.