


Part of the Case Operator Manuals.
All 350 pages of this Case MX Series Operator Manual (OEM #Don 6-20150) are built around keeping your MX80C, MX90C, or MX100C running right from first start to end of season. You get cold-start procedures, PTO and three-point hitch setup, remote hydraulic valve operation, dashboard indicator guides, service lamp diagnostics, and tire pressure and load capacity tables for every wheel configuration. Maintenance intervals run from 10-hour daily checks through 50-, 100-, 250-, 500-, 1,000-, and 2,000-hour service milestones, each with its own procedure list. Fill the engine to 7 litres on an oil-and-filter change, top the coolant to 17.5 litres, and swap the in-line fuel filter at the 1,000-hour mark. No more hunting forum posts for a number that's right here. Download once, open on any device, and use the bookmarks to land on the exact section you need.
What's Inside This Case MX80C–MX100C Operator Manual
| System | Pages | Key Topics |
|---|---|---|
| To the Owner | 8-12 | How to Use This Manual, Safety Decals, Declaration of Conformity, Emc - Supplementary Information, Manual Storage, Tractor Models |
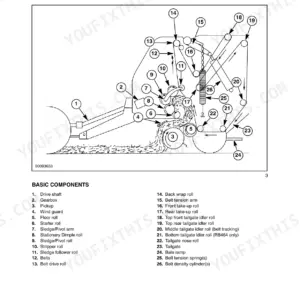
| Identification Numbers/Machine Components | 13-16 | Product Identification and Serial Numbers, Machine Components |
| Safety/Decals | 17-26 | Intended Use, Transporting Passengers, Operation, Leaving the Tractor, Implements, PTO Operation, Service, Battery Safety |
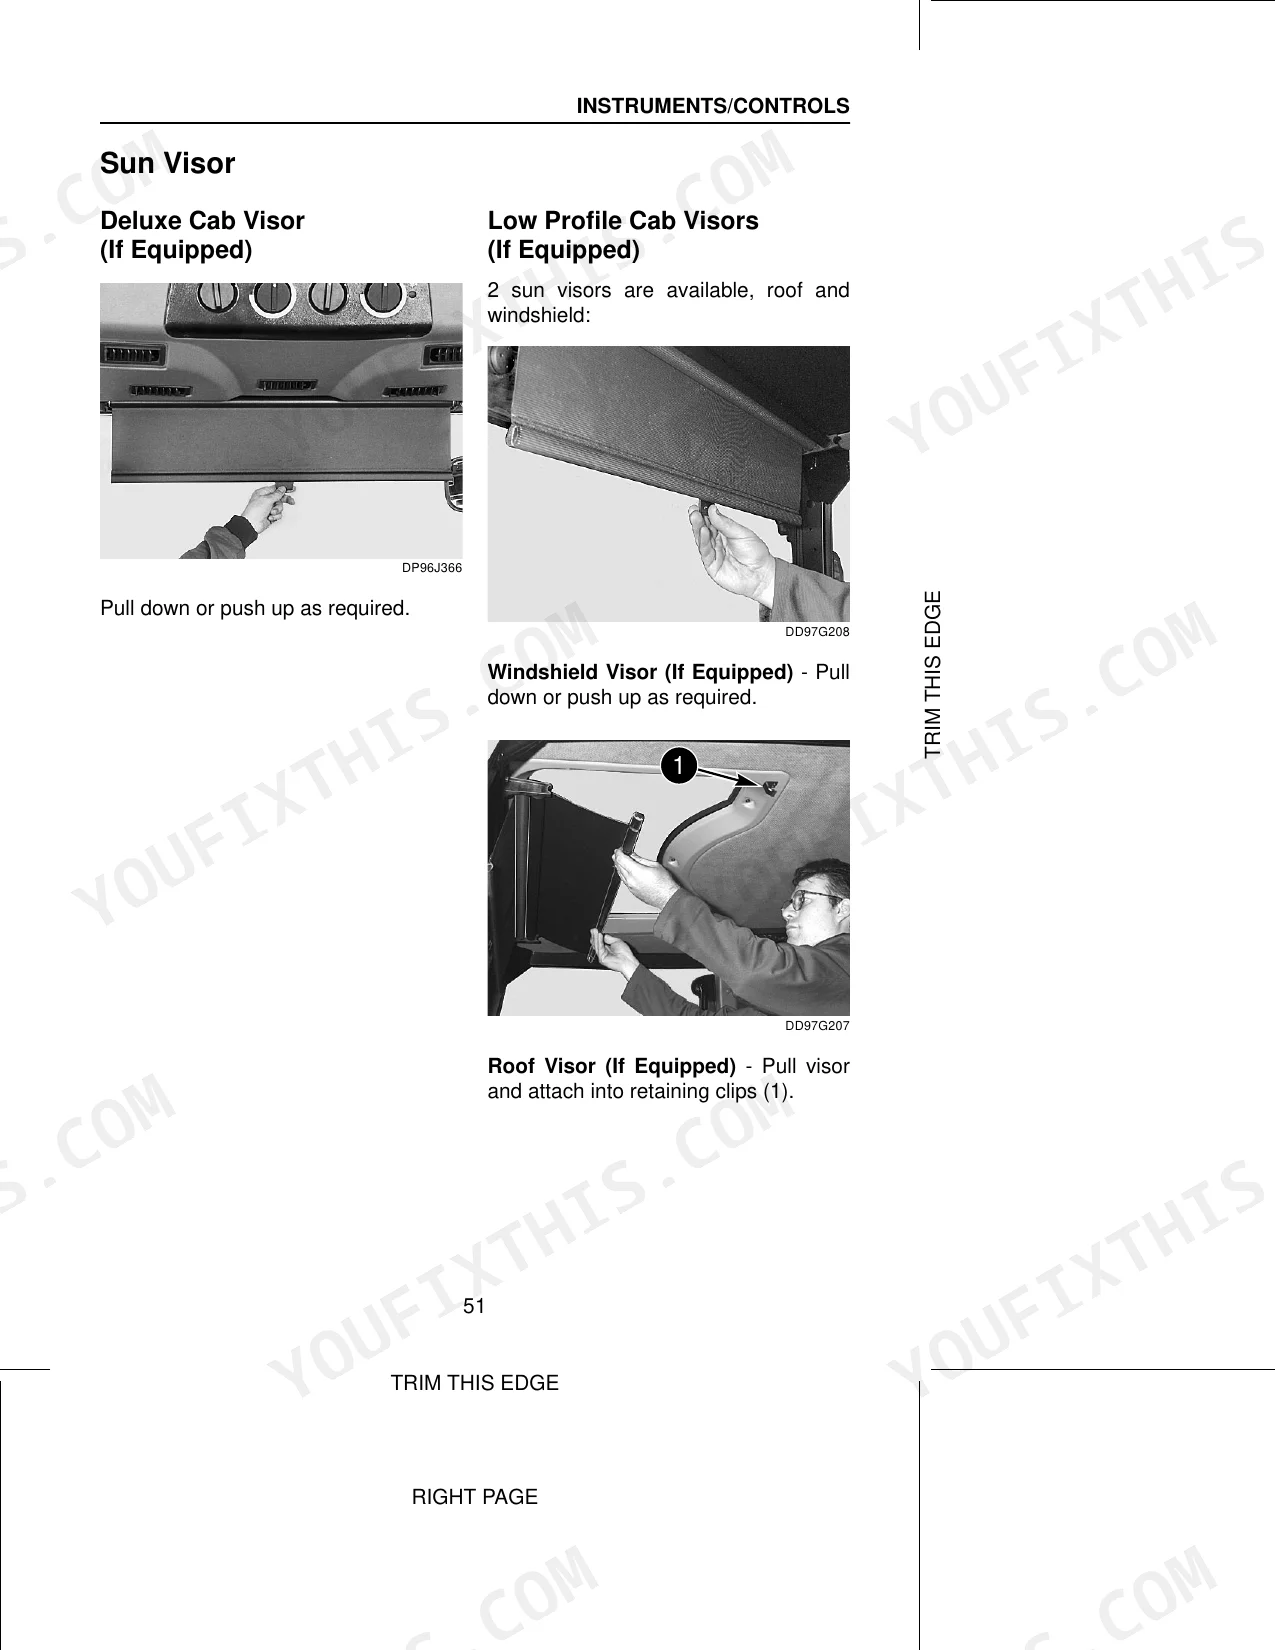
| Instruments/Controls | 27-60 | Tractor Access, Operators Seat, Steering Column Adjustment, Standard Instrument Cluster, Deluxe Instrument Cluster, Operating Controls, Operator Cab Environment Controls |
| Operating Instructions | 61-106 | Before Starting the Engine, Run in Procedure, Master Disconnect Switch, Service Indicator Lamps, Normal Starting Procedure, Cold Temperature Operation, Parking the Tractor |
| Field Operation | 107-188 | Transmission Creeper Operation, Wheel Slip Indicator, Programming the Digital Instrument Cluster, Distance Function Operation, Area Function Operation, Rear Power Takeoff |
| Tires/Wheels/Spacing/Ballast | 189-236 | Tire Inflation Specifications, Tire Pressures and Load Capacities, Front Axle and Front Tread Adjustments, Rear Wheel Tread Adjustment, Tractor Ballast, Tractor Weight Distribution |
| Lubrication/Maintenance | 237-300 | Environment, Plastic and Resin Parts, Service Parts, Tool Box, Hourmeter, Tilt Hood, Lubricants and Capacities, Regular Service Chart |
| Electrical System | 301-319 | Batteries, Bulb and Lamp Replacement, Fuses and Relays, Relays Under Instrument Panel, Relays Under R/H Side Console, Relays in Front Headliner |
| Machine Storage | 320-321 | Putting the Tractor Into Storage, Preparing the Tractor for Storage, Removing the Tractor From Storage |
| Specifications | 322-342 | Diesel Engines, Travel Speeds, Approximate Tractor Dimensions, Approximate Tractor Weights, Noise Levels |
Quick Reference Specifications
| Specification | Value | Page |
|---|---|---|
| All Models | ||
| In-line Fuel Filter Replacement Interval | 1000 hours | p. 285 |
| Engine Oil Capacity - With Filter Change | 7 Litres (1.5 UK Gallons) | p. 241 |
| Coolant Capacity | 17.5 Litres (3.8 UK Gallons) | p. 241 |
| Fuel Tank Capacity | 189 Litres (41.6 UK Gallons) | p. 241 |
| Transmission/Hydraulic Oil Factory Fill Capacity | 71 Litres (15.6 UK Gallons) | p. 241 |
| Remote Hydraulic Maximum System Pressure | 206 bar (2 987 psi) | p. 243 |
| Rated Engine Speed | 2200 rpm | p. 323 |
| Drawbar Support Bracket Bolts Torque (bolts 1) | 295 to 330 Nm (215 to 245 ft lb) | p. 263 |
| 2WD | ||
| Front Wheel Mounting Nuts Torque (2WD) | 108 to 136 Nm (80 to 100 Ibs ft) | p. 213 |
| MX100C | ||
| Engine Power Output (MX100C) | 75 kW | p. 323 |
| Max. Torque (MX100C) | 402 Nm | p. 323 |
Case MX80C–MX100C Common Problems This Manual Covers
Engine hard to start in cold weather, long cranking before it fires
Follow the cold temperature starting procedure on pages 67-70, which covers Thermostart and Ether system use in sequence. Allow the Thermostart to preheat for the full recommended cycle before engaging the starter. Do not crank for more than 30 seconds continuously. If the engine still fails to fire, inspect the fuel pre-filter for contamination and check the suction line for air leaks, as cold fuel thickens and any air ingress becomes critical below freezing.
Manual Section: Operating Instructions p. 67Fuel warning or reservoir pressure anomaly indicated on instrument cluster
Check fuel level in the 189-litre (41.6 UK Gallon) tank first. Inspect the fuel cap seal and reservoir gasket for cracks or improper seating that could cause pressure loss. Examine the full length of the suction line from tank to pre-filter for kinks or separation at fittings. Refer to for the fuel system general inspection procedure, which covers fuel line routing and injection nozzle condition checks.
Manual Section: Lubrication/MaintenanceElectrical fuse blown, cab light or accessory circuit stops working without warning
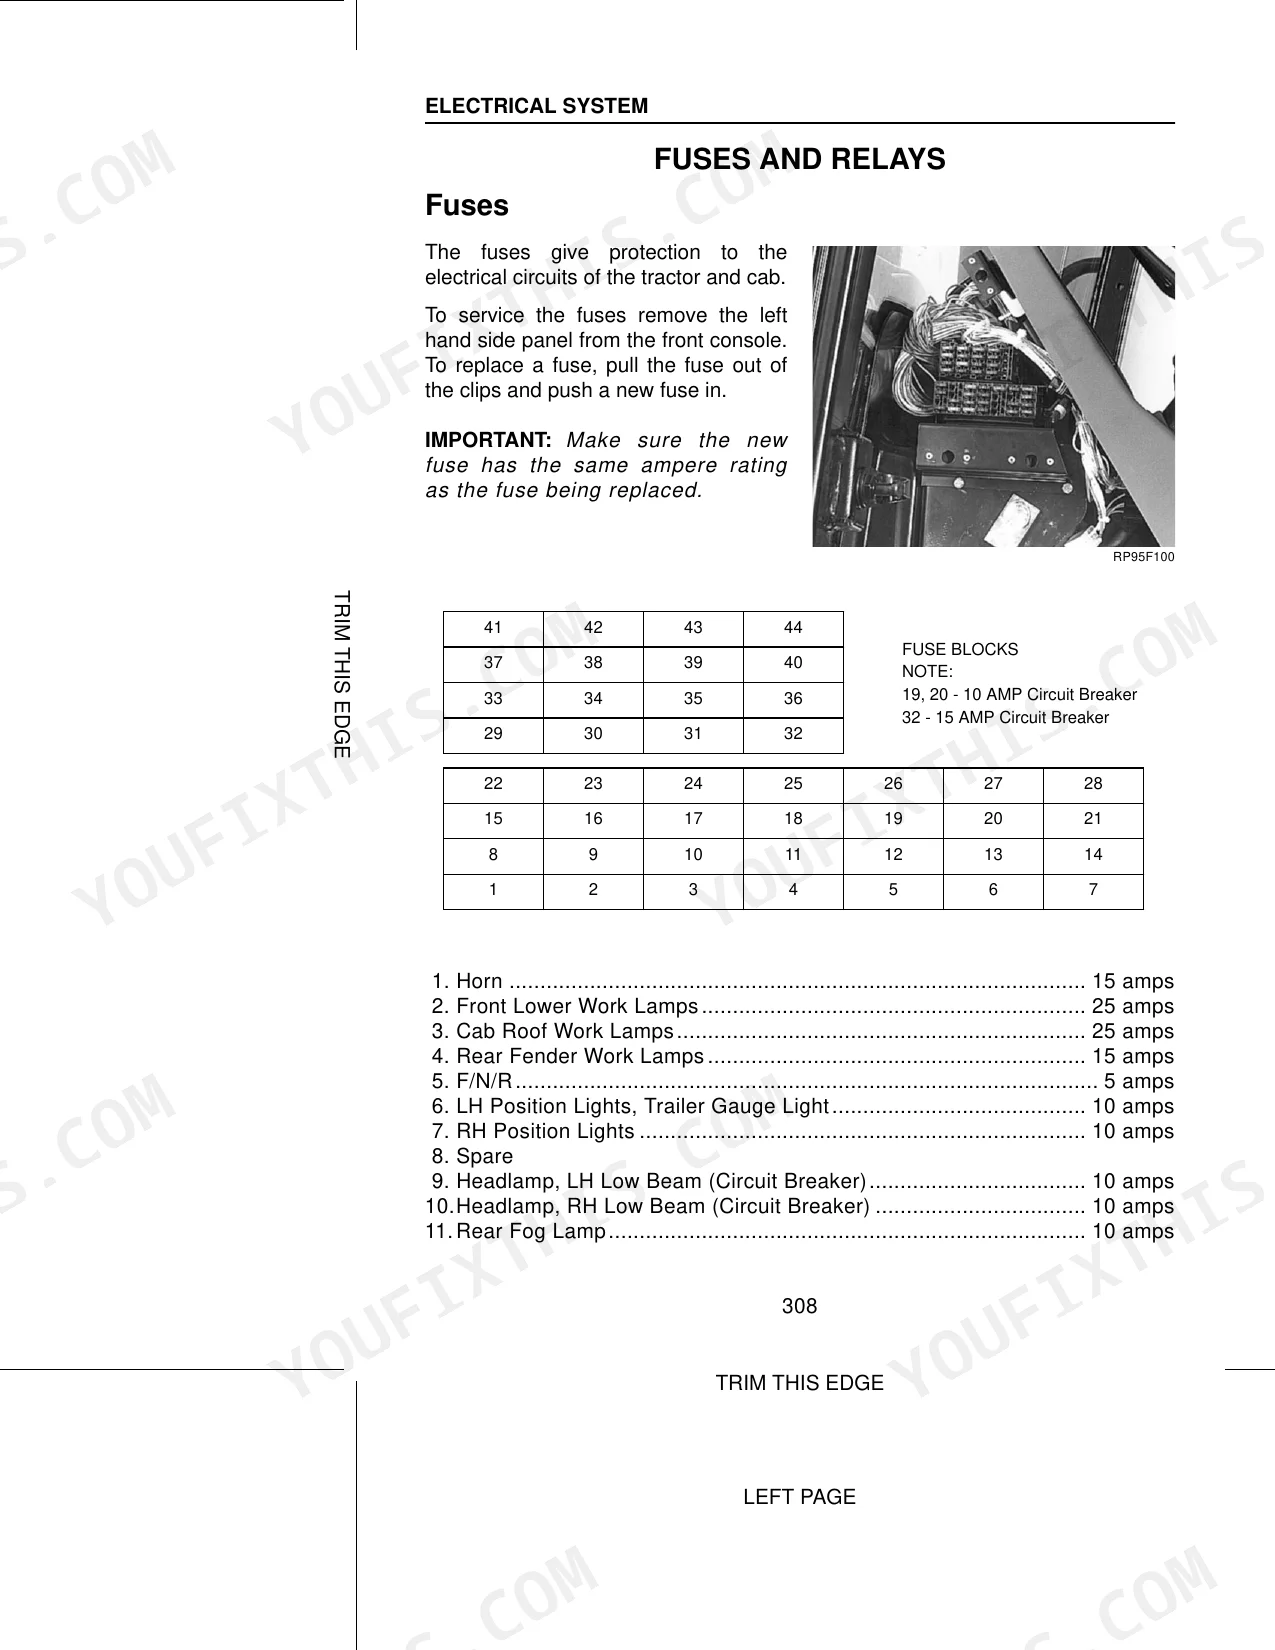
Identify the affected circuit using the fuse and relay diagram starting on page 315. Carry spare fuses in the toolbox (location covered on page 237). Before replacing, disconnect any recently added implements or accessories that may be drawing excessive current. Install a fuse of identical amperage rating only; never substitute a higher-rated fuse. If the replacement blows immediately, stop and have the wiring inspected rather than cycling through more fuses.
Manual Section: Electrical System p. 315Hitch refuses to raise or lower implement, no response from control lever
Check the hitch diagnostic display for an active error code before manually cycling controls. If a code is present, cross-reference it against the error code reference. As an interim step, use the hitch control bypass procedure to manually override the electronic controls and lower the implement safely. Do not force the lever or increase engine speed to compensate; verify hydraulic oil level in the transmission/hydraulic system (factory fill 71 litres) and move the side console control lever forward and rearward to equalize system pressure (page 180).
Manual Section: Field OperationFrequently Asked Questions
How to reset the error code on Case IH Maxxum MX80C, MX90C, or MX100C?
PTO system error codes can be cleared upon tractor start-up if caused by operation. To re-enable the PTO system after an error code, push the PTO ON/OFF switch fully down to the OFF position to turn off the indicator lamp, then lift the locking collar and pull the switch up to the ON position to re-engage the PTO. For other error codes, restart the tractor and observe if the code repeats; if so, contact your dealer. p. 129
What are the torque specs for the front axle bolts on Case IH Maxxum MX80C, MX90C, or MX100C?
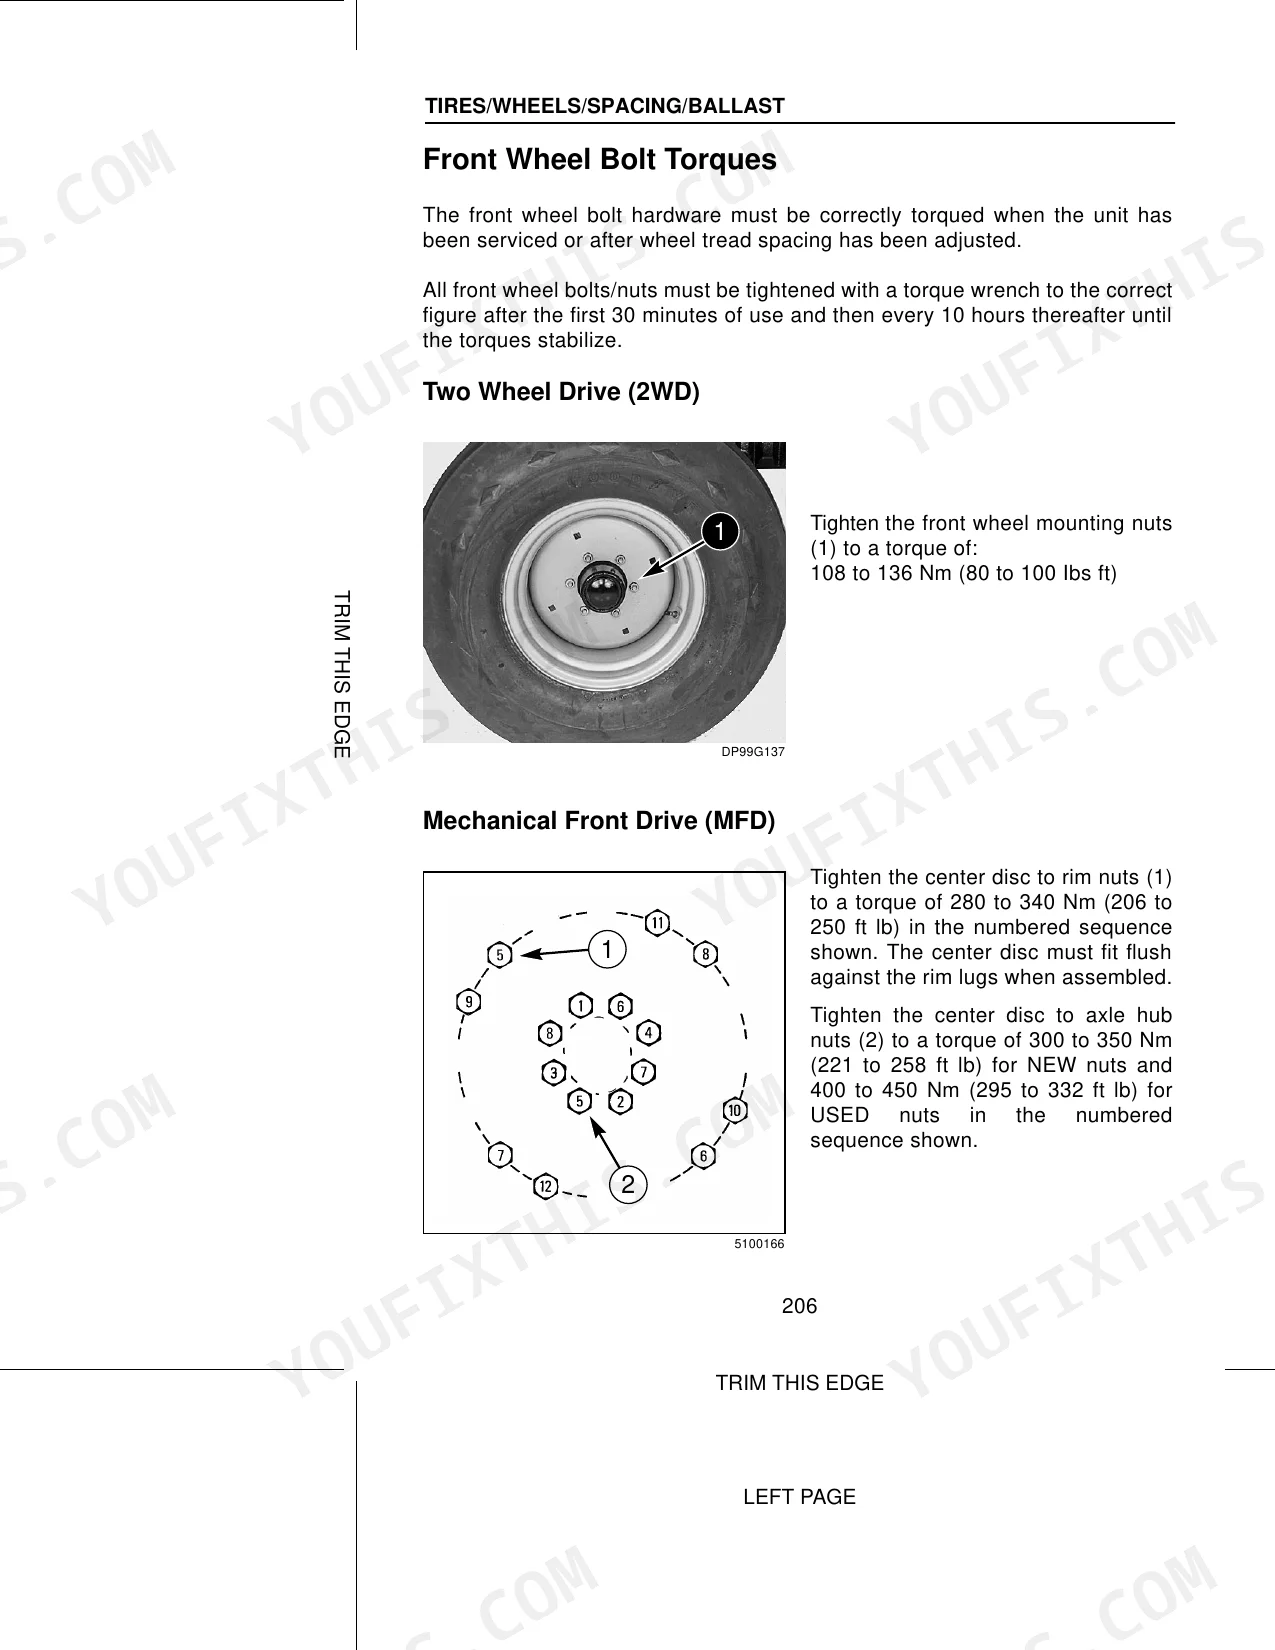
For Mechanical Front Drive (MFD) tractors, tighten the center disc to axle hub nuts to a torque of 300 to 350 Nm (221 to 258 ft lb) for NEW nuts, and 400 to 450 Nm (295 to 332 ft lb) for USED nuts. For Two Wheel Drive (2WD) tractors, tighten the front wheel mounting nuts to a torque of 108 to 136 Nm (80 to 100 Ibs ft). p. 206
How do you fix case MX80C, MX90C, or MX100C engine cranks slowly or fails to start, especially after sitting overnight?
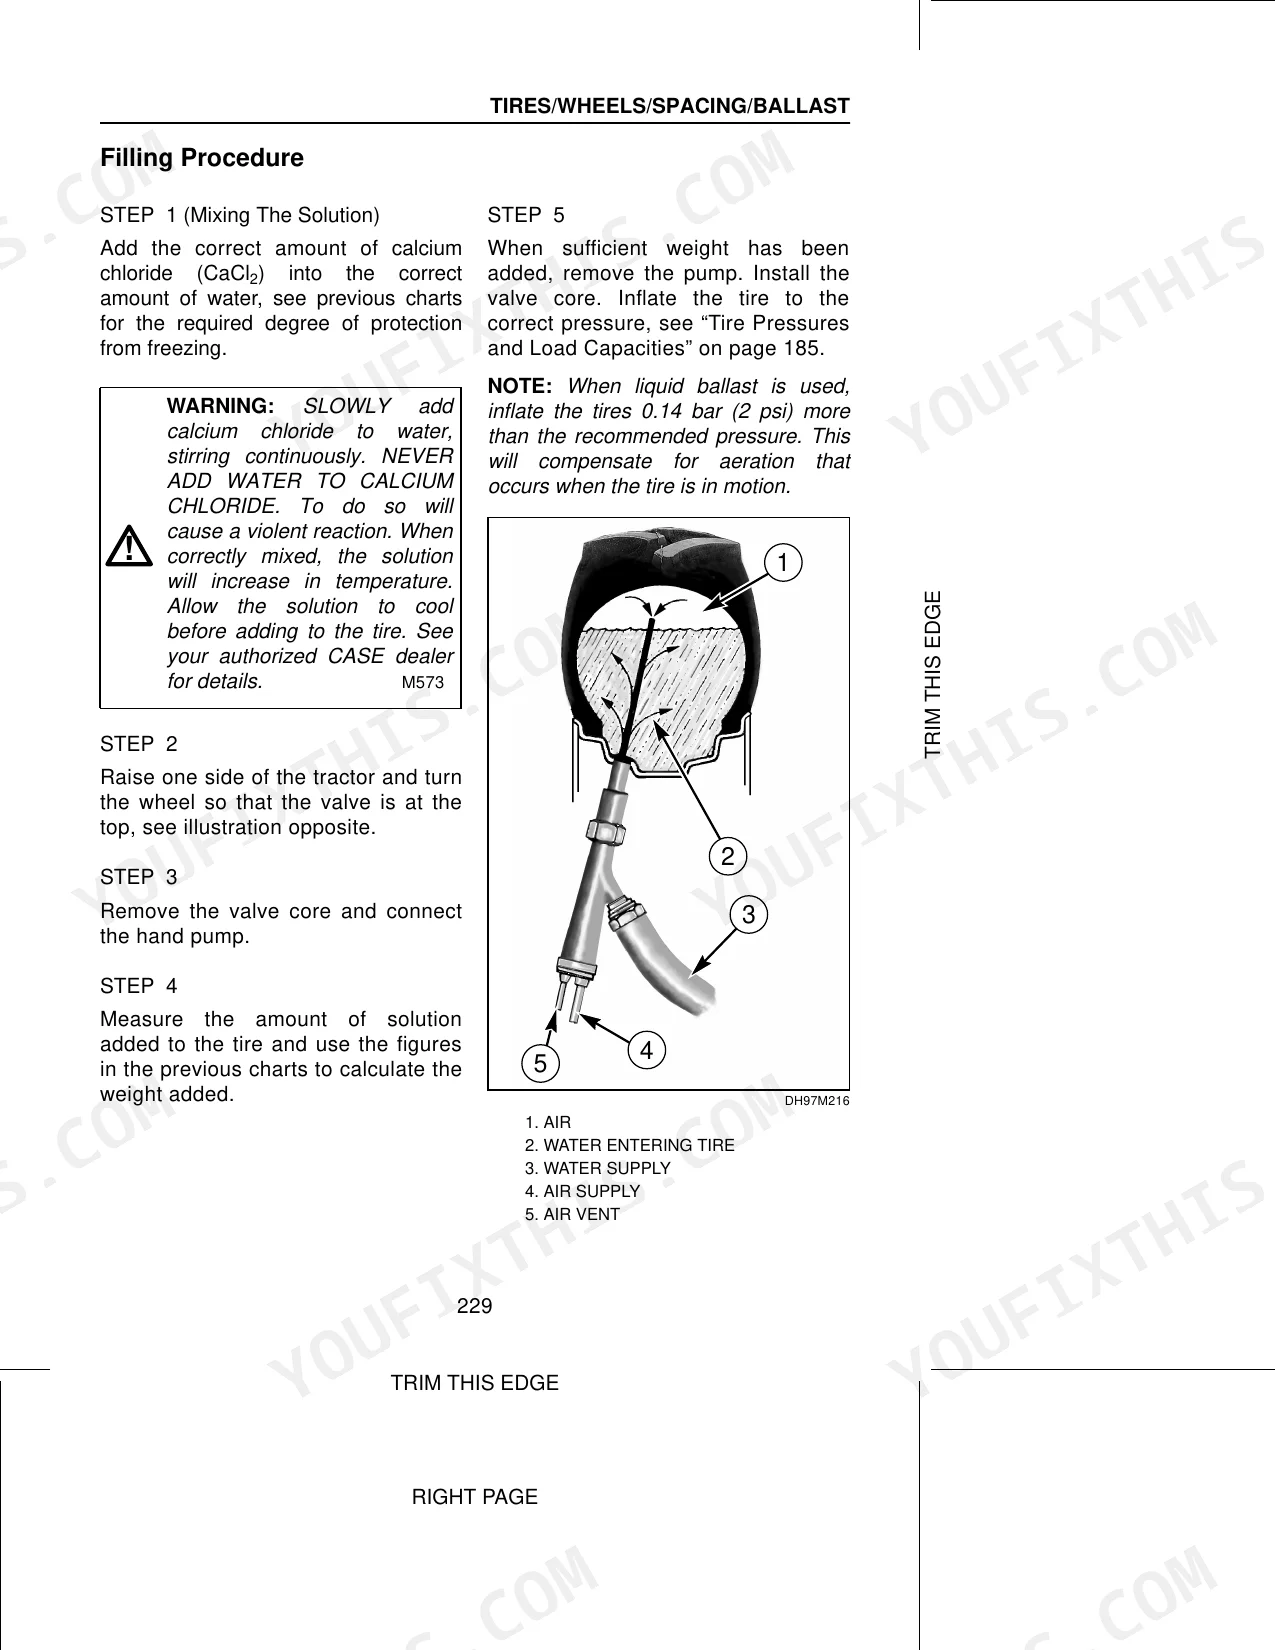
Check the fuel system for air ingress before cranking again. Inspect the suction line running from the reservoir to the pre-filter for cracks, loose fittings, or damaged seals. Replace the in-line fuel filter if it has exceeded 1000 hours of service (page 285). Prime the system by cycling the ignition several times before attempting a full start. If the suction line shows any wear, replace it along with the reservoir gasket and line seals. p. 285
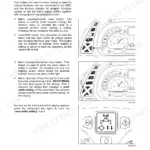
How do you fix service indicator lamp illuminates on the dashboard during or after engine startup?
Check the indicator lamp meaning table on page 63 to identify which system is flagged before assuming the worst. Verify engine oil level is correct for a 7-litre (1.5 UK Gallon) capacity with filter, and confirm coolant sits between MIN and MAX marks in the overflow reservoir (system capacity 17.5 litres). If the lamp clears after warmup, note which lamp it was and monitor for recurrence over the next operating cycle. p. 63
How quickly can I access this manual after buying?
You get a 350-page searchable PDF that downloads instantly after checkout. Open it on your laptop, tablet, or phone, and bring it right to the shop floor.
Can I print specific sections of this Case MX80C, MX90C, MX100C Operator Manual?
Absolutely. No DRM or copy protection. Print the whole manual or just the pages you need. Any home or office printer works.


Reviews
There are no reviews yet.