


Part of the JCB Operator Manuals.
Looking for the exact factory maintenance intervals for your utility vehicle? All 152 pages of this JCB Workmax 1000D operator manual pdf (OEM #9821-0850) focus on keeping your machine running strong day after day. Inside, you get complete fluid capacity charts, detailed daily inspection checklists, and a full section explaining every dashboard indicator. Open to the maintenance schedules to find exact interval breakdowns for servicing the CVT, differentials, and braking systems safely. Swap out your air cleaner element every 100 hours in dusty conditions, and always verify your front wheel nuts are tightened to exactly 120 Nm before hitting the job site. Don't risk unexpected downtime over skipped grease points or ignored warning lights. Download this bookmarked file straight to your phone or tablet, walk out to your vehicle, and get your daily checks done right the first time.
What's Inside This JCB WORKMAX 1000D Operator Manual
| System | Pages | Key Topics |
|---|---|---|
| Introduction & General Safety | 1-19 | General Information, Safety Notices, Operator Manual Overview, Safety Warnings (Danger, Warning, Caution), Intended Use, Care and Alertness, Clothing/Alcohol/Drugs, Mobile Phones and Lifting Equipment, Machine Limits, Exhaust Gases, Fluid Under Pressure and Hydraulic Pressure, Electrical Circuits, Fuel and Oil Handling, Safety Labels and Hazard Identification |
| Machine Identification & Labels | 20-26 | Safety Label Identification, Part Numbers and Description, Machine Identification Plate, Machine and Engine Serial Numbers, Product Identification Number (Pin), World Manufacturer Identification, ROPS Data Plate, Single Vehicle Approval Data Plate, Engine Identification Number |
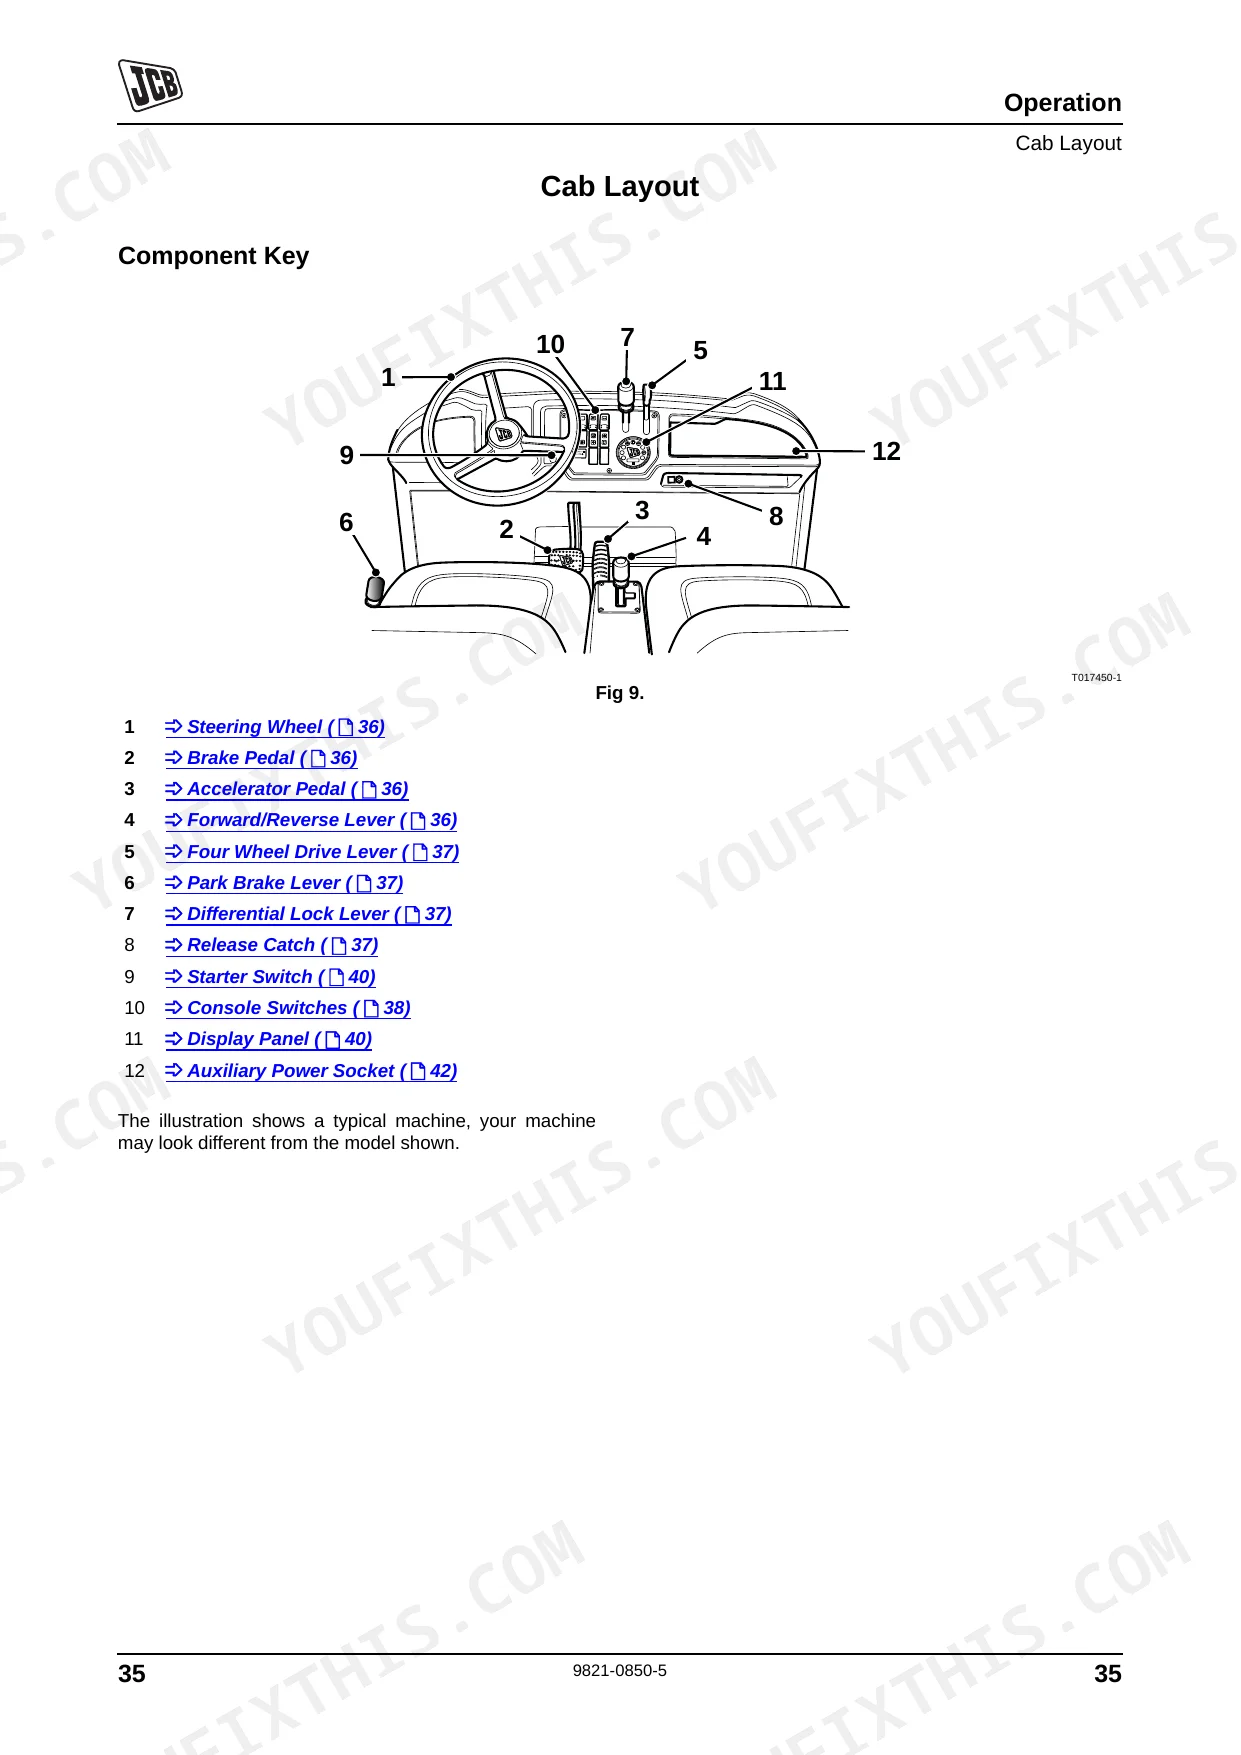
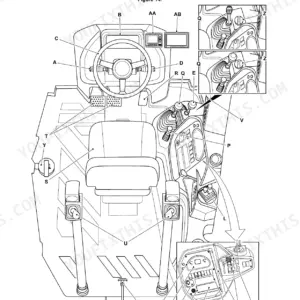
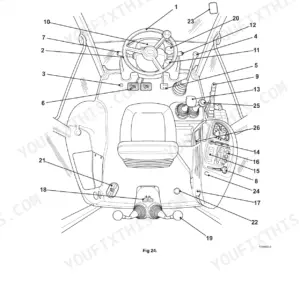
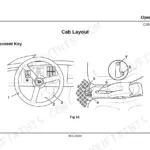
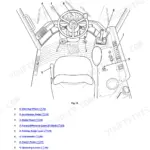
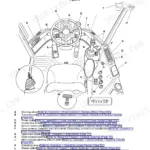
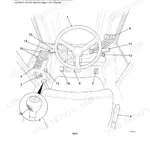
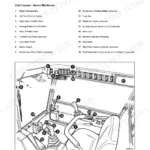
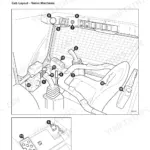
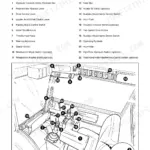
| Cab, Seating & Controls | 27-45 | Cab Entry and Exit, Emergency Exit, Doors and Windscreen, Adjustable Operator Seat, Inertia Reel Seat Belt, Mirrors and Visibility, Cab Layout, Steering Wheel, Brake and Accelerator Pedal, Forward/Reverse Lever, Four Wheel Drive Lever, Park Brake Lever, Console Switches (Beacon, Hazard Warning Lights, Headlights), Hour-Meter, 12V Auxiliary Power Socket |
| Starting, Driving & Site Operation | 46-65 | Glow Plug Pre-Heat and Engine Starting, Road and Work Lights, Differential Lock Lever, Power Steering Warning Light, Park Brake, Load Bay Tipper Switch, Hydraulic Tipper Rams, Gas Strut, Tailgate and Side Door Latches, Maximum Load Capacity, Slopes and Rough Terrain, Low Temperature Operation, Tow Hitch and Trailer Draw Bar |
| Refuelling, Towing & Transport | 66-71 | Fuel Tank Filling, Fuel Type, Towing a Disabled Machine, Rigid Draw-Bar, Loading Ramps, Wheel Alignment, Forklift Points, Pallet Forks Alignment, Machine Securement for Transport |
| Storage & Maintenance Overview | 72-78 | Machine Storage Preparation, Coolant Condition Check, Battery Installation After Storage, Service and Maintenance Agreements, Genuine JCB Replacement Parts, Lubricant Hygiene and Waste Disposal, First Aid for Oil Exposure |
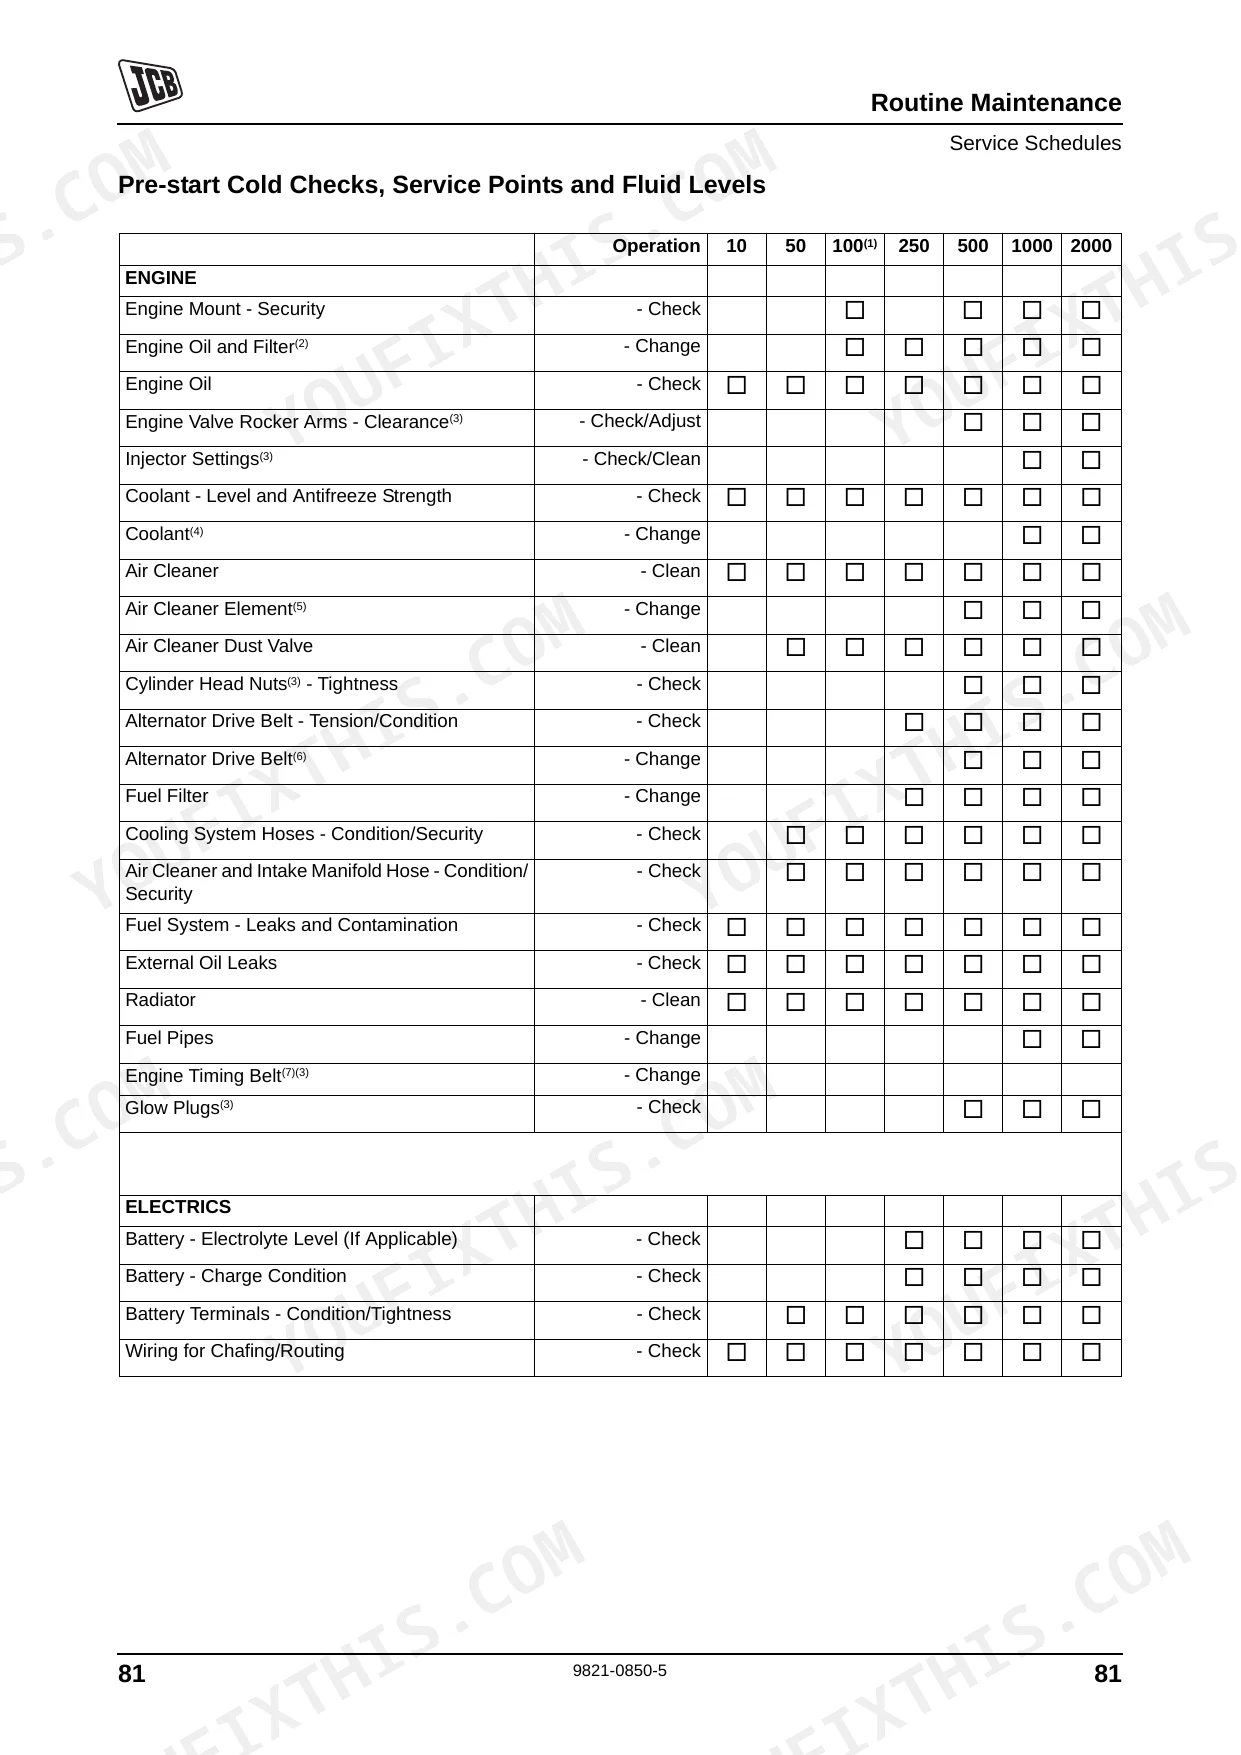
| Battery, Service Schedule & Fluids | 79-89 | Battery Disconnection/Connection, Electrolyte Level Check, Service Interval Schedule, Front and Rear Differential, Gearbox, Continuously Variable Transmission (CVT), Driveshaft, Engine Oil, Coolant, Brake Fluid, Recommended Fuel Specification, Antifreeze Concentration |
| Cleaning, Inspection & Greasing | 90-99 | Pressure Washing and Steam Cleaning, ROPS Mounting Bolts and Security Check, Electrical Circuit Damage Check, Tyre and Seat Belt Check, Grease Points, Grease Gun Application, Driveshaft Grease Points, Front Access and Fuse/Battery Cover Panels |
| Brakes & Electrical System | 100-111 | Park Brake Adjustment, Brake Cables and Calliper, Foot Brake Pad Inspection, Brake Fluid Level Check, Wiring and Fuse Locations, Circuit Protection, Battery Isolation Switch, Jump Start Procedure, Power Steering Fuses |
| Engine & Fuel System Servicing | 112-124 | Engine Oil Level Check, Oil and Filter Change, Cooling System and Coolant Change, Radiator Hoses and Clamps, Alternator Drive Belt Tension, Air Filter Element Replacement, Fuel Filter Change, Fuel System Bleeding |
| Hydraulics, Transmission & Running Gear | 125-136 | Hydraulic Oil Level, Load Bay Tipper Mechanism, Gearbox Oil Level, Front and Rear Differential Oil Level, Cv Joint Gaitors, Tyre Inflation, Wheel Nut Torques, Windscreen Washer Bottle |
| Specifications & Capacities | 137-143 | Static Dimensions, Load Bay Capacity, Fuel Tank/Gearbox/Differential/Coolant/Brake Fill Capacities, Maximum Travel Speed, Maximum Operating Slope Angle, Maximum Gross Trailer Weight, Tyre Sizes and Pressures, Whole-Body and Hand-Arm Vibration Emission |
| Warranty, Registration & Compliance | 144-152 | Warranty Service Installation Checklist, Service Intervals (50 to 1500 Hrs), Customer and Dealer Registration Copy, Ec Declaration of Conformity, Product Identification Number, En Standards |
Quick Reference Specifications
| Specification | Value | Page |
|---|---|---|
| Wheel Nut Torque - Front | 120 Nm (88 lbf ft) | p. 134 |
| Wheel Nut Torque - Rear | 120 Nm (88 lbf ft) | p. 134 |
| Battery Capacity | 60 Ah | p. 140 |
| System Voltage | 12 VDC | p. 140 |
| Air Cleaner Element Change Interval (dusty conditions) | every 100 Hours | p. 84 |
| Alternator Drive Belt Deflection | 7 - 9 mm (0.275 - 0.354 in.) | p. 121 |
| Alternator Drive Belt Change Interval | every 500 hours or two years | p. 84 |
| Fuel Tank Capacity | 37 (8.1) Litres (Gallons) | p. 138 |
| Engine Oil Sump and Filter Capacity | 2.6 (0.6) Litres (Gallons) | p. 138 |
| CVT Belt Slip Condition | If belt slip occurs during normal use for example on a steep slope, always examine the belt. | p. 128 |
| Differential Lock Usage Warning | Excessive tyre wear occurs if the differential lock is engaged on normal ground conditions. Turning the vehicle or driving at high speeds while the differential lock is engaged can cause you to lose control of the vehicle. Only use the differential lock at low speeds. | p. 39 |
| Gearbox Oil Capacity | 1.2 Litres (0.3 Gallons) | p. 138 |
JCB WORKMAX 1000D Common Problems This Manual Covers
JCB Workmax 1000D engine will not start or stalls shortly after starting in cold weather conditions.
Bleed the fuel system as described on page 124 to remove trapped air. Check the engine oil dipstick and verify the sump contains exactly 2.6 Litres (0.6 Gallons) of oil. Inspect battery terminals for corrosion and confirm the starter engages properly.
Manual Section: Change the Fuel Filter p. 124Power steering indicator light stays illuminated on the dashboard and steering feels unusually heavy during operation.
Engage the park brake and stop the engine immediately. Check the diagnostic steps on page 52. Inspect the power steering primary and in-line fuses located in the secondary fuse box. Verify the alternator drive belt deflection measures between 7 - 9 mm (0.275 - 0.354 in.).
Manual Section: Power Steering System p. 52Driveline performance degrades and transmission slips when driving up steep inclines or carrying heavy loads.
Inspect the CVT belt for severe fraying or cracks. Verify the gearbox oil level is correct and holds exactly 1.2 Litres (0.3 Gallons) of fluid. Check the front wheel nut torques on page 134 to ensure they are tightened to 120 Nm (88 lbf ft).
Manual Section: Gearbox p. 129Unusual rattling noise from the cab structure when driving over rough terrain or bumpy job sites.
Examine the Roll Over Protection Structure (ROPS) for damage and loose mounting hardware as described on page 94. Tighten any loose mounting bolts to the manufacturer-specified torque. Inspect all safety harnesses and cables for proper security before resuming operation.
Manual Section: Checking the ROPS p. 94Frequently Asked Questions
What is the torque spec for JCB Workmax 1000D wheel nuts?
The correct torque specifications for the JCB Workmax 1000D wheel nuts are 120 Nm (88 lbf ft) for both front and rear wheels. For the hub, the torque is 250 Nm (184 lbf ft). Check wheel nut torques each day before work and recheck after any wheel removal until readings are stable. p. 134
What are the replacement specifications for battery?
The battery capacity for the JCB Workmax 1000D is 60 Ah. The system voltage is 12 VDC. p. 140
What are the replacement specifications for filters?
The manual specifies that the air cleaner element should be changed every 100 hours, or more frequently in dusty conditions. For engine oil, JCB Engine Oil EP 15W40 (above -10°C) is recommended; the oil and filter should be changed every year in low use conditions. p. 83
How do you fix JCB Workmax 1000D engine will not start or stalls shortly after starting in cold weather conditions?
Bleed the fuel system as described on page 124 to remove trapped air. Check the engine oil dipstick and verify the sump contains exactly 2.6 Litres (0.6 Gallons) of oil. Inspect battery terminals for corrosion and confirm the starter engages properly. p. 124
What do I get after purchasing this JCB Workmax 1000D manual?
A 152-page Operator Manual in searchable PDF format, available the moment you complete checkout. View on computer, tablet, or phone, with no shipping wait.
Can I print this manual?
Yes. The PDF has no DRM restrictions, so print any page or section you need for your shop. Works with any standard printer.
![JCB JZ140 [T4i], JZ141 [T4F] operator station diagram showing component locations for joysticks, consoles, and controls.](https://youfixthis.com/wp-content/uploads/2026/06/jcb-jz140-to-t4f-excavator-operator-manual-9831-4300-controls-28-150x150.webp)

Reviews
There are no reviews yet.