


![John Deere 7715, 7815 Repair Manual [Tractors]](https://youfixthis.com/wp-content/uploads/2012/02/Manual_Download-300x300.jpg)
Part of the John Deere Repair Manuals.
This is the John Deere 7200 and 7400 tractor repair manual, publication tm1551, covering 2WD and MFWD models from serial numbers 7200: 002180-up and 7400: 002368-up. It is a 933-page technical service manual for experienced mechanics and owners doing their own work.The manual walks through every major system: engine removal and repair, the fuel, air intake, and cooling systems, the full electrical section with connectors, charging, and starting circuits, SyncroPlus and PowrQuad transmissions, MFWD drive systems and final drives, hydrostatic steering and brakes, and the hydraulics section. Quick reference specifications, torque values, and dealer-fabricated tool drawings are included.With this PDF you can diagnose a no-start, rebuild a transmission, set valve clearances, or find the exact torque for a front axle bolt. Download it once and keep it on your phone, tablet, or shop computer, or print the pages you need.
What's Inside This John Deere 7200, 7400 Repair Manual
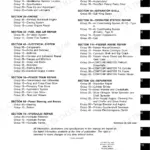
| System | Pages | Key Topics |
|---|---|---|
| Dealer Predelivery Service | 6 | - |
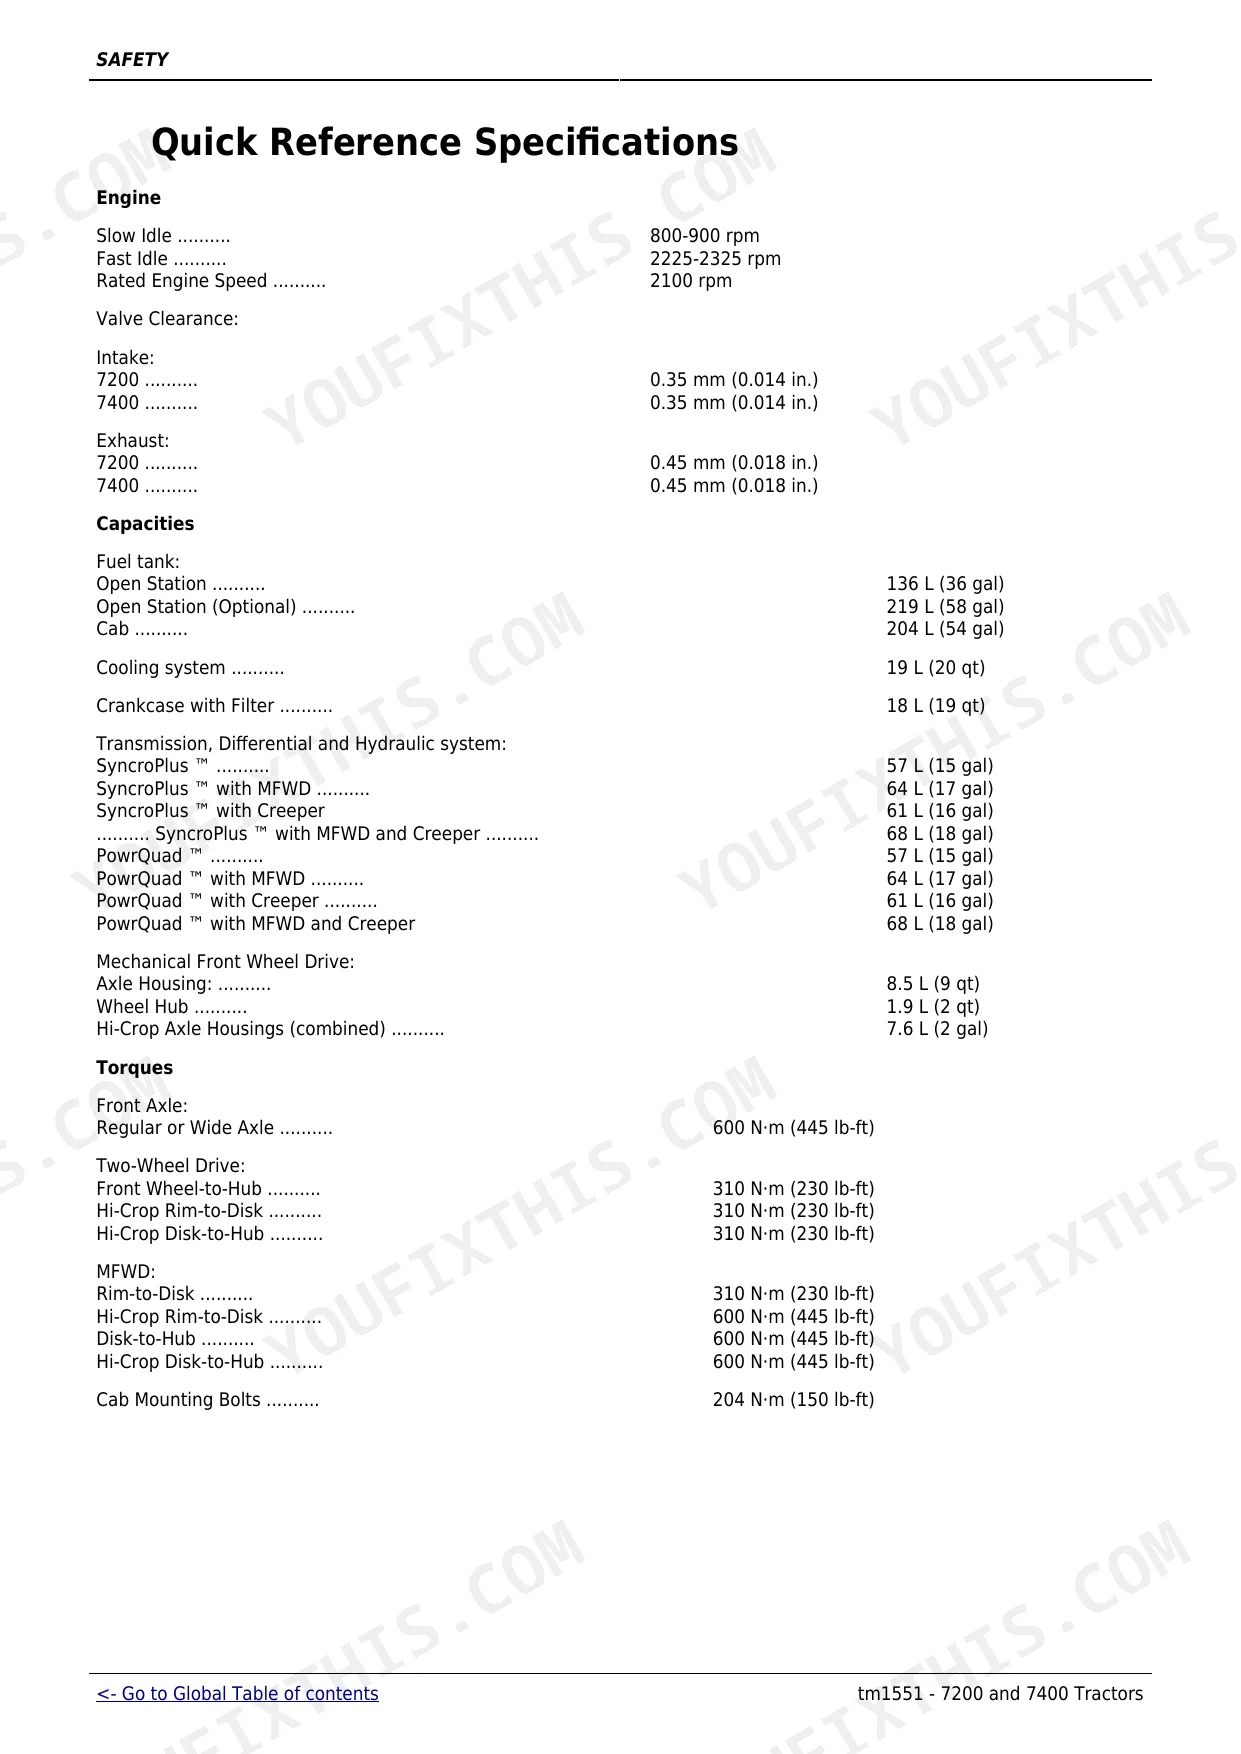
| Quick Reference Specifications | 7-8 | Engine, Capacities, Torques, Valve Clearance, Fuel Tank, Transmission, Differential and Hydraulic System |
| Safety | 9-25 | Safety (Handle Fluids Safely-Avoid Fires, Prevent Battery Explosions, Prepare for Emergencies, Prevent Acid Burns, Handle Chemical Products Safely, Avoid High-Pressure Fluids) |
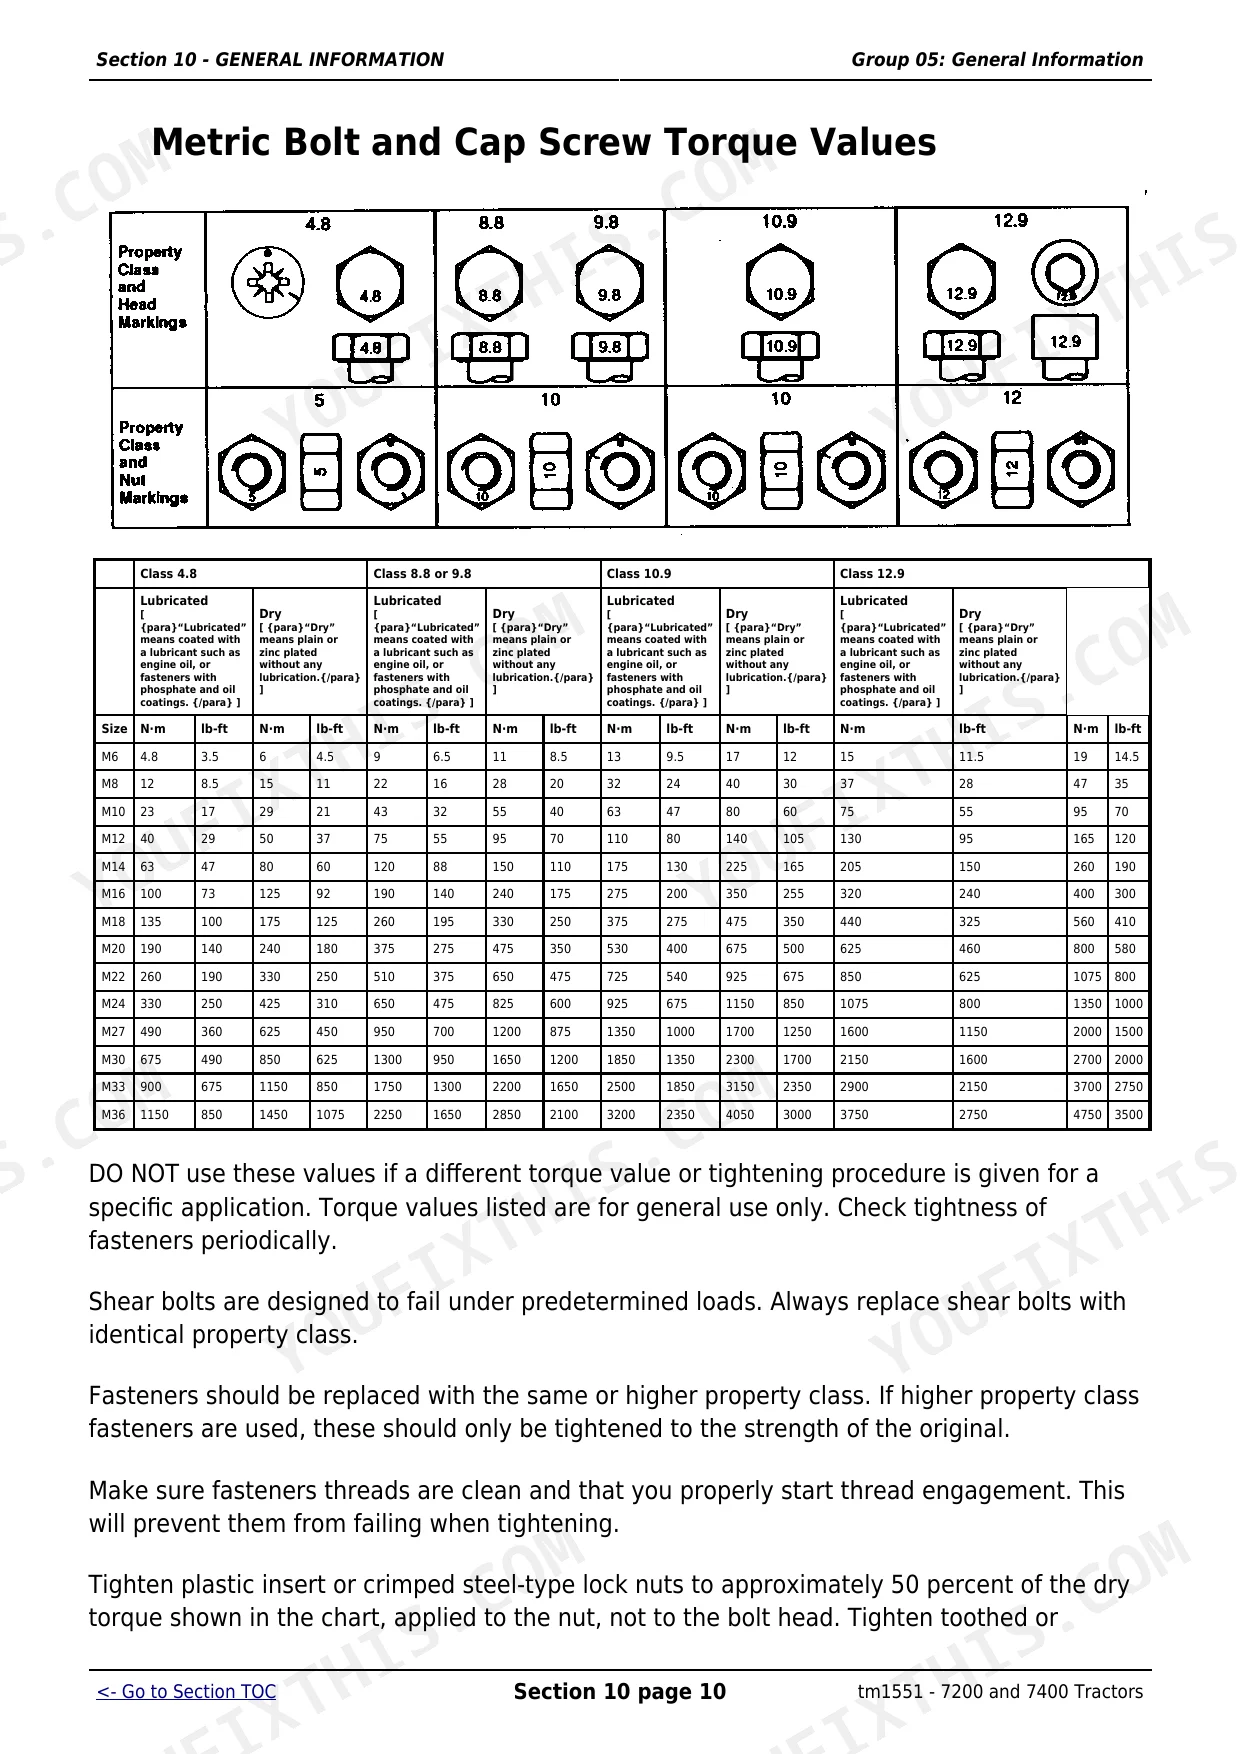
| General Information | 26-39 | General Information (Specifications, Sealants and Adhesives Cross-Reference Chart, Glossary of Terms, Metric Bolt and Cap Screw Torque Values, Unified Inch Bolt and Cap Screw Torque Values) |
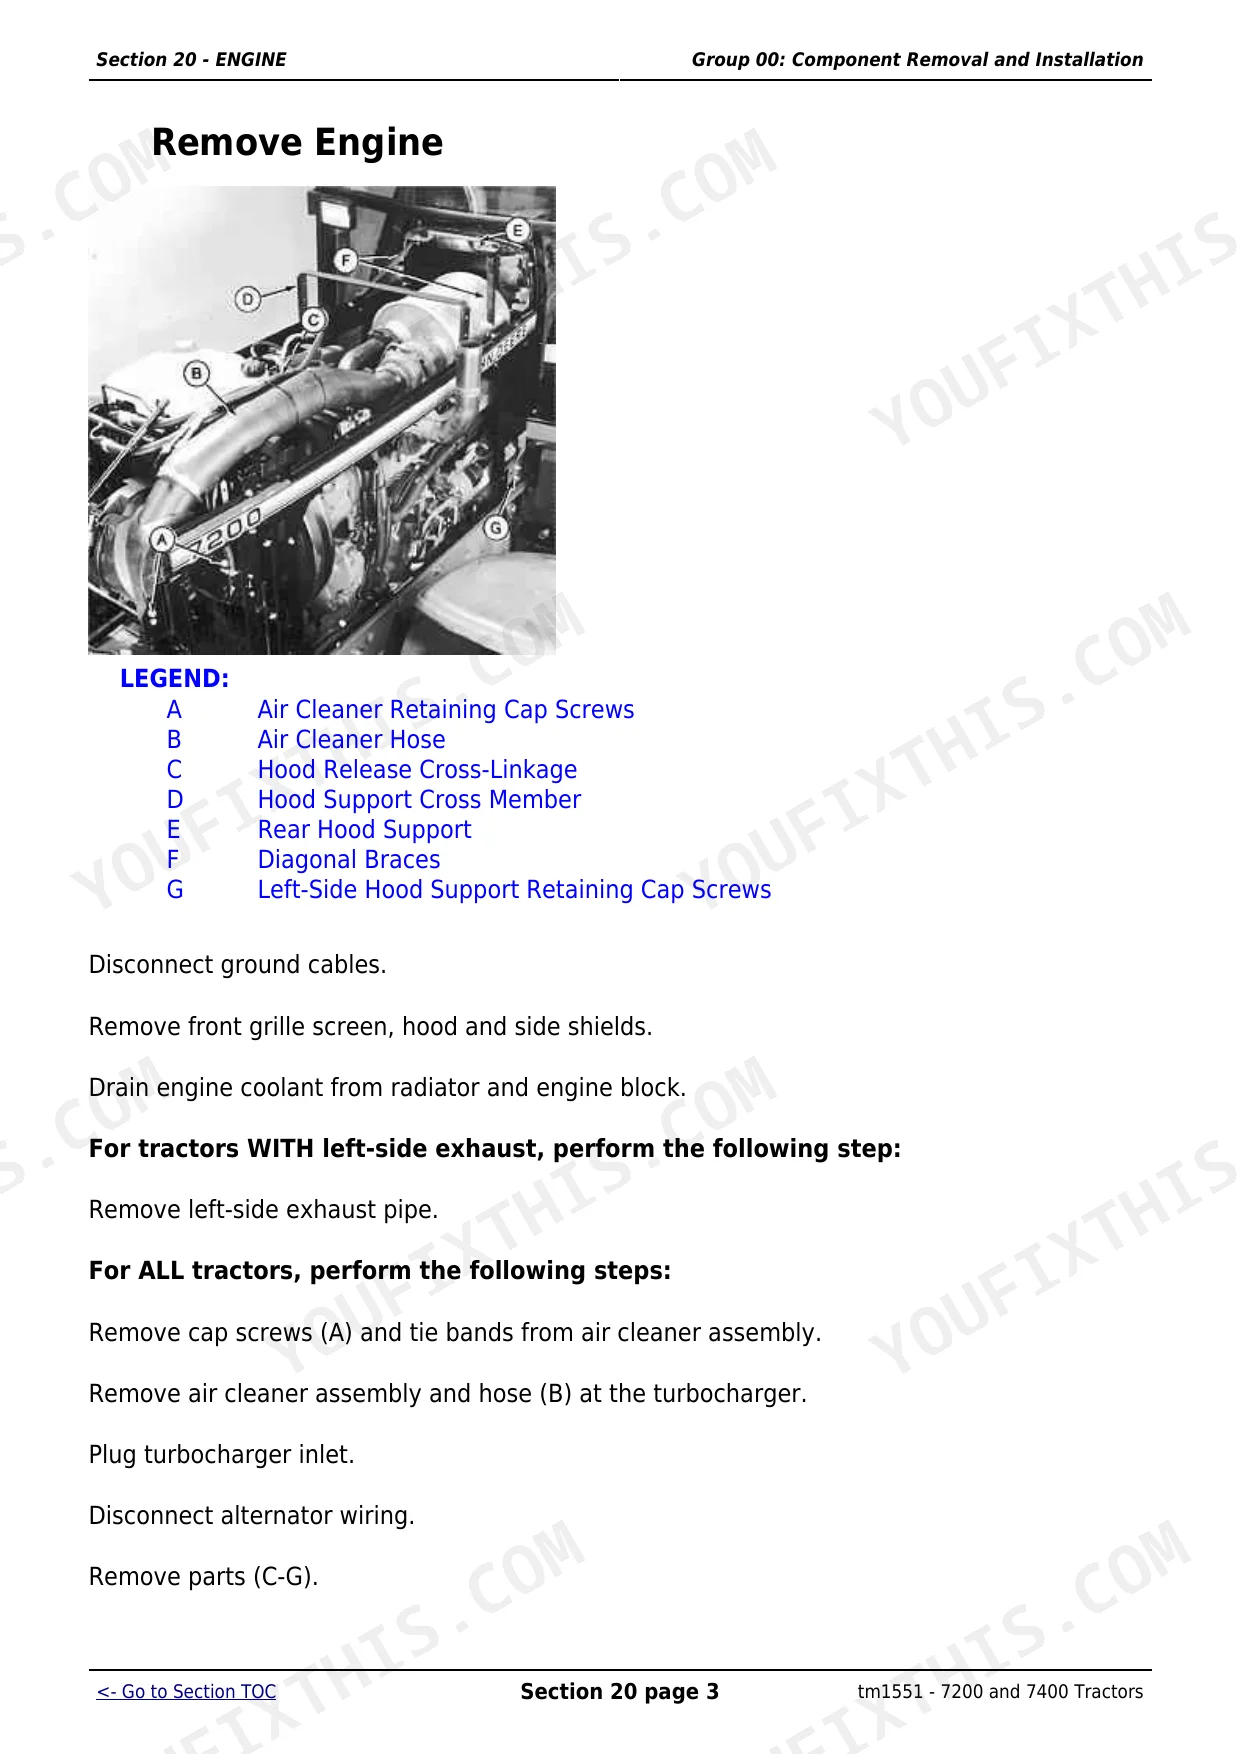
| Engine | 40-56 | Component Removal and Installation (Essential or Recommended Tools, Service Equipment and Tools, Repair Engine-Use CTM8, Specifications, Install Engine in Repair Stand) |
| Fuel, Air Intake, and Cooling Systems | 57-78 | Throttle Controls (Repair Engine-Use CTM8, Specifications, Hand and Foot Throttle Linkage, Adjust Foot Throttle Pedal, Adjust Hand Throttle) |
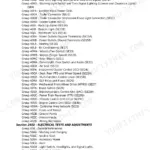
| Electrical | 79-159 | Connectors (Service Equipment and Tools, Other Material, Using High-Pressure Washers, Replace Weather Pack Weather Pack Is a Trademark of Packard Electric.Connector, Install Weather Pack Weather Pack Is a Trademark of Packard Electric.Contact, Remove Connector Body From Blade Terminals) |
| Transmission | 160-469 | Component Removal and Installation (Essential or Recommended Tools, Service Equipment and Tools, Other Material, Specifications, Sealing Instructions, Remove Drive Train) |
| Drive Systems | 470-674 | Component Removal and Installation (Essential or Recommended Tools, Service Equipment and Tools, Other Material, Specifications, Sealing Instructions, Remove MFWD Clutch) |
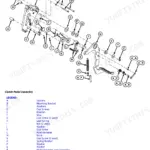
| Steering and Brakes | 675-716 | Hydrostatic Steering (Essential or Recommended Tools, Service Equipment and Tools, Specifications, Remove and Install Steering Valve, Steering Valve-Exploded View, Disassemble) |
| Hydraulics | 717-832 | Component Removal and Installation (Essential or Recommended Tools, Specifications, Remove and Install Inlet-Priority Valve Assembly, Remove and Install Main Hydraulic Pump, Remove and Install Charge Pump) |
| Miscellaneous | 833-842 | Component Removal and Installation (Special or Essential Tools, Specifications, Remove Front Axle, Install Front Axle) |
| Operator Station | 843-917 | Component Removal and Installation (Specifications, Remove Cab, Install Cab) |
| Dealer Fabricated Tools | 918-933 | Fabricated Tools (Dfrw4-Axle Wheel Hub Tool, DFRW11-Differential Side Bevel Gear End Play Tool, DFRW20-Compressor Holding Fixture, DFRW29-Final Drive Housing Adapter, DFRW30-Axle Jacking Tool, DFRW60 - DFRW61 - DFRW62-Extension Harnesses) |
Quick Reference Specifications
| Specification | Value | Page |
|---|---|---|
| Front Axle: Regular or Wide Axle Torque | 600 N·m (445 lb-ft) | p. 7 |
| Axle Pivot Cap Screws Torque | 500 N·m (370 lb-ft) | p. 833 |
| Starter Circuit Relay Replacement | Procedure described, no specific torque value for relay itself | p. 111 |
| Starter Motor Cap Screw Torque | 48 N·m (35 lb-ft) | p. 110 |
| Key Switch | Component identified, no specific clearance, torque, or replacement values found | p. 101 |
| Battery cables / ground straps | Component identified, no specific clearance, torque, or replacement values found | p. 111 |
| Engine Flywheel-to-Detuner Cap Screw Torque | 50 N·m (37 lb-ft) | p. 188 |
| Output Shaft End Play | 0.015-0.15 mm (0.001-0.006 in.) | p. 616 |
| Threaded Pins of Shifter forks Torque | 40 N·m (30 lb-ft) | p. 294 |
| Shifter Fork Pins Protrusion | 6.75-7.25 mm (0.266-0.285 in.) | p. 414 |
| Fuel Shut-Off Solenoid Replacement | Procedure described, no specific torque or clearance values found | p. 120 |
| Slow Idle Speed | 800-900 rpm | p. 7 |
John Deere 7200, 7400 Common Problems This Manual Covers
Hard starting or no-crank
Owners report the tractor cranks intermittently or refuses to crank until the key is cycled many times, pointing to the starting circuit relay, solenoid, starter, or a bad ground. The electrical section covers testing and replacing these components.
Manual Section: Section 40 - ELECTRICAL p. 79Engine dies and won't restart when hot
A common complaint is the engine dying and failing to restart, or running rough and low on power once warm, often traced to the fuel shut-off circuit or a fuel delivery restriction. Fuel and air intake troubleshooting is covered here.
Manual Section: Section 30 - Fuel, Air Intake, and Cooling Systems p. 57Stuck in gear or shift fault
Shift forks can drop into the synchros and lock the tractor in gear, leaving it stuck. The transmission section covers removing the clutch housing and rebuilding the SyncroPlus and PowrQuad gear trains.
Manual Section: Section 50 - TRANSMISSION p. 160Drivetrain vibration under load
Vibration between the engine and transmission or drivetrain weakness under load usually means a failed coupler or worn output shaft splines. Removal and inspection of the drive train and final drives is documented in this section.
Manual Section: Section 56 - DRIVE SYSTEMS p. 470Weak air conditioning and cab airflow
Cab cooling can fall off when filters clog or blowers fail, a frequent gripe on these tractors. The operator station section covers cab removal and the related air conditioning and heating hardware.
Manual Section: Section 90 - Operator Station p. 843Hydrostatic steering leaks or hard steering
Worn or leaking steering valve components make the tractor hard to steer. The steering and brakes section walks through removing, inspecting, and reassembling the hydrostatic steering valve.
Manual Section: Section 60 - Steering and Brakes p. 675Frequently Asked Questions
Which tractors does this manual cover?
It covers the John Deere 7200 and 7400 tractors, both 2WD and MFWD, publication tm1551. Serial coverage is 7200: 002180-up and 7400: 002368-up.
Where do I find the front axle torque specifications?
The Quick Reference Specifications list the regular or wide front axle torque at 600 N·m (445 lb-ft), along with wheel and cab bolt values, so you can set fasteners correctly without hunting through the manual. p. 7
Does the manual help troubleshoot a no-start?
Yes. The Electrical section covers the starting circuit, relays, solenoids, and connectors, with the tests needed to trace an intermittent no-crank back to the relay, starter, or a ground fault. p. 79
Does it cover SyncroPlus and PowrQuad transmission repair?
Yes. The Transmission section covers removing the clutch housing and drive train and rebuilding both the SyncroPlus and PowrQuad gear transmissions, including the creeper and range box. p. 160
How quickly can I access this manual after buying?
A 933-page Repair Manual in searchable PDF format, available the moment you complete checkout. View on computer, tablet, or phone — no shipping wait.
Is this John Deere 7200, 7400 Repair Manual printable?
Yes — the PDF is DRM-free. Print whatever sections you need to take out to the shop. Standard letter or A4 paper works.


Reviews
There are no reviews yet.