Part of the John Deere Repair Manuals.
When it is time to tear down the TSS transmission on your utility tractor, this 418-page John Deere 5403 repair manual pdf (OEM #tm8139) brings the factory teardown procedures for the 5403, 5600, 5603, 5605, 5700, and 5705 models. You get complete removal and assembly instructions for both the Carraro and LUK clutch systems. Inside, find step-by-step guidance for overhauling the mechanical front-wheel drive, rebuilding the Bosch hydraulic pump, bleeding the creeper transmission brakes, and servicing the planetary final drives. Verify your PTO clutch disc thickness measures between 7.6 and 6.6 mm, then lock down the clutch assembly attaching bolts to exactly 36 N.m. Quit wasting shop hours on guesswork. Download this bookmarked, searchable file right to your tablet, pull up the numbers you need, and get that tractor back in the dirt.
What's Inside This John Deere 5403, 5600, 5603, 5605, 5700, 5705 Repair Manual
| System | Pages | Key Topics |
|---|---|---|
| General Information | 6-38 | Safety (Recognize Safety Information, Understand Signal Words, Follow Safety Instructions, Handle Fluids Safely, Avoid Fires, Prevent Battery Explosions, Prepare for Emergencies, Prevent Acid Burns, Service Cooling System Safely, Handle Chemical Products Safely, Avoid High-Pressure Fluids, Park Machine Safely, Support Machine Adequately, Wear Protective Clothing, Work in Clean Area, Service Machines Safely, Work in Ventilated Area, Illuminate Work Area Safely, Replace Safety Signs, Use Proper Lifting Equipment, Keep ROPS Installed Properly, Service Tires Safely, Avoid Harmful Asbestos Dust, Avoid Heating Near Pressurized Fluid Lines, Remove Paint Before Welding or Heating, Use Proper Tools, Dispose of Waste Properly, Live with Safety) |
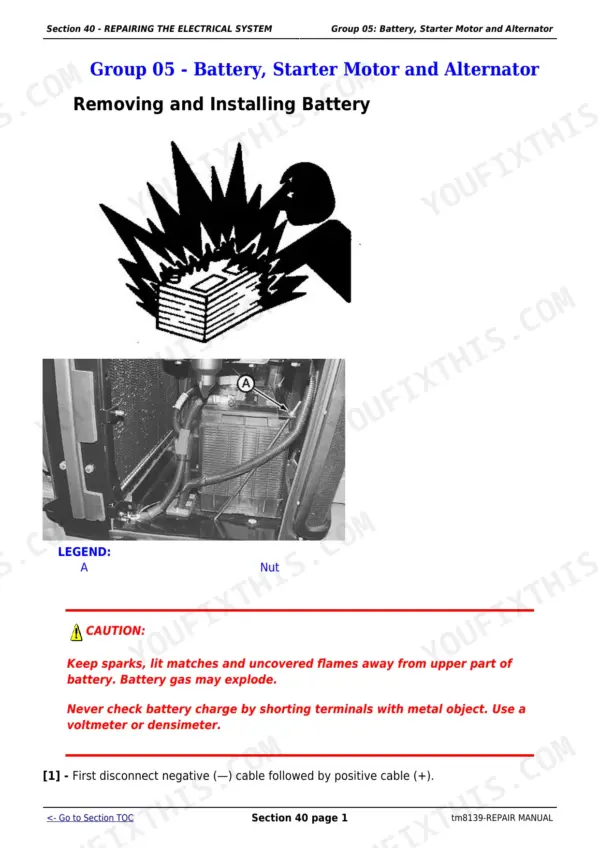
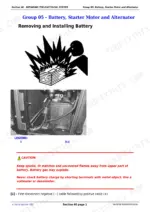
| Repairing the Electrical System | 39-68 | Group 05 - Battery, Starter Motor and Alternator, Group 10 - Electrical System Components, Group 15 - Wiring Harness |
| Clutch Housing, Tss Transmission | 69-80 | Safe Maintenance, Proper Tools, Engine/Clutch Housing Separation, Clutch Housing Retainer Replacement, Clutch Pedal Inspection and Adjustment |
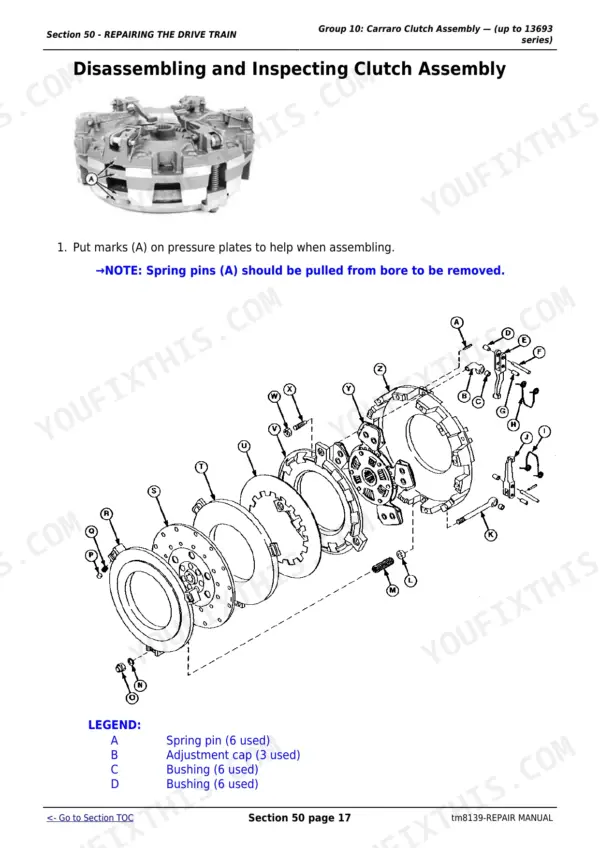
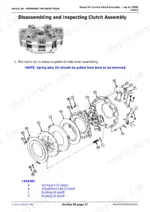
| Clutch Assembly (Carraro & Luk) | 81-130 | Special Tools & Materials, Clutch Assembly Removal & Installation, Clutch Disassembly & Inspection, Clutch Assembly & Adjustment (Drive & PTO Fingers) |
| Tss Transmission | 131-203 | Other Material, Clutch Housing Separation/Installation, Gear Shift Lever Inspection/Repair, Transmission Removal/Disassembly/Assembly, Parking Brake Components |
| PTO Drive Shaft | 221-232 | Other Material, PTO Lever and Link Inspection/Repair, Standard Rear PTO Drive Shaft Assembly Removal/Installation, PTO Drive Shaft Assembly Disassembly/Assembly (540/540E) |
| Differential | 233-252 | Special Tools & Materials, Differential Assembly Removal/Installation, Differential Drive Shaft Inspection/Installation, Differential Lock Assembly, Adjusting Differential Cone End |
| Final Drives | 254-270 | Special Tools & Materials, Final Drive Turn Tool, Final Drive Assembly Removal/Installation, Planetary Drive Assembly Inspection/Installation, Shaft Assembly Removal/Installation |
| Front-Wheel Drive Engagement | 271-286 | Special Tools & Materials, PTO Lever and Linkage Inspection/Repair, MFWD Housing Removal/Installation, MFWD Housing Disassembly/Assembly, MFWD Drive Shaft Removal/Installation |
| Creeper Transmission | 287-291 | Creeper Transmission Removal/Installation, Lock Pedal Removal, Disassembly/Assembly of Creeper Transmission, Final Considerations, Bleeding Brakes |
| Repairing Steering and Brakes | 293-343 | Group 05 - Repairing Steering, Group 10 - Repairing Brakes, Group 15 - Steering Cylinder, 4x2 Shaft |
| Hydraulic Repair | 344-413 | Group 05 - Hydraulic Pump and Filter, Group 05A - Bosch Hydraulic Pump, Group 05B - Hydraulic Oil Cooler, Group 10 - Hydraulic Hitch, Group 15 - Selective Control Valve |
| Mechanical Front-Wheel Drive | 414-415 | Group 05 - Mechanical Front-Wheel Drive |
| ROPS | 416-418 | Group 10 - Roll-Over Protective Structure |
Quick Reference Specifications
| Specification | Value | Page |
|---|---|---|
| Carraro Clutch Assembly | (up to 13693 series) | p. 2 |
| LUK Clutch Assembly | (13694 series onwards) | p. 2 |
| Fuel shut-off solenoid replacement | Replace fuel shut-off solenoid (B) and O-ring | p. 44 |
| Bolts (C) Torque | 120 N.m (84 lb-ft) | p. 357 |
| Fitting (3) Torque | 28 N.m (21 lb-ft) | p. 352 |
| Approximate transmission capacity | 41.8 L (11.04 U.S. gal) | p. 352 |
| Main relief valve torque | 51 N.m (38 lb-ft) | p. 34 |
| Overpressure relief valve torque | 34 N.m (25 lb-ft) | p. 35 |
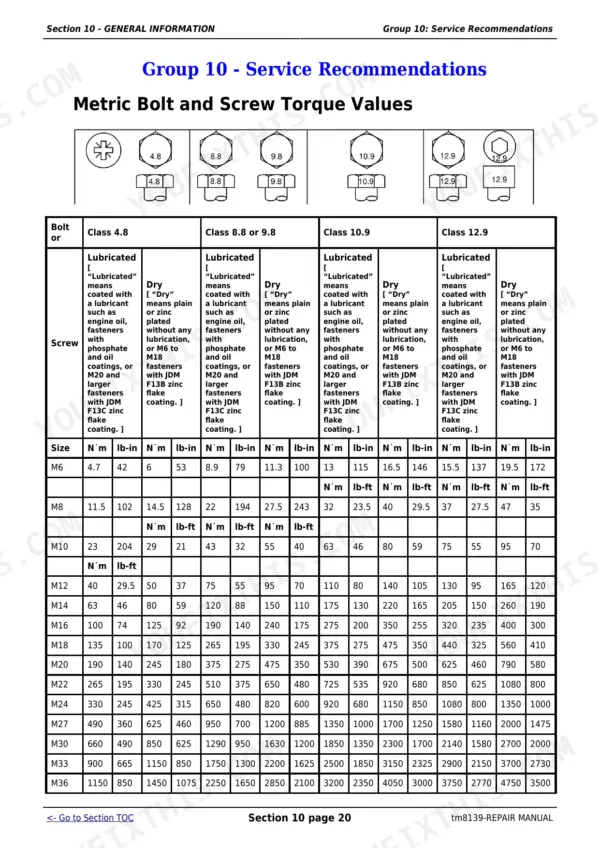
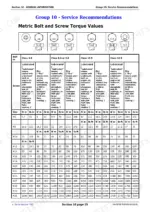
| Metric Bolt Torque (M12, Class 12.9, Lubricated) | 130 Nm (95 lb-ft) | p. 141 |
| SAE Bolt Torque (1/2 inch, Grade 8, Lubricated) | 120 Nm (88 lb-ft) | p. 329 |
| Clutch Pedal Play | 25-35 mm (0.984-1.377 In) | p. 80 |
| Clutch Assembly Attaching Bolts Torque | 36 N.m (27 lb-ft) | p. 103 |
John Deere 5403, 5600, 5603, 5605, 5700, 5705 Common Problems This Manual Covers
John Deere 5403 engine cranks over but fails to start after sitting overnight
Drain the tank and check for water or debris contamination, common with low-quality diesel. Remove and replace the fuel shut-off solenoid and its O-ring on page 44 if fuel isn't reaching the injectors. Bleed the lines and torque any disturbed mounting bolts to 130 Nm (95 lb-ft) per the M12 spec on page 141 before cranking again. Test battery voltage and starter draw while access is open.
Manual Section: Repairing the Electrical System p. 44Hydraulic lift arm jerks or fails to hold position when raising implements
Check the pump mounting bolts on page 345; torque them to 120 N.m (84 lb-ft) if you find seepage at the flange. Inspect fitting (3) for wear and torque it to 28 N.m (21 lb-ft) per page 352. If the arm still jerks or drifts down, verify the main relief valve on page 34 holds 51 N.m (38 lb-ft) and isn't stuck partially open.
Manual Section: Hydraulic Pump & Filter Repair p. 345Engine overheats and loses power after roughly 30 minutes of continuous operation
Follow the cooling system safety and inspection steps in the General Information section before opening any pressurized lines; let the system cool first. Drain and flush the radiator, inspect the water pump shaft for bearing play, and clean debris packed against the core. Torque any disturbed radiator mounting hardware to 130 Nm (95 lb-ft) per the M12 spec on page 141, then refill and bleed the system before restarting.
Manual Section: General InformationTransmission slips or loses power under load when climbing hills in high gear
Inspect the LUK clutch disc thickness on page 103; replace it once wear drops below the 6.6 mm minimum in the 7.6-6.6 mm spec range. Check the pressure plate for warping and torque the clutch assembly attaching bolts to 36 N.m (27 lb-ft). Verify PTO and drive finger adjustment during reassembly, since misaligned fingers cause the same slipping symptom under load.
Manual Section: Clutch Assembly (Carraro & Luk) p. 103Clutch pedal feels soft and needs frequent readjustment to engage properly
On 5605 and 5705 models, check clutch pedal free play against the spec on page 80: 25-35 mm (0.984-1.377 in). Adjust the linkage rod until play falls back in range, then inspect the pedal pivot bushing for wear that lets play drift out of spec. Recheck after the next 50 hours of operation, since a soft pedal often returns quickly if the bushing is worn.
Manual Section: Clutch Housing, Tss Transmission p. 80Frequently Asked Questions
What are the torque specifications for John Deere 5603 engine bolts?
The manual specifies that the wheel bolts used to install the engine to the transmission housing for 5403, 5603, 5605, and 5705 Tractors should be tightened to 318 N.m (235 lbf-ft). This is found in the "Installing Engine to Clutch Housing" procedure. p. 74
What are the replacement specifications for a hydraulic pump seal kit?
When assembling the hydraulic pump, it is important to use new O-rings and retainers, as used or damaged ones can cause leaks. The manual does not provide a specific part number for a complete seal kit, but instructs to replace these components during repair. p. 350
What is the approximate transmission/differential oil capacity for John Deere tractors?
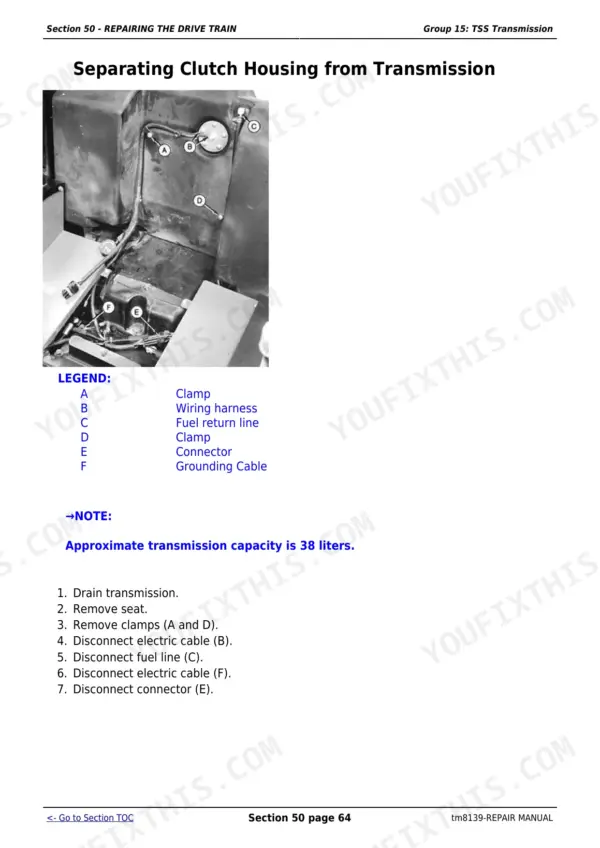
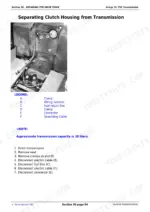
The approximate capacity of the transmission/differential is 38 liters. This information is provided in the context of separating the clutch housing from the transmission. p. 132
What is the minimum thickness for the drive clutch disk in Carraro Clutch Assembly models (up to 13693 series)?
For Carraro Clutch Assembly models up to 13693 series, the minimum thickness for the drive clutch disk is 6.50 mm. This specification is crucial when inspecting parts for wear or damage. p. 86
What is the specified torque for the final drive housing bolts?
The final drive housing bolts should be tightened to a torque of 128 N.m (94 lb-ft). This specification is provided for installing the final drive assembly. p. 257
What format is this John Deere 5403 & variants manual in?
You get a 418-page searchable PDF that downloads instantly after checkout. Open it on your laptop, tablet, or phone, and bring it right to the shop floor.
Is this John Deere 5403 & variants Repair Manual printable?
Yes. Print the pages or sections you need for your own shop use. Any standard printer works.